If you’re formatting a document in Microsoft Word and need to use different page number formats—like numbers, Roman numerals, or letters—on different parts of your document (e.g., front matter vs. body vs. appendices), you’re in the right place.
This step‑by‑step guide on how to insert different page numbers in word is very helpful. It will show you how to insert different page numbers in Word. You will use section breaks and page numbering formats. This enables you to customize numbering for each section of your document.
Watch the Video Tutorial
If you prefer to see this in action, the full video walkthrough is below, showing each method step by step.
Why You Need Different Page Numbering in Word
By default, Word applies the same page numbering to the entire document. But in longer or formal documents—like a thesis, report, or dissertation—you often need:
- Roman numerals (i, ii, iii…) for front matter
- Arabic numbers (1, 2, 3…) for the main content
- Letters (A, B, C…) for appendices or special sections
To do this, you must divide the document into sections and format the page numbers individually for each.
How to Insert Different Page Numbers in Word
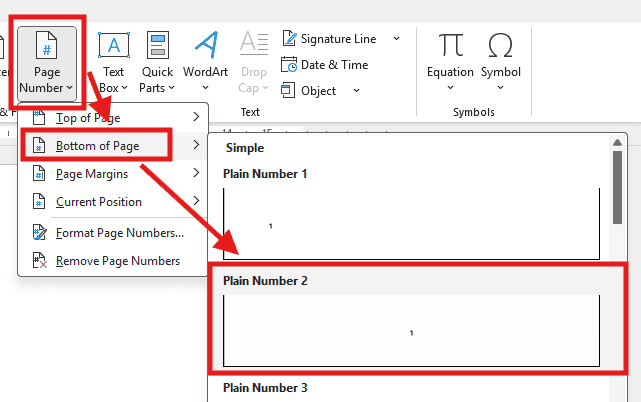
Step 1. Insert Initial Page Numbers
Before splitting into sections, add basic page numbers:
- Click Insert in the top menu.
- Choose Page Number → Bottom of Page.
- Select a style (e.g., Plain Number 2).
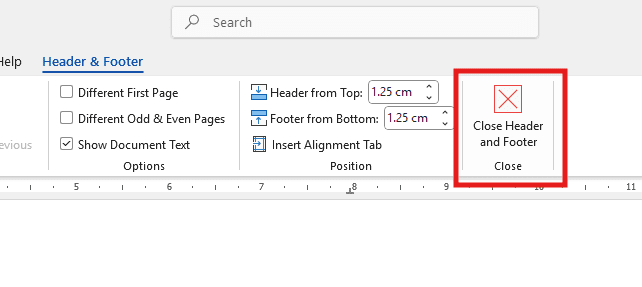
- Click Close Header and Footer.
Now your document has basic numbering.
Step 2. Create a Section Break
To change page number formats later, you must tell Word to treat different parts as separate sections:
- Place your cursor at the end of the first section (e.g., front matter).
- Go to the Layout tab.
- Click Breaks → Next Page.
This inserts a section break, signaling Word that a new section begins here.

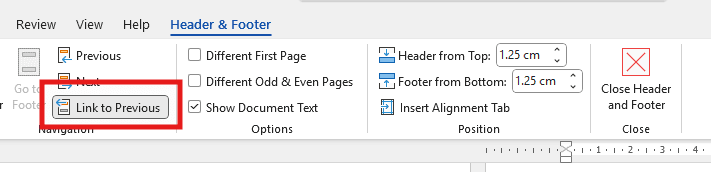
Step 3. Unlink Sections so Numbering Can Change
By default, Word keeps headers and footers linked across sections. To use different page numbers:
- Double‑click the footer (not the header) on the new page.
- In the Header & Footer Tools ribbon, click Link to Previous to turn it off.
You’ll know it worked when you see ‘Same as Previous’ disappear in the footer (not the header).
Tip: Word treats headers and footers separately.
Turning off “Link to Previous” in the header doesn’t automatically turn it off in the footer. You must unlink both if necessary.


Step 4. Change Page Number Format for the New Section
Now your second section can have its own numbering style:
- Double click the footer of Section 2.
- Go to Insert.
- Go to Page Number → Format Page Numbers.
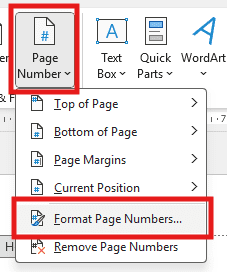
- Click the dropdown under Number format.
- Choose a style:
- Numbers(1, 2, 3)
- Roman numerals (i, ii, iii)
- Letters (A, B, C)
- Under Page numbering, choose Start at:
- Type “A” if you’re using letters
- Type “1” if restarting numbers
- Click OK.
- Close the header and footer.

Step 5. Confirm Your New Sections Work
Now check your sections:
- Go to the first section — it should use the original numbering.
- Insert a new page in Section 2 — it should now continue with the style you chose (e.g., A, B, C).
This confirms you have completely separate numbering sections.

Step 6. Add More Sections with Different Styles
Need three different formats (e.g., numbers, letters, Roman numerals)? Just repeat:
- Insert another Next Page section break.
- Unlink Link to Previous.
- Format the numbers for each section as desired.
You can manage unlimited number styles this way.
Troubleshooting Tips: Common Page Numbering Issues in Word
| Issue | Cause | Fix / Solution |
|---|---|---|
| Page numbers aren’t changing in the new section | Footer is still linked to the previous section | Double-click the footer and turn off Link to Previous. Important: Unlinking the header does NOT unlink the footer. |
| Page numbers are repeating or restarting incorrectly | Word is continuing the numbering from the previous section | Go to Insert → Page Number → Format Page Numbers, select Start at, and enter your desired starting number or letter |
| New section doesn’t show up in Navigation Pane or status bar | You added a regular page break instead of a section break | Replace it with a section break: Layout → Breaks → Next Page |
| Page numbers disappear after changing formatting | Unlinking headers/footers may remove page number fields | Re-insert the page number: Insert → Page Number → Bottom of Page → Style |
Summary: Key Takeaways for Using Different Page Numbers in Word
- Different page numbers in Word are essential for formatting documents like theses, reports, or manuscripts with multiple parts.
- Use section breaks (Next Page) to divide your document into areas that can have different page numbering styles.
- Always unlink headers and footers using “Link to Previous” so each section can be formatted independently.
- Choose from numbers (1, 2, 3). You can also select Roman numerals (i, ii, iii) or letters (A, B, C) to suit different content sections.
- Confirm section changes using the Navigation Pane to verify correct numbering (e.g., 1, A, B or i, ii, iii).
- You can repeat the process to create as many uniquely numbered sections as needed.
With this method, your Word document will look professional, organized, and meet academic or business formatting standards.

More Microsoft Word Tutorials

Looking for more help with Microsoft Word? Browse all step-by-step Word tutorials covering formatting, layout, pages, and document setup.
👉 View all Microsoft Word tutorials: https://wordmadeeasy.org/microsoft-word/

Prefer watching instead of reading? Many Word tutorials are also available as short, step-by-step videos on the Word Made Easy YouTube channel.


Leave a Reply