Password protecting your Microsoft Word documents is simple and smart. It effectively protects sensitive content. Yet most users overlook this method. Whether you’re managing personal data, distributing forms, or sharing editable templates, Word gives you complete control. You decide who can open your files. You also decide who can edit them. Moreover, you control how others can interact with your files.
In this guide, you’ll learn:
- Security limitations and best practices
- The three types of password protection in Word
- How to apply each method step-by-step
- The real-world reasons why it matters
Watch the Video Tutorial
If you prefer to see this in action, the full video walkthrough is below, showing each method step by step.
Why Password Protect Your Word Documents?
Word’s built-in password options aren’t just technical features. They’re practical tools for controlling how your documents are accessed. They also dictate how they are used. Whether you’re:
- A teacher sharing templates or feedback forms
- A business professional handling staff files
- A student storing private info in one Word file
Password protection helps ensure your files are seen, edited, or filled only how you want.
The 3 Password Protection Options in Word
Option 1: Password to open the document (the main one)
This is the most secure method. No one can open the document unless they enter the password.
- Open your Word document
- Click File
- Click Info
- Click Protect Document
- Choose Encrypt with Password
- Type a strong password
- Re-enter it to confirm
- Click Ok
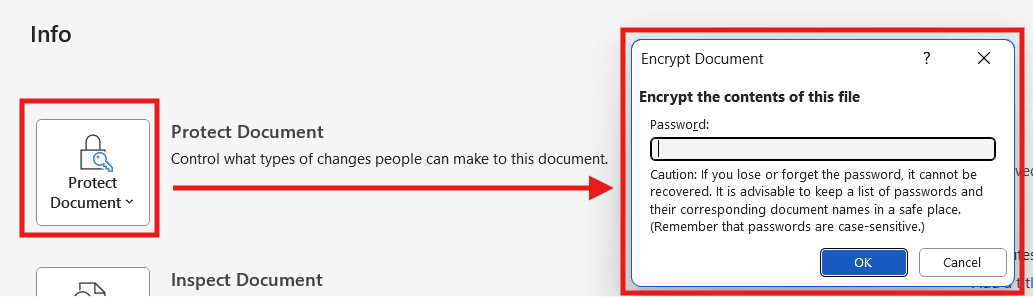
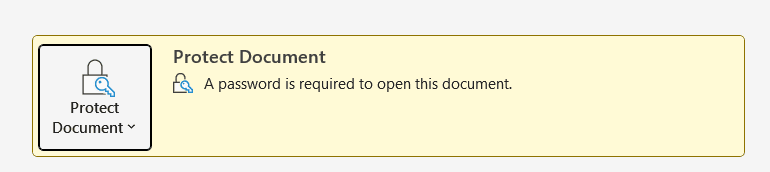
That’s it. The next time someone tries to open the document, Word will ask for the password.
Important: If you forget this password, you cannot recover it. There’s no reset.
Option 2: Password to modify (Read-Only Control)
This lets anyone open the file, but only users with the password can make edits. Everyone else sees a read-only version.
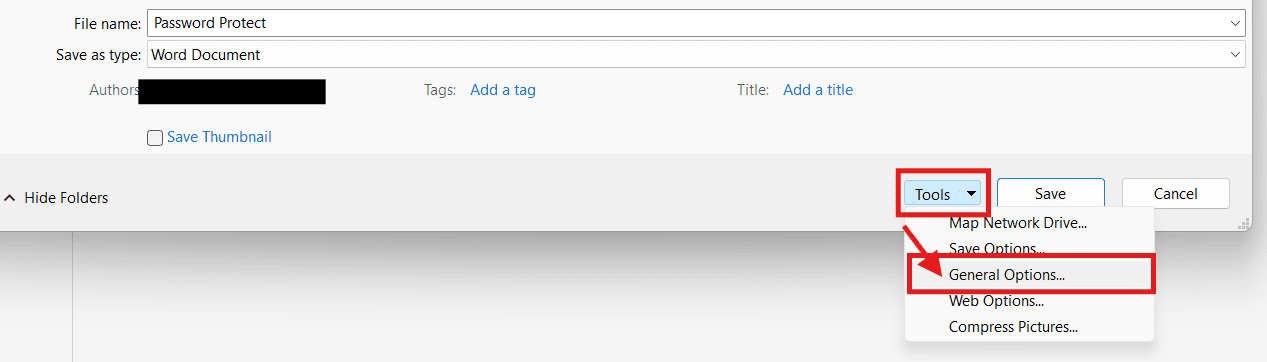
- Click File
- Click Save As (or Save a Copy)
- In the Save window, click Tools (usually near the bottom)
- Select General Options
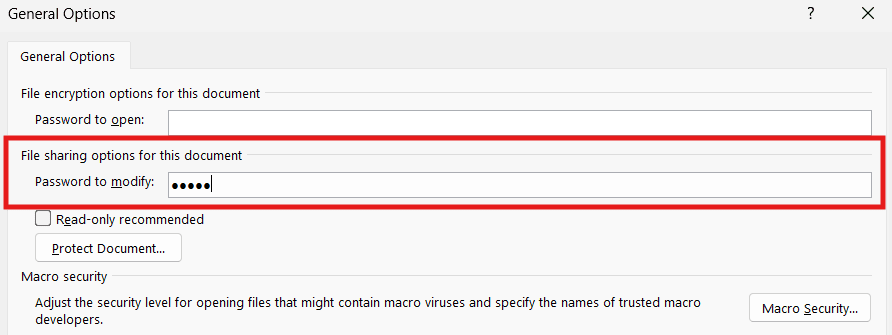
- Set a Password to modify
- Save the document
Ideal for documents that require feedback, but shouldn’t be freely altered.
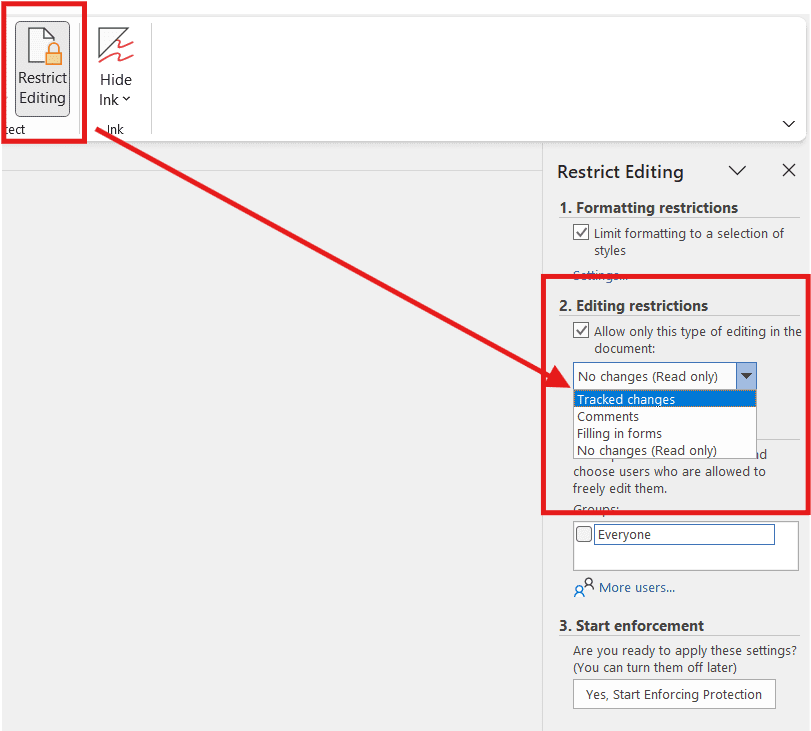
- Go to the Review tab
- Click Restrict Editing
- Tick Allow only this type of editing
- Choose what you want:
- No changes (Read only)
- Comments (people can comment but not edit)
- Tracked changes
- Filling in forms
- Click Yes, Start Enforcing Protection
- Set a password
This doesn’t encrypt the document but locks down how users can interact with it.
When Should You Use Each Method?
| Method | Best For | Protection Level |
|---|---|---|
| Password to Open | Confidential files, personal data | Strongest (encrypted) |
| Password to Modify | Templates, public forms | Medium (read-only) |
| Restrict Editing | Feedback, forms, formatting | Basic control (not encrypted) |
Common Issues + Fixes
| Issue | Fix |
|---|---|
| Forgot your password to open | Unfortunately, it’s unrecoverable. Always store passwords securely. |
| Can’t find “General Options” | It appears under Tools when saving a document (Save As dialog box). |
| Word Online won’t let you protect | Use the desktop version of Word for password options. |
Final Thoughts
Password protection in Word isn’t about paranoia—it’s about smart document management. Whether you’re shielding sensitive content or guiding others on how to use your file, Word’s built-in protection provides flexible control. It does so without complicating your workflow.

More Microsoft Word Tutorials

Looking for more help with Microsoft Word? Browse all step-by-step Word tutorials covering formatting, layout, pages, and document setup.
👉 View all Microsoft Word tutorials: https://wordmadeeasy.org/microsoft-word/

Prefer watching instead of reading? Many Word tutorials are also available as short, step-by-step videos on the Word Made Easy YouTube channel.


Leave a Reply