
You can record audio and screen in PowerPoint without installing a single piece of extra software. The tools are already in the Insert tab — most people just never find them. This guide walks through the full workflow: narration, screen capture, trimming, and exporting.
In this guide, you’ll learn how to record audio only, how to record your screen with audio, how to trim recordings, and how to save the files outside PowerPoint. Four straightforward steps that turn Microsoft PowerPoint into a usable screen-and-voice recorder.
Why Record Audio and Screen in PowerPoint
PowerPoint’s built-in recording tools are good enough to replace most third-party screen recorders for everyday use. They’re free, native, and produce standard media files you can use anywhere.
- Add narration to slides for self-paced presentations
- Capture software walkthroughs for tutorials and training
- Record online lessons without a separate screen-recording tool
- Export clips for YouTube, social media, or embedding elsewhere
Everything happens inside PowerPoint — no extra downloads, no licence keys, no learning curve.
Watch the Video Tutorial
If you prefer to see this in action, the full video walkthrough is below, showing each method step by step.
How to Record Audio and Screen in PowerPoint: Step-by-Step
The process runs across four steps — record audio, record screen, trim the result, and save the file. Each builds on the last, but you can stop at any point depending on what you need.
Step 1: How to Record Audio Only in PowerPoint
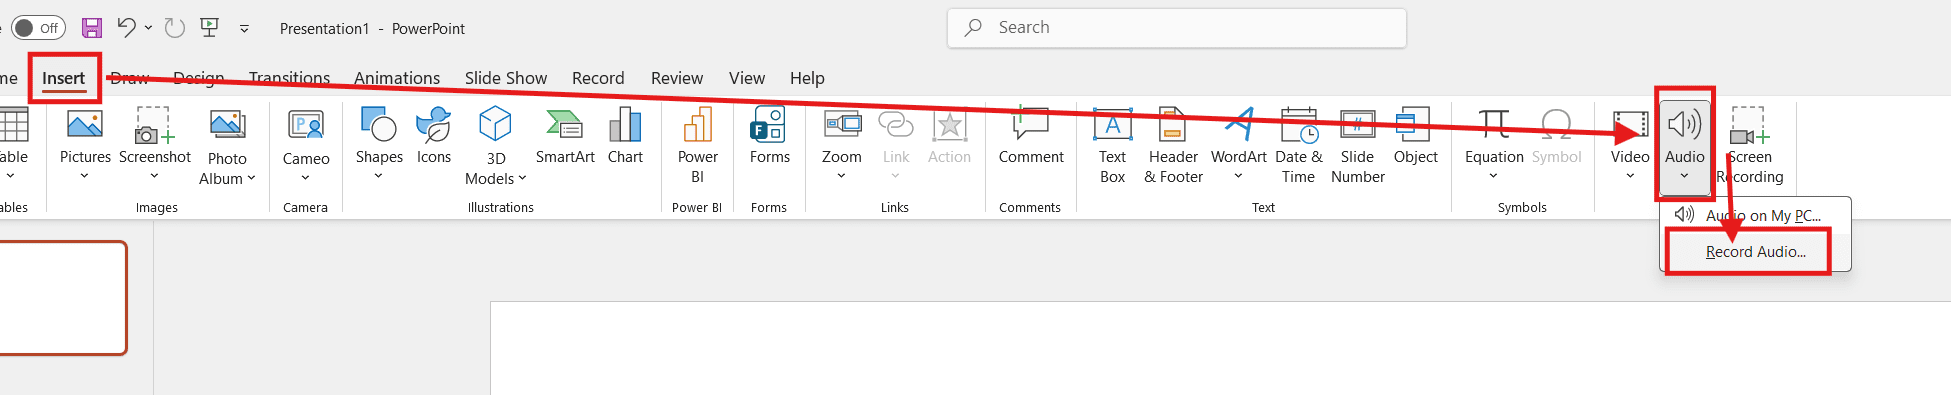
For voice-only narration on a slide, PowerPoint has a dedicated Record Audio tool inside the Insert tab.
- Open your presentation
- Click the Insert tab
- Click the downward arrow under Audio
- Select Record Audio
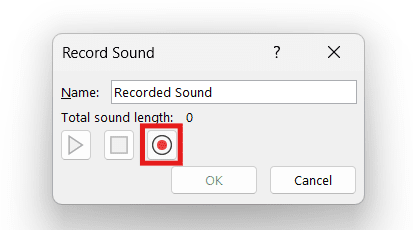
Tip: Rename the recording before you start (e.g. “Slide 1 Narration”). It makes audio management much easier when you have multiple narrated slides.
- Click Record and begin speaking
- Click OK when finished
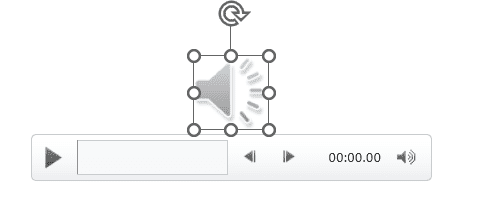
👉 Your audio drops onto the slide as a speaker icon. Click it to access playback controls, volume, and the Format options that let you restyle the icon to match your slide design.
Step 2: How to Record Screen and Audio Together in PowerPoint
For tutorials and walkthroughs, PowerPoint records your screen and microphone simultaneously through the Screen Recording tool — also under the Insert tab.
- Click the Insert tab
- Click Screen Recording

PowerPoint minimises and a control bar docks at the top of your screen. Three settings matter:
- Record Pointer — captures mouse movements (leave on for tutorials)
- Audio — captures your microphone (toggle off for silent screen capture)
- Select Area — draw the red border around what you want recorded
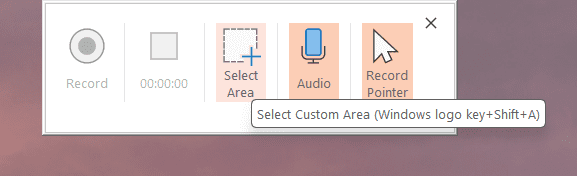
- Drag Select Area over the region you want — full screen or part of it
- Click Record (or press Windows + Shift + R)
- Wait for the 3-2-1 countdown, then perform your walkthrough
- Click Stop on the control bar when finished (Windows + Shift + Q)

👉 PowerPoint drops the video onto your current slide automatically. Click it once and press Play to confirm both screen and audio captured cleanly.
Step 3: How to Trim Your Recording in PowerPoint
Recordings often start a second too early or run a second too long. PowerPoint’s trim tool fixes this without needing a video editor.
- Left-click the video on the slide to select it
- Right-click and choose Trim
- Drag the green handle to set the new start point
- Drag the red handle to set the new end point
- Click OK to apply
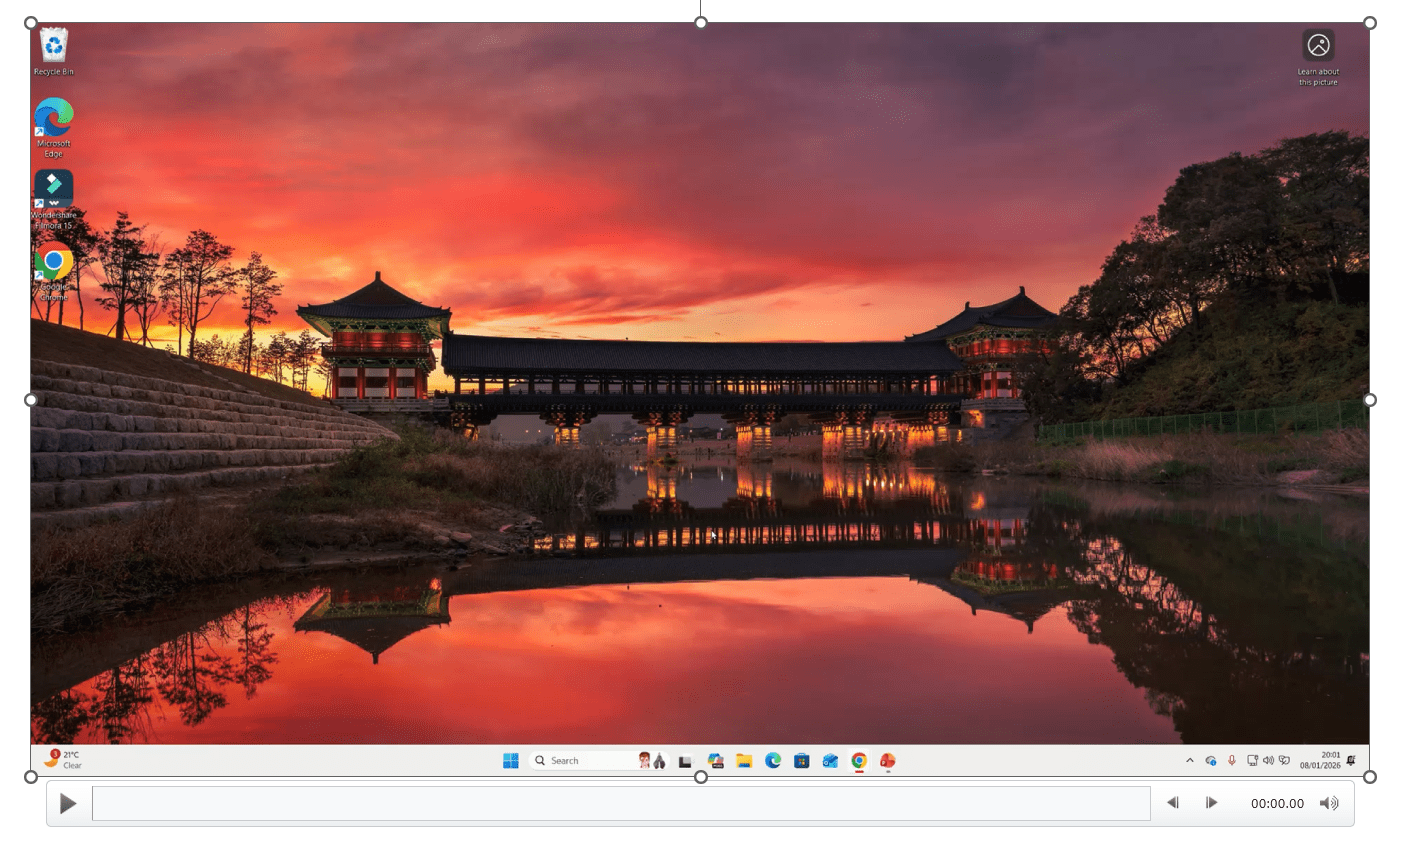
👉 Anything outside the green and red handles is removed from playback. The original file isn’t destroyed — you can re-open Trim later and adjust further if needed.
Step 4: How to Save Your Recording Outside PowerPoint
To use your recording outside PowerPoint — uploading to YouTube, sharing as a standalone file, importing into a video editor — you need to export it as a media file.
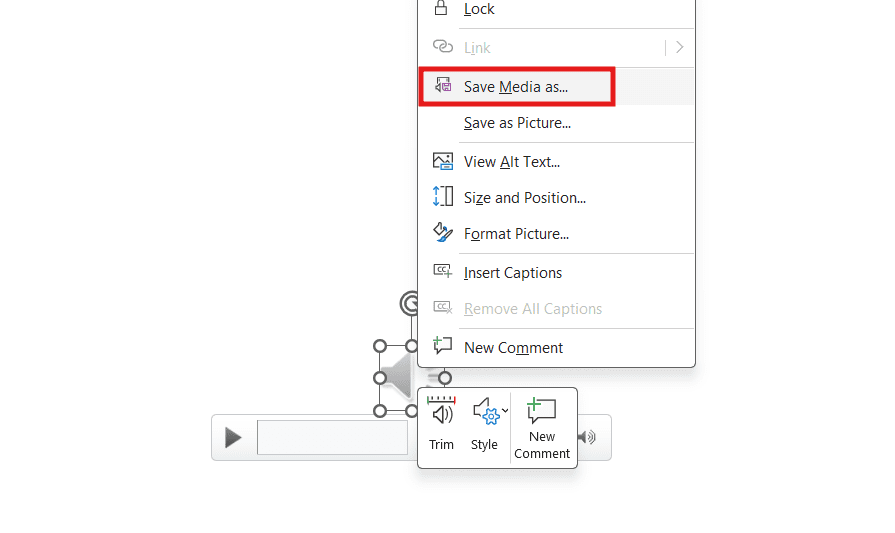
- Right-click the video or audio on the slide
- Click Save Media As
- Pick a folder and name the file
- Click Save
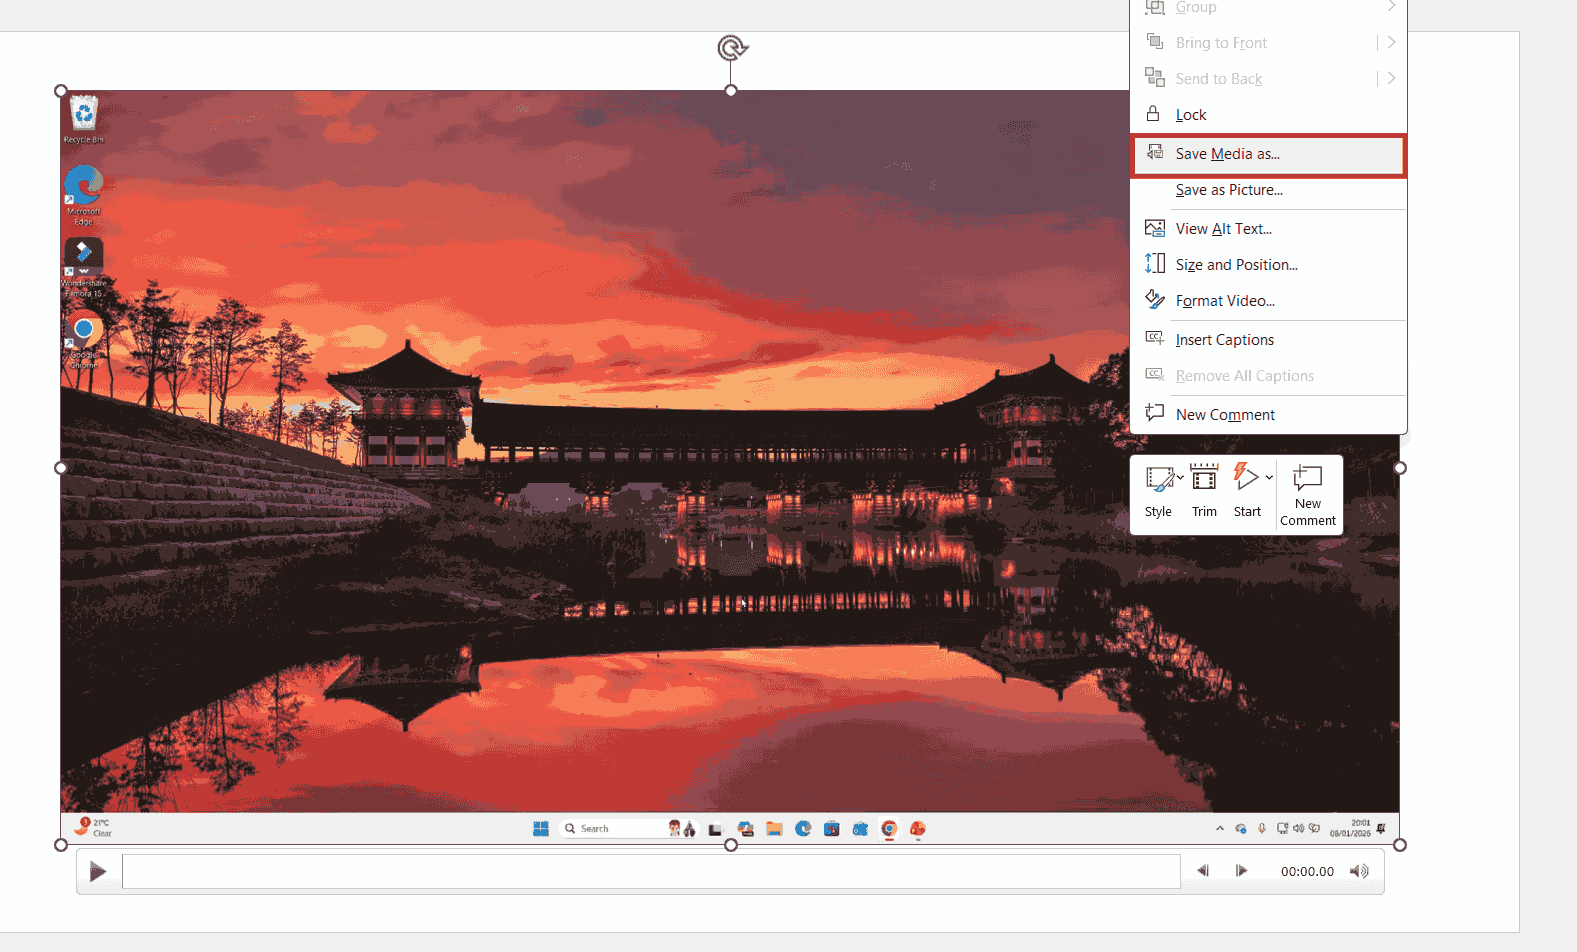
Screen recordings save as MP4. Audio recordings save as M4A. Both are universally compatible — playable on every modern computer, phone, and video editor without conversion.
Which Recording Method Should You Use?
| Method | Best For | Output |
|---|---|---|
| Record Audio | Voice narration on individual slides | M4A audio file |
| Screen Recording (with audio) | Software tutorials, walkthroughs, demos | MP4 video with sound |
| Screen Recording (audio off) | Silent demos, GIF-style captures | MP4 video, no sound |
For most tutorial work, Screen Recording with audio is the answer. For self-paced presentations where each slide gets its own narration, use Record Audio per slide.
Common Problems When Recording Audio and Screen in PowerPoint
No Audio Captured in the Recording
The Audio toggle in the Screen Recording toolbar is off. Click it to enable microphone capture before pressing Record. If the toggle is on but audio still isn’t recording, check Windows Sound settings to confirm the right microphone is set as the default input device.
Screen Recording Button Is Greyed Out
You’re either in Slide Show mode or using PowerPoint on the web. Screen Recording is desktop-only — switch to the PowerPoint desktop app and exit any presentation mode before trying again.
Audio Icon Shows but No Sound Plays
Either your system volume is muted or the audio file’s own volume slider is set to zero. Click the speaker icon, hover over the playback bar, and check the volume control on the right. Adjust upward if needed.
Save Media As Is Missing From the Right-Click Menu
You’re right-clicking the slide background instead of the video or audio object itself. Click directly on the speaker icon or video frame first to select it, then right-click — Save Media As will appear.
Pro Tips for Recording Audio and Screen in PowerPoint
- Always do a 5-second test recording before the real one — catches mic problems, system volume issues, and the wrong area being selected
- Close Slack, email, and notifications before screen recording — pop-ups will appear in your video
- Use Windows + Shift + R to start and Windows + Shift + Q to stop — far faster than reaching for the toolbar
- For documentation that pairs with your recording, use how to insert a picture in Word to drop screenshots from your video into a written companion guide
FAQs About Recording Audio and Screen in PowerPoint
How do I record audio and screen in PowerPoint?
To record audio and screen in PowerPoint, go to the Insert tab and click Screen Recording. Turn on the Audio toggle, drag Select Area over the region you want, then click Record. PowerPoint captures screen and microphone together into a single video.
Can PowerPoint record just my voice without screen capture?
Yes. Go to Insert → Audio → Record Audio, click Record, speak, then click OK. The audio drops onto the slide as a speaker icon — no screen capture involved.
What file format does PowerPoint save screen recordings in?
Screen recordings export as MP4 video files via Save Media As. Audio-only recordings export as M4A. Both formats are universally supported and need no conversion for upload to YouTube, social media, or video editors.
Is there a time limit on PowerPoint screen recording?
No hard time limit, but very long recordings produce very large files and can crash PowerPoint if your system is low on RAM. For anything over 20 minutes, record in segments and stitch them together later.
Can I edit the screen recording after it’s recorded?
PowerPoint allows trimming via right-click → Trim. For anything beyond start/end trimming — cuts, transitions, overlays — export the file with Save Media As and edit it in a dedicated video editor.
Does PowerPoint screen recording capture system audio?
Only the microphone, not internal system sounds. If you need to capture audio playing through your speakers (a video, music, app sounds), you’ll need a dedicated screen recorder — PowerPoint’s tool is microphone-only.
Why doesn’t PowerPoint for Mac have Screen Recording?
Screen Recording is Windows-only in PowerPoint. Mac users should use the built-in macOS screen recorder (Shift + Cmd + 5), then insert the resulting video into PowerPoint via Insert → Video.
Can I record audio and screen in PowerPoint on the web?
No. Both Record Audio and Screen Recording are desktop-only features. PowerPoint for the web doesn’t support either — you’ll need the installed desktop application.
Summary: Record Audio and Screen in PowerPoint
- PowerPoint has built-in tools to record audio and screen in PowerPoint — no extra software needed
- Record Audio (Insert → Audio → Record Audio) captures voice narration as a speaker icon on the slide
- Screen Recording (Insert → Screen Recording) captures screen and microphone together as a video
- Trim recordings via right-click → Trim, dragging the green and red handles
- Save recordings outside PowerPoint via right-click → Save Media As (MP4 for video, M4A for audio)
- Screen Recording is Windows-only and desktop-only — not available on Mac or web
Once you’ve recorded a tutorial or two, the workflow becomes muscle memory. For documents that accompany your recordings, you can paste exported screenshots straight into Word using how to insert a picture in Word — a handy way to build a written companion guide from your screen capture.
Related Tutorials
- How to Insert a Picture in Word
- How to Move a Picture in Word
- Microsoft Word Keyboard Shortcuts Cheat Sheet
More Microsoft PowerPoint Tutorials
Looking for More?
Browse step-by-step PowerPoint tutorials covering formatting, slide layout, presentation setup, and creating interactive PowerPoint games.
👉 View all Microsoft Word tutorials: https://wordmadeeasy.org/powerpoint-tutorials/
Watch the Video Version
Prefer watching instead of reading? Many PowerPoint tutorials are also available as short, step-by-step videos on the Word Made Easy YouTube channel.




Leave a Reply