
Different page numbers in Word are essential for any formal document — a thesis, report, or dissertation that needs Roman numerals on the front matter, Arabic numbers in the body, and letters on the appendices. Get the section breaks wrong and the whole structure falls apart, just like when you try to put different footers on each page in Word without first understanding how sections work.
In this guide, you’ll learn how to insert different page numbers in Word using section breaks, unlinked footers, and the Format Page Numbers dialog. Six steps, every numbering style covered — i, ii, iii / 1, 2, 3 / A, B, C — across as many sections as your document needs.
Why You Need Different Page Numbers in Word
By default, Word applies the same page numbering across an entire document. But in longer or formal documents — theses, reports, dissertations, legal filings — that uniform style doesn’t work.
You need:
- Roman numerals (i, ii, iii…) for front matter and preliminary pages
- Arabic numbers (1, 2, 3…) for the main body content
- Letters (A, B, C…) for appendices and supplementary material
The only way to do this cleanly is to split your document into sections and format each section’s page numbers independently. It’s the same section-break foundation you’d use to add different footers across pages.
Watch the Video Tutorial
If you prefer to see this in action, the full video walkthrough is below, showing each method step by step.
How to Insert Different Page Numbers in Word: Step-by-Step
The process follows six steps. First you insert basic page numbers, then split the document with section breaks, unlink the footers, and change the format for each section. Get the order right and the rest is mechanical.
Step 1: Insert Initial Page Numbers
Before splitting the document into sections, add basic page numbers across the whole file. This gives you a baseline to work from.
- Click Insert in the top menu
- Choose Page Number → Bottom of Page
- Select a style (e.g. Plain Number 2)
- Click Close Header and Footer
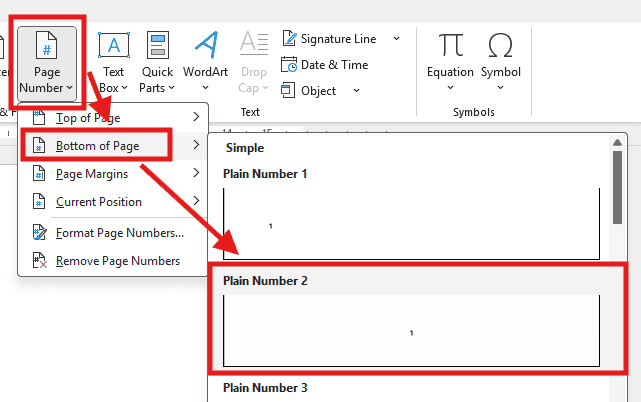
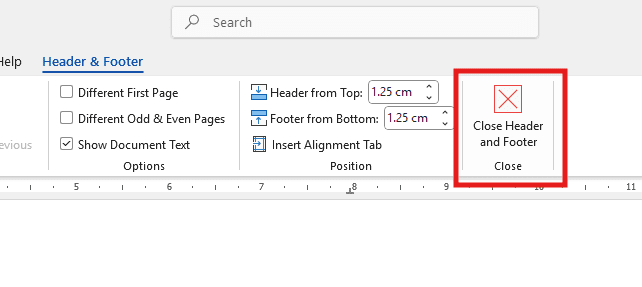
👉 Your document now has uniform page numbers across every page. That’s your starting point — everything from here is about breaking that uniformity in the right places.
Step 2: Create a Section Break
A section break is what tells Word to treat parts of your document as independent units. Without it, every page format change applies to the whole file.
- Place your cursor at the end of the first section (e.g. front matter)
- Go to the Layout tab
- Click Breaks → Next Page
This inserts a section break, signalling Word that a new section begins on the next page — the same foundation you’ll need if you want to create an index in Word or any other multi-section document structure.

Step 3: Unlink Sections So Numbering Can Change
By default, Word keeps headers and footers linked across sections. Unless you break that link, any format change in the new section will overwrite the previous one.
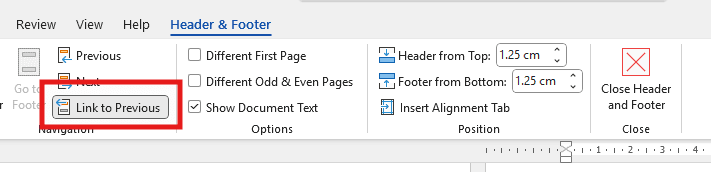
- Double-click the footer (not the header) on the new page
- In the Header & Footer Tools ribbon, click Link to Previous to turn it off
You’ll know it worked when ‘Same as Previous’ disappears from the footer.
Tip: Word treats headers and footers separately. Turning off “Link to Previous” in the header does not turn it off in the footer. You must unlink both individually if you’re customising both.


Step 4: Change Page Number Format for the New Section
With the footer unlinked, the new section can carry its own numbering style — independent from the first.
- Double-click the footer of Section 2
- Go to Insert
- Click Page Number → Format Page Numbers
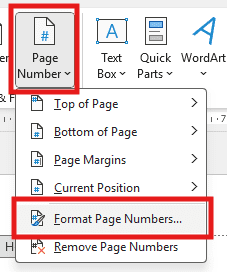
- Click the dropdown under Number format
- Choose a style:
- Numbers (1, 2, 3)
- Roman numerals (i, ii, iii)
- Letters (A, B, C)
- Under Page numbering, choose Start at:
- Type “A” if using letters
- Type “1” if restarting numbers
- Type “i” if using Roman numerals
- Click OK
- Close the header and footer

Step 5: Confirm Your New Sections Work
Before adding more sections, verify the split has actually taken effect.
- Scroll to the first section — it should still show the original numbering
- Insert a new page in Section 2 — it should continue with the style you chose (e.g. A, B, C)
If both sections behave independently, the structure is working.

Step 6: Add More Sections with Different Styles
If you need three or more numbering formats — say Roman for front matter, Arabic for body, letters for appendices — repeat the same process.
- Insert another Next Page section break
- Unlink Link to Previous in the new section’s footer
- Format the numbers for each section using the Format Page Numbers dialog
There’s no upper limit. As long as each section is unlinked, you can manage as many numbering styles as your document needs.
Which Numbering Style Should You Use?
| Section | Recommended Style | Typical Use Case |
|---|---|---|
| Front matter | Roman numerals (i, ii, iii) | Title page, abstract, table of contents, acknowledgements |
| Main body | Arabic numbers (1, 2, 3) | Chapters, sections, core content |
| Appendices | Letters (A, B, C) | Supplementary material, reference data, raw figures |
This is the standard convention for theses, dissertations, and formal reports. Universities and publishers will expect this structure by default.
Common Problems When Using Different Page Numbers in Word
Page Numbers Aren’t Changing in the New Section
The footer is still linked to the previous section. Double-click the footer in the new section and turn off Link to Previous. Unlinking the header alone won’t fix this — headers and footers are unlinked separately.
Page Numbers Are Repeating or Restarting Incorrectly
Word is continuing the count from the previous section instead of restarting. Go to Insert → Page Number → Format Page Numbers, tick Start at, and enter the value you want to begin from.
New Section Doesn’t Show Up in the Navigation Pane
You inserted a regular page break instead of a section break. Delete it and replace it with Layout → Breaks → Next Page. The status bar at the bottom of Word will confirm the section number once it’s correct.
Page Numbers Disappear After Changing Formatting
Unlinking a section can sometimes strip the page number field from the footer. Re-insert via Insert → Page Number → Bottom of Page and pick the same style — the formatting you set for that section will hold.
Pro Tips for Different Page Numbers in Word
- Turn on Show/Hide formatting marks (Ctrl + Shift + 8) before you start — section breaks are invisible otherwise, and that’s where most numbering bugs hide
- Set up the section break structure before writing the document if you can — retrofitting sections into a finished draft is painful
- For documents that also need different footer text per section, the same unlinking workflow applies — see the full guide on how to put different footers on each page in Word for the matching technique
- The status bar shows your current section number — right-click the status bar and tick Section if it’s not showing
FAQs
How do I insert different page numbers in Word?
To insert different page numbers in Word, split the document with section breaks (Layout → Breaks → Next Page), unlink the footer of each new section by turning off Link to Previous, then use Insert → Page Number → Format Page Numbers to choose a different style per section.
How do I add Roman numerals to the first section only?
Place your cursor in the first section’s footer, go to Insert → Page Number → Format Page Numbers, and select i, ii, iii from the Number format dropdown. Make sure the section is properly separated from the next via a Next Page section break.
Why is Link to Previous still on after I click it?
You’re likely clicking it in the header instead of the footer. Headers and footers unlink separately. Double-click the footer specifically, then click Link to Previous in the ribbon.
Can I have no page number on the title page but numbers on the rest?
Yes. Put a Next Page section break after the title page, unlink the footer in Section 2, then delete the page number from Section 1’s footer. Section 2’s numbering will remain.
How do I restart page numbering at 1 mid-document?
After your section break, open Format Page Numbers, tick Start at, and enter 1. The new section will count from 1 regardless of the previous section’s final page number.
What’s the difference between a page break and a section break?
A page break only moves text to the next page — formatting stays continuous. A section break creates a structurally independent unit where headers, footers, page numbers, margins, and orientation can all differ from the previous section.
How many sections can a Word document have?
There’s no practical limit. A thesis with four numbering styles needs four sections; a complex report with mixed orientations and footers might need ten or more. Word handles it without performance issues.
Will different page numbers in Word survive PDF export?
Yes. When you export to PDF using File → Save As → PDF or File → Export, all section-specific page numbers carry across exactly as they appear in Word.
Summary: Different Page Numbers in Word
- Different page numbers in Word are essential for formatting theses, reports, and dissertations with multiple parts
- Use section breaks (Next Page) to divide your document into areas that can carry different page numbering styles
- Always unlink headers and footers with “Link to Previous” so each section formats independently
- Choose from numbers (1, 2, 3), Roman numerals (i, ii, iii), or letters (A, B, C) to suit each section
- Confirm changes using the Navigation Pane or the section indicator in the status bar
- Repeat the process to create as many uniquely numbered sections as your document needs
Once your sections are set up correctly, your document will meet academic and business formatting standards — and the same structural foundation makes adding a table of contents in Word far easier, since the heading styles and section breaks both feed into the contents generation.
Related Tutorials
- Different Footers on Different Pages
- How to Remove Formatting Marks in Word
- How to Create a Table of Contents in Word
Word Tutorials
Recent Microsoft Word Tutorials
Browse the complete collection for help with formatting, layout, pages, tables, images, and document setup.
For Microsoft support documentation, visit the official Microsoft guidance.
Leave a Reply