Double line spacing in Word is one of the most common formatting requirements in school, university, and professional documents — yet most users still hunt through menus to find it. The same friction shows up with how to indent in Word, another formatting step that trips people up far longer than it should.
In this guide, you’ll learn three fast and reliable ways to apply double line spacing in Word — the paragraph settings dialog for precision, the Ctrl + 2 shortcut for speed, and the visual line spacing button for clarity. Every method takes seconds once you know where to look.
Why Double Line Spacing in Word Matters
Double line spacing in Word isn’t a stylistic choice — for most academic and professional documents, it’s a requirement. It gives reviewers room to write notes, makes long passages easier to read, and meets the standard formatting rules used by universities, publishers, and law firms.
- Essays, dissertations, and research papers almost always require double spacing
- Manuscripts submitted to editors and publishers expect it by default
- Legal drafts use double spacing to leave room for handwritten revisions
- Teachers and reviewers can annotate between the lines without crowding
Before applying any method, highlight the text you want to change — or press Ctrl + A to select everything in your document.
Watch the Video Tutorial
If you prefer to see this in action, the full video walkthrough is below, showing each method step by step.
How to Apply Double Line Spacing in Word: Step-by-Step
There are three reliable ways to apply double line spacing in Word. Each gives the same outcome — the difference is whether you optimise for precision, speed, or visual clarity. Pick the method that matches the document you’re working on.
Method 1: How to Apply Double Line Spacing in Word Using Paragraph Settings
This is the most precise method. Use it for formal documents where you want full control over spacing values, before-and-after paragraph spacing, and indentation in one place.
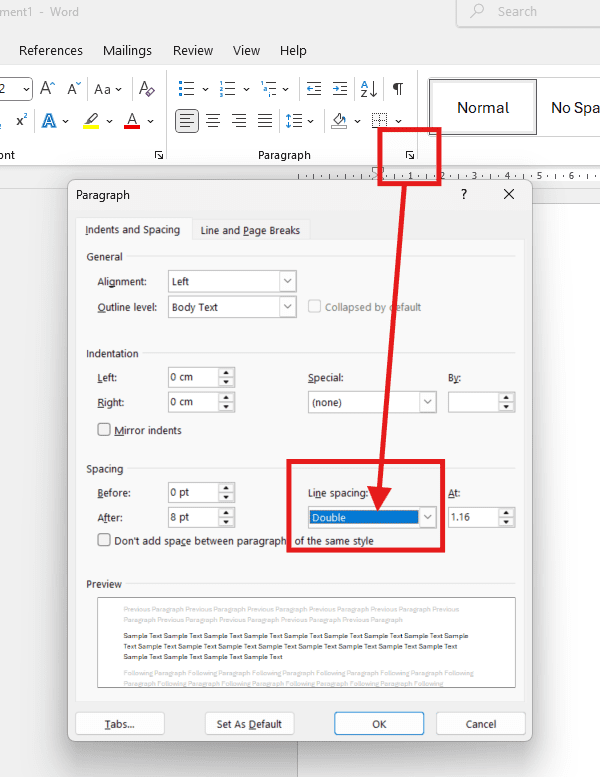
- Select your text with Ctrl + A
- Go to the Home tab
- Click the small arrow in the bottom-right corner of the Paragraph section
- Find Line spacing in the Spacing area
- Select Double from the dropdown
- Click OK
👉 Your spacing is now applied cleanly across the document. For a fully polished layout, pair this with properly set margins in Word — the two settings work together to control how much breathing room your text actually gets.
Method 2: How to Apply Double Line Spacing in Word Using the Keyboard Shortcut
If speed matters, this is the method you should be using. No menus, no clicks — just two keys.
- Select your text with Ctrl + A
- Press Ctrl + 2
That’s it. Word instantly switches your document to double line spacing.
👉 If you work in Word every day, this is the shortcut to memorise. It pairs neatly with Ctrl + 1 for single spacing and Ctrl + 5 for 1.5 spacing — three keystrokes that cover almost every formatting request you’ll ever get.
Method 3: How to Apply Double Line Spacing in Word Using the Line Spacing Button
This method is the most visual and ideal if you prefer clicking over shortcuts — or if you’re teaching someone else who needs to see what they’re doing.
- Select your text with Ctrl + A
- Go to the Home tab
- Click the Line and Paragraph Spacing icon (two arrows: one up, one down)
- Choose 2.0 from the dropdown

👉 You get instant visual confirmation as soon as you click — the document reflows behind the dropdown so you can see the spacing before committing.
Which Method Should You Use?
| Method | Best For | Speed |
|---|---|---|
| Paragraph Settings | Formal essays, dissertations, legal drafts | Slowest, most precise |
| Ctrl + 2 Shortcut | Everyday work, fast formatting | Fastest |
| Line Spacing Button | Teaching, demonstrating, beginners | Medium, most visual |
All three achieve the same outcome — the difference is whether you optimise for precision, speed, or clarity.
Common Problems When Applying Double Line Spacing in Word
Only One Paragraph Changes, Not the Whole Document
This happens when you didn’t select all your text first. Line spacing applies only to the paragraph your cursor is sitting in unless you highlight the rest. Press Ctrl + A to select everything, then reapply the spacing.
Spacing Looks Wider Than Expected
If your double spacing looks like triple spacing, you probably have extra paragraph spacing added before or after each line. Open Paragraph settings and set both Before and After to 0 pt in the Spacing section.
New Paragraphs Revert to Single Spacing
This means your default style is still set to single spacing. Apply double spacing, right-click the Normal style in the Home ribbon, choose Modify, set line spacing to Double, and tick New documents based on this template.
Ctrl + 2 Shortcut Not Working
If Ctrl + 2 does nothing, another add-in has probably remapped the shortcut. Check File → Options → Customize Ribbon → Keyboard shortcuts and reset the binding for SpacePara2.
Pro Tips for Double Line Spacing in Word
- Set double spacing in the Normal style if every new document should start double-spaced — saves reapplying it every time
- Combine double spacing with justified alignment for a clean academic look — see the guide on how to justify text in Word for the keystroke
- For drafts you’ll mark up by hand, push spacing higher than Double using Multiple at 2.5 or 3.0 in Paragraph settings
- Remember the spacing shortcut family — Ctrl + 1 for single, Ctrl + 5 for 1.5, Ctrl + 2 for double
FAQs About Double Line Spacing in Word
How do I apply double line spacing in Word?
To apply double line spacing in Word, select your text with Ctrl + A, then press Ctrl + 2. You can also open Paragraph settings from the Home tab and set Line spacing to Double.
What is the shortcut for double spacing in Word?
The shortcut is Ctrl + 2. Select your text first, then press the two keys together. The spacing changes instantly with no menus.
How do I make double spacing the default in Word?
Right-click the Normal style in the Home ribbon, choose Modify, set Line spacing to Double, then tick New documents based on this template. Every new document will open with double spacing.
Why is my double spacing too wide in Word?
Extra paragraph spacing is being added on top of the line spacing. Open Paragraph settings and set Before and After to 0 pt to remove the extra gap.
Can I apply double spacing to only part of a document?
Yes. Highlight only the paragraphs you want to change, then press Ctrl + 2 or use Paragraph settings. The rest of the document keeps its original spacing.
Does double spacing affect page count in Word?
Yes — significantly. Double spacing roughly doubles your page count compared to single spacing. A 5-page single-spaced document will run to about 10 pages once double-spaced.
What’s the difference between double spacing and 2.0 line spacing in Word?
There is no functional difference. The Double option in Paragraph settings and the 2.0 option in the Line Spacing button both set line spacing to exactly 2.0 — the same value Ctrl + 2 applies.
How do I remove double line spacing in Word?
Select your text and press Ctrl + 1 for single spacing or Ctrl + 5 for 1.5 spacing. You can also open Paragraph settings and choose a different value from the Line spacing dropdown.
Summary: How to Apply Double Line Spacing in Word
Double line spacing in Word is a routine formatting need that should never take more than a few seconds. This guide covered three methods:
- Paragraph Settings — most precise, ideal for formal documents
- Ctrl + 2 Shortcut — fastest, best for everyday work
- Line Spacing Button — most visual, perfect for beginners
Before you start, select your text or press Ctrl + A. Each technique reaches the same result — the choice is about workflow, not output. Once your spacing is dialled in, how to align text in Word is the natural next step for a clean, professional finish.
Related Tutorials

Recent Microsoft Word Tutorials

Looking for more help with Microsoft Word? Browse all step-by-step Word tutorials covering formatting, layout, pages, and document setup.
👉 View all Microsoft Word tutorials: https://wordmadeeasy.org/microsoft-word/
👉 Need more support – check out the official guidance: https://support.microsoft.com/en-au

Prefer watching instead of reading? Many Word tutorials are also available as short, step-by-step videos on the Word Made Easy YouTube channel.


Leave a Reply