If you want to learn how to indent in Word, this guide covers the three easiest methods. Knowing how to indent in Word properly improves readability, structures your text, and gives essays, reports, and professional documents a polished look. You’ll learn how to indent in Word using the ruler, keyboard shortcuts, and the Paragraph settings dialog.
Why Indentation Matters in Word
Before you learn how to indent in Word, it helps to understand why it matters. Indentation controls how text sits on the page and is used to:
- Improve document structure
- Make text easier to read
- Create professional layouts
- Meet academic or formatting requirements
For similar reasons, it is also worth learning how to align text in Microsoft Word to control how content sits across both margins.
Word offers both simple and advanced tools to manage indentation depending on your needs.
Watch the Video Tutorial
If you prefer to see this in action, the full video walkthrough is below, showing each method step by step.
Method 1: How to Indent in Word Using the Ruler
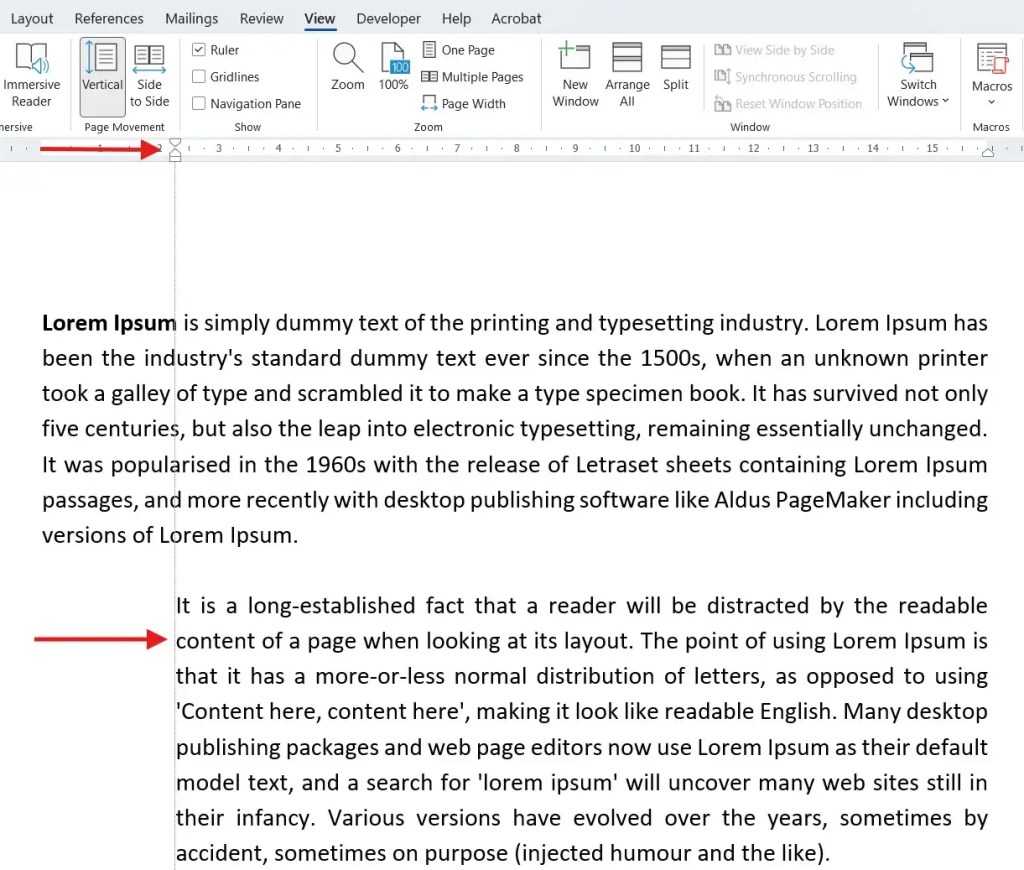
The ruler is the easiest way to learn how to indent in Word visually. To enable it:
- Click the View tab
- Tick Ruler
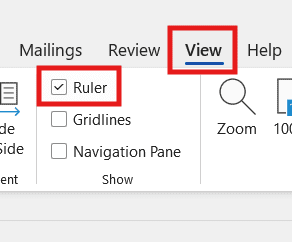
The ruler will now appear at the top of your document.
Indent Whole Paragraphs
To indent entire paragraphs in Word:
- Highlight the paragraph(s)
- On the ruler, select the bottom rectangle (Left Indent)
- Click and drag it to the right
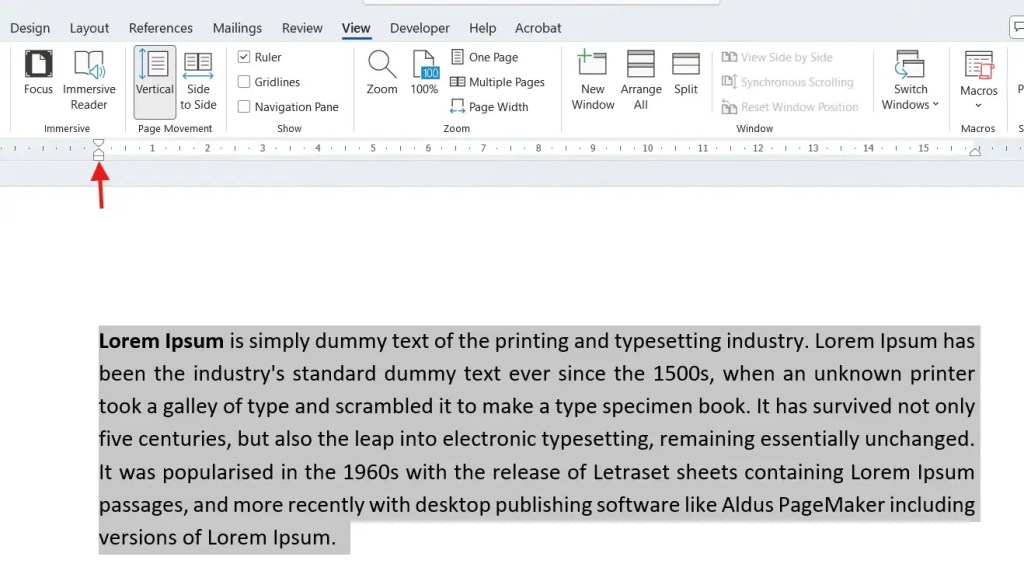
A vertical guide line appears, showing where the text will move. The measurement is based on the ruler, so you can see the exact centimetres being applied.

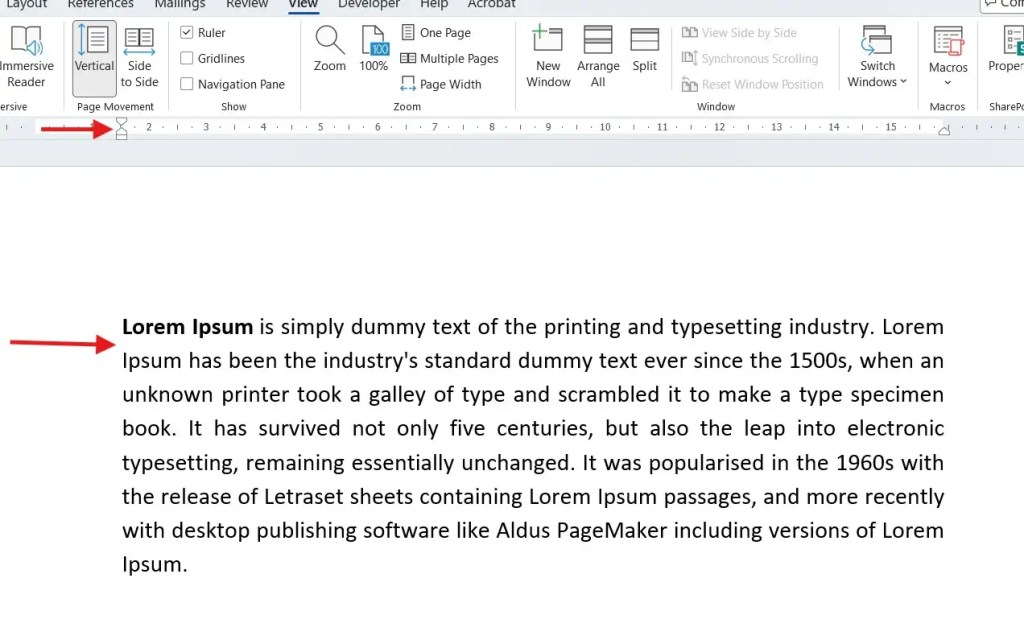
Indent the First Line Only
To indent only the first line of a paragraph in Word:
- Highlight the paragraph(s)
- Select the top triangle on the ruler (First Line Indent)
- Drag it to the right

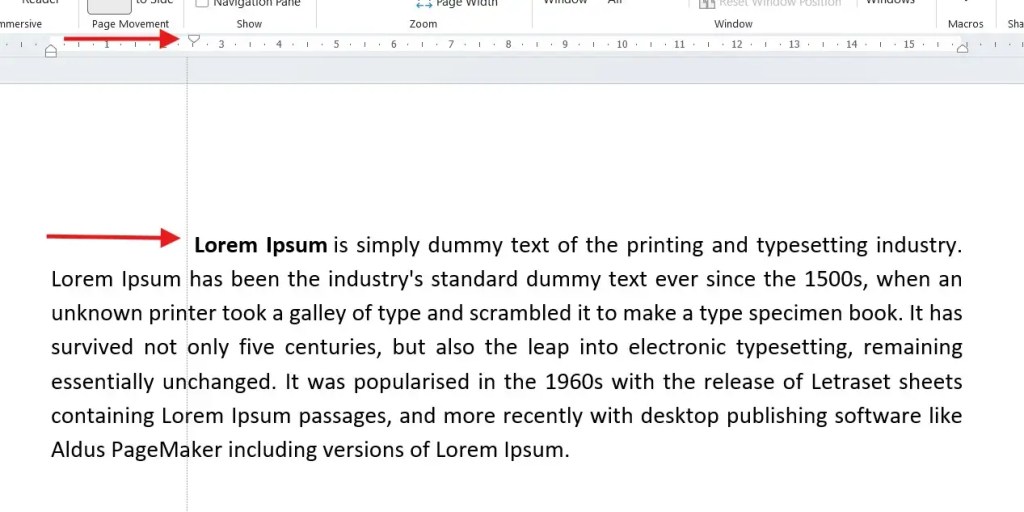
Only the first line of each paragraph will move, leaving the rest aligned normally. You can place the cursor in a single paragraph or highlight multiple paragraphs at once — only the selected text will be affected.
Method 2: How to Indent in Word Using Keyboard Shortcuts
The fastest way to indent in Word is with a keyboard shortcut:
- Select the text
- Press Ctrl + M to indent
Each press increases the indentation. To reverse it, press Ctrl + Shift + M.
You can also click Increase Indent on the Home tab.

Use the Tab Key for First-Line Indents
To indent just the first line of a paragraph in Word:
- Place the cursor at the start of the paragraph
- Press Tab
This creates a first-line indent based on Word’s default tab stop.
Method 3: How to Indent in Word Using Paragraph Settings
For full control over how to indent in Word, use the Paragraph settings dialog:
- Go to the Home tab
- Click the small arrow in the Paragraph section
- The Paragraph window will open
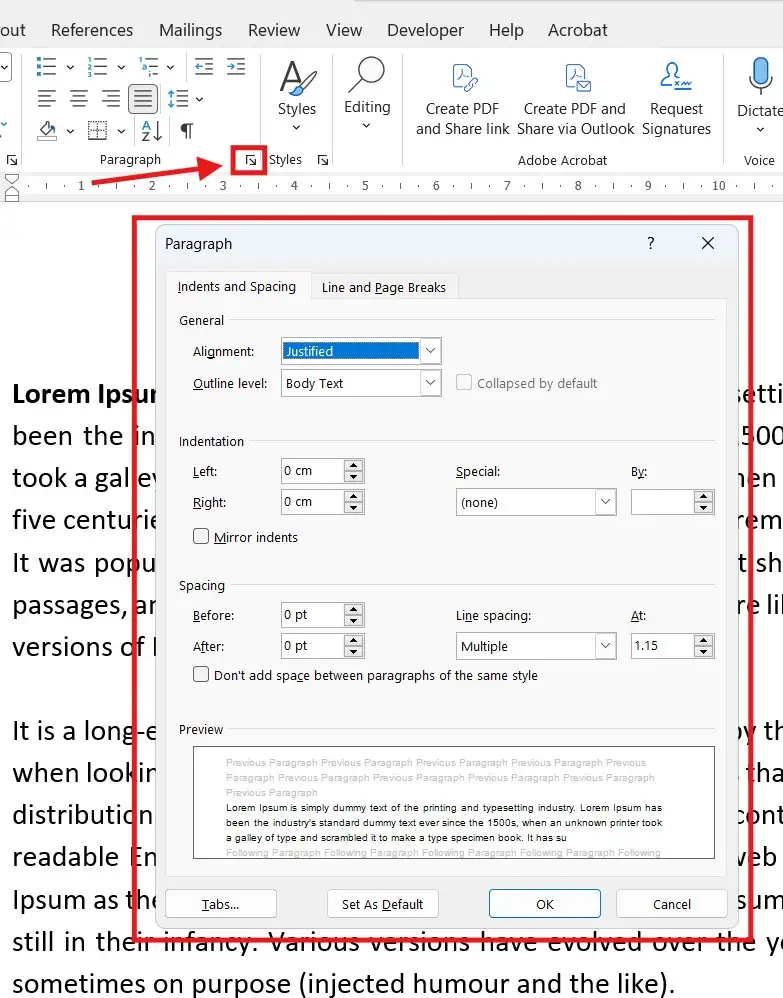
Use the Preview box at the bottom to see changes before applying them.
Set Left and Right Indentation
In the Indentation section:
- Adjust Left to move text in from the left margin
- Adjust Right to move text in from the right margin
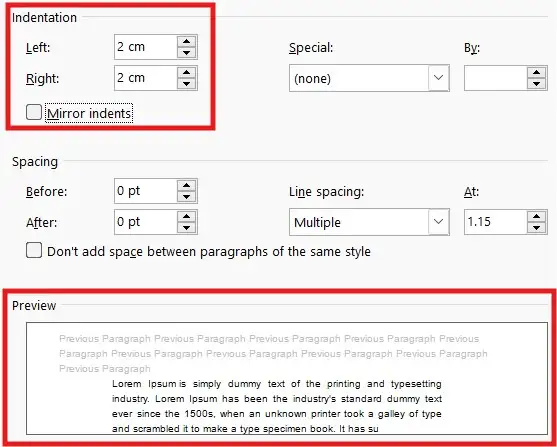
For example, setting both to 2 cm creates equal spacing on each side.
First Line and Hanging Indents
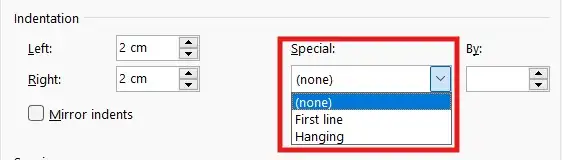
Under Special:
- First line indents only the first line
- Hanging indents all lines except the first
You can also adjust the exact measurement used.
These are commonly used in essays, references, and bibliographies — and if your essay also requires specific line spacing, see the guide on how to use double line spacing in Microsoft Word.
Change Default Tab Stops in Word
To change how far the Tab key moves text:
- Open Paragraph Settings
- Click Tabs
- Change Default tab stops (e.g. from 1.27 cm to 2 cm)
- Click OK
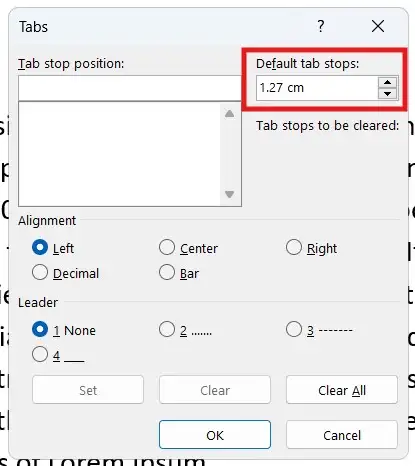
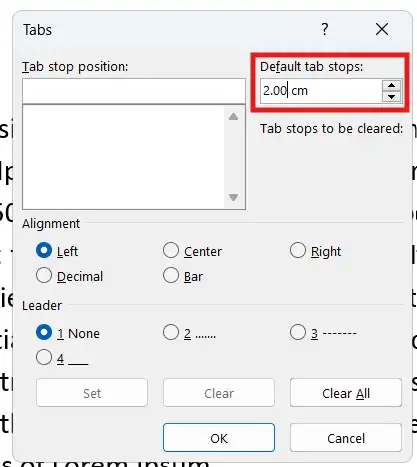
The Tab key will now move text by the new amount.
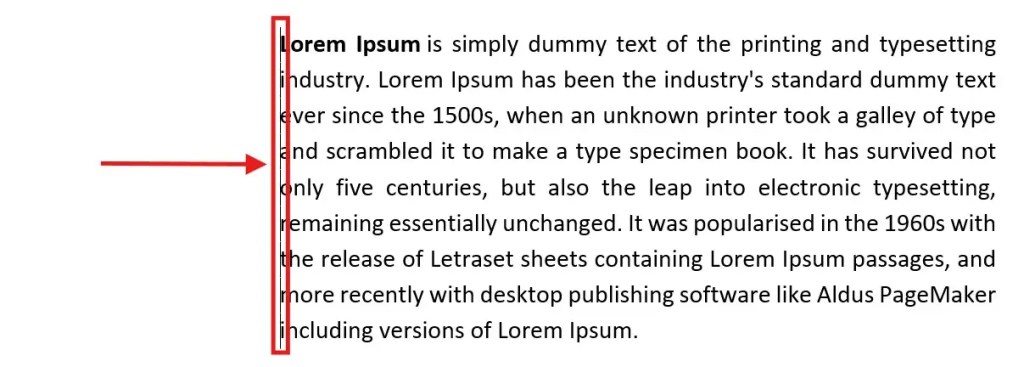
Create Lines Using Tab Stops
You can also use tab stops to create dividing lines in your Word document.
- Highlight the paragraph
- Open Paragraph Settings → Tabs
- Enter 4 cm as a new tab stop position
- Select Bar
- Click Set, then OK
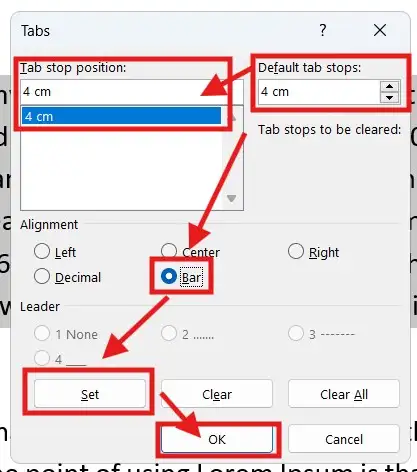
A vertical line appears at the chosen position.
Use Dots, Dashes, or Underscores with Tabs
Instead of empty space, you can add tab leaders:
- Open Paragraph Settings → Tabs
- Set a tab position
- Choose a leader:
- Dots
- Dashes
- Underscores
- Click Set, then OK
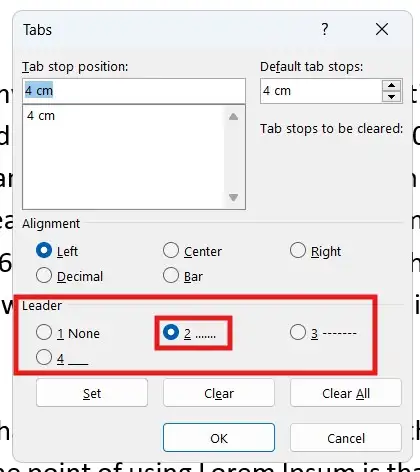
This is useful for structured layouts, contents pages, or forms.
FAQs
What is the easiest way to indent in Word?
The quickest way to indent in Word is to highlight the text and press Ctrl + M, or drag the indent marker on the ruler.
How do I indent on Word for just the first line?
Use the First Line Indent marker on the ruler or press Tab at the start of the paragraph. Both methods work the same way.
What is a hanging indent used for?
Hanging indents are commonly used for references, citations, and bibliographies — the first line stays at the margin while every following line is indented.
What is the keyboard shortcut to indent in Word?
Press Ctrl + M to indent and Ctrl + Shift + M to remove an indent. These work in all modern versions of Word.
Can I change how far the Tab key indents?
Yes. Open Paragraph settings, click Tabs, and change the default tab stop value.
Does indentation affect the whole document?
Only selected text is affected unless you set the changes as the default style.
Conclusion
Now that you know how to indent in Word three different ways — using the ruler, keyboard shortcuts, and Paragraph settings — you can pick whichever method suits the document you’re working on.
For everyday formatting, Ctrl + M is the fastest. For visual control, the ruler is the easiest. For precise measurements like 2 cm or hanging indents for references, Paragraph settings give you full control.
Small adjustments like these make a big difference in the overall quality of your Word documents — and for even more control over page layout, it is also worth knowing how to adjust margins in Word.
Related Tutorials
- How to Align Text in Microsoft Word
- How to Use Double Line Spacing in Microsoft Word
- How to Adjust Margins in Word

Recent Microsoft Word Tutorials

Looking for more help with Microsoft Word? Browse all step-by-step Word tutorials covering formatting, layout, pages, and document setup.
👉 View all Microsoft Word tutorials: https://wordmadeeasy.org/microsoft-word/
👉 Need more support – check out the official guidance: https://support.microsoft.com/en-au

Prefer watching instead of reading? Many Word tutorials are also available as short, step-by-step videos on the Word Made Easy YouTube channel.


Leave a Reply