
If you want to learn how to change margins in Word, this guide covers the 3 easiest methods. Knowing how to change margins in Word lets you control how text sits on the page, dramatically improving the look and professionalism of essays, business reports, and printable forms. You’ll learn how to change margins in Word using preset layouts, the Page Setup dialog box, and the ruler tool.
Whether you’re preparing an academic essay, business report, or printable form, knowing how to change margins in Word is one of the most useful formatting skills you can master.
Watch the Video Tutorial
If you prefer to see this in action, the full video walkthrough is below, showing each method step by step.
Why Margins Matter Before You Change Them
Before you learn how to change margins in Word, it helps to understand why they matter. Margins define the space between your text and the edge of your paper. They provide balance, improve readability, and ensure your document looks clean and professional.
Incorrect margins can cause text to run off the page or appear cramped. Properly set margins help your content look neat and well-structured — and combining them with the right line spacing in Word takes your document layout even further.
Default Margin Settings in Word
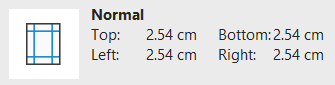
By default, Word sets margins to 2.54 cm (1 inch) on all sides. This “Normal” layout is ideal for most standard documents such as essays, letters, and reports. Each page has four main margins — top, bottom, left, and right. Adjusting these can make your text appear more centered, symmetrical, or spaced out depending on your needs.
Method 1: How to Change Margins in Word Using Preset Layouts
This is the quickest and easiest way to change margins in Word, perfect for users who want instant results without deep customisation.
Step 1: Go to the Layout Tab
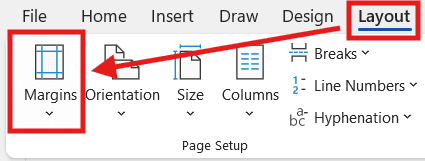
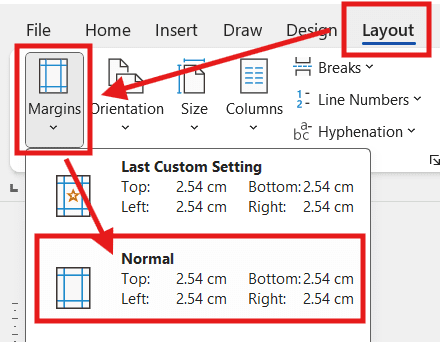
At the top of the Word window, click “Layout” (or “Page Layout” in older versions). This tab contains all the tools related to document structure, including margins, orientation, and size.
Step 2: Choose a Preset Margin
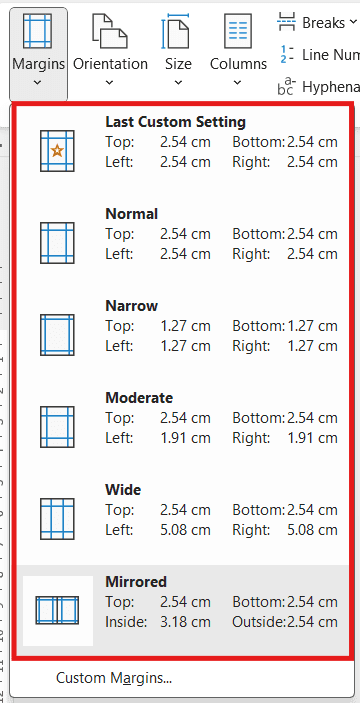
Click the “Margins” button. A dropdown menu appears with five preset options to change margins in Word:
- Normal (2.54 cm) – The default, ideal for most documents.
- Narrow (1.27 cm) – Allows more text on each page.
- Moderate – Balances white space for reports or printouts.
- Wide – Adds breathing room, perfect for notes or binding.
- Mirrored – Designed for double-sided or book layouts.
When to Use Each Preset Margin Type
Use Normal for general documents, Narrow for saving paper, and Wide for academic submissions. The Mirrored option is useful when preparing booklets or printed manuals.
Method 2: How to Change Margins in Word Using Page Setup
When you need more control over how to change margins in Word, this method lets you set exact measurements for each margin individually.
Step 1: Open Custom Margins
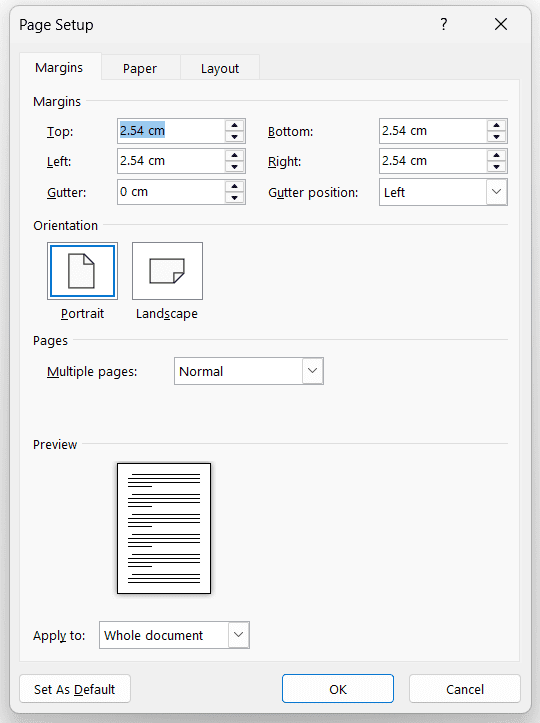
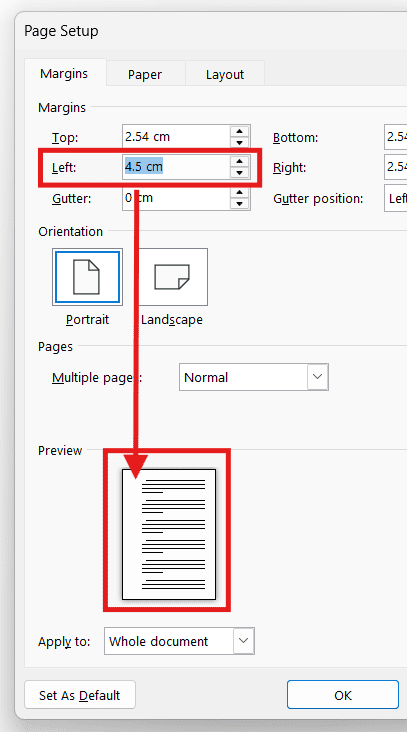
Go to Layout > Margins > Custom Margins. The Page Setup dialog box will appear, offering detailed options to change margins in Word.
Step 2: Adjust Left, Right, Top, and Bottom Margins
Enter your desired measurements (in cm or inches). You can make one side wider or narrower as needed — for example, a wider left margin for binding.
Step 3: Preview Before Applying
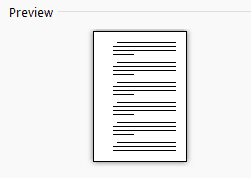
The Preview section is at the bottom of the dialog box. It shows how your document will look after you change margins in Word. This helps avoid mistakes before committing.
Step 4: Apply to Whole Document or Selected Sections
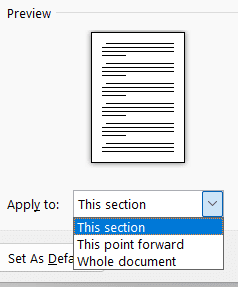
Under “Apply to”, you can choose:
- Whole Document – Apply margins to all pages.
- This Section Only – You will need page breaks for this. This is the same technique used when you want to rotate a single page in Word without affecting the rest of your document.
- This Point Forward – Apply new margins from your cursor position onward.
Bonus Tip: Set Margins as Default for Future Documents
Click “Set as Default” to make your custom margins the new default for all future documents. This method is perfect for consistent formatting.
Method 3: How to Change Margins in Word Using the Ruler
This hands-on method gives you visual control when you change margins in Word using the ruler at the top and side of your workspace.
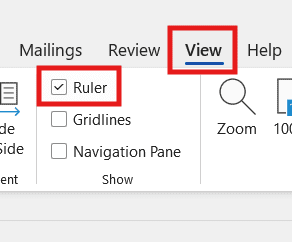
Step 1: Enable the Ruler View
Go to the View tab and tick the Ruler checkbox. This displays horizontal and vertical rulers on your screen so you can change margins in Word visually.
Step 2: Adjust Left and Right Margins
Hover over the ruler until you see a double-headed arrow labeled “Left Margin” or “Right Margin.” Click and drag to change the margins in Word — moving right narrows the text area, while moving left expands it.

Step 3: Modify Top and Bottom Margins
Scroll to the top or bottom of your document. Drag the gray margin area up or down to change spacing.

Best Practices for Precision Margin Adjustments
- Hold Alt (Windows) or Option (Mac) while dragging for finer adjustments.
- Zoom in for more precision.
- Always preview print layout before finalising.
Common Margin Mistakes and How to Fix Them
Uneven Margins and Alignment Issues
If text appears misaligned after you change margins in Word, ensure your paragraph indents haven’t been altered. Indents can sometimes mimic margin changes.
How to Fix Margins in Word (Reset to Default)
To fix margins and reset everything in Word, go to Layout > Margins > Normal. This restores Word’s default margin settings (2.54 cm each side).
Recommended Margin Sizes for Different Documents
When you change margins in Word, use these recommended sizes based on document type:
| Document Type | Recommended Margins |
|---|---|
| Resume | 2–2.5 cm |
| Academic Essay | 2.54 cm (Standard) |
| Business Report | 2–3 cm |
| Booklet or Brochure | Mirrored, 2.54 cm inside margin |
How Margins Affect Printing
Margins prevent text from being cut off when printing. Always test your document in Print Preview mode before sending it off.
FAQs
How do I change margins in Word quickly?
The fastest way to change margins in Word is to go to the Layout tab, click Margins, and select a preset (Normal, Narrow, Moderate, Wide, or Mirrored).
How do I set margins in Word to a specific size?
Go to Layout > Margins > Custom Margins, then enter your desired measurements for top, bottom, left, and right. Click OK to apply.
How do I adjust margins in Word using the ruler?
Enable the ruler from the View tab. Hover over the gray section of the ruler until you see a double-headed arrow, then click and drag to adjust margins visually.
How do I make custom margins the default in Word?
Go to Layout > Margins > Custom Margins, set your desired sizes, then click “Set as Default”. This applies them to all future Word documents.
Why can’t I change my margins in Word?
Ensure the document isn’t restricted or in “Read-Only” mode. Click Edit Document if there’s a banner at the top, then try changing margins again.
Can I set different margins for different sections?
Yes — use section breaks and apply margin changes to “This Section Only.” Section breaks also come in handy when you want to add columns in Word across just part of your document.
What’s the best margin for printing booklets?
Use Mirrored Margins with an inside margin of 3 cm to allow for binding.
Why are my margins uneven when printing?
Printer settings might override Word’s layout. Check printer properties before printing and ensure “Fit to Page” is disabled.
Conclusion
Now that you know how to change margins in Word three different ways — using preset layouts, the Page Setup dialog, and the ruler tool — you can pick whichever method suits the document you’re working on.
For everyday formatting, the preset layouts are the fastest. For exact measurements, Page Setup gives you full control. For visual adjustments, the ruler is the most intuitive. Mastering these three ways to change margins in Word ensures your pages always look polished and professional.
For more tutorials like this, visit Word Made Easy — your go-to resource for quick, practical Microsoft Word guides.
Related Tutorials
- How to Use Double Line Spacing in Microsoft Word
- Rotate a Single Page in Word
- How to Add Columns in Microsoft Word
Word Tutorials
Recent Microsoft Word Tutorials
Browse the complete collection for help with formatting, layout, pages, tables, images, and document setup.
For Microsoft support documentation, visit the official Microsoft guidance.
Leave a Reply