If you want to learn how to rotate one page in Word, this guide covers the 5 easy steps. Knowing how to rotate one page in Word lets you switch a single page to landscape — perfect for wide tables, charts, or a custom cover page — without affecting the rest of your document. You’ll learn how to rotate one page in Word using section breaks and the Layout tab.
By default, Word applies orientation changes to every page in the document. The trick is using section breaks to isolate just the one page you want to rotate.
Why Word Rotates All Pages by Default
Before you learn how to rotate one page in Word, it helps to understand the default behaviour. Word applies layout changes — including orientation — to the entire section of a document, not just a single page. That’s why when you change the orientation, every page flips at once.
This means:
- Most Word documents only contain one section by default
- To rotate one page in Word without affecting the others, you need section breaks
- Section breaks let layout changes (orientation, margins, page numbers) apply to one part of the document only
This works best when you’ve already set your margins in Word correctly.
Watch the Video Tutorial
If you prefer to see this in action, the full video walkthrough is below, showing each method step by step.
How to Rotate One Page in Word: Step-by-Step
Step 1: Place Your Cursor Before the Page You Want to Rotate
Before you can rotate one page in Word, you need to mark where the new section starts. Scroll to the page before the one you want to rotate and click at the very end of the text. This is where the new section will begin.
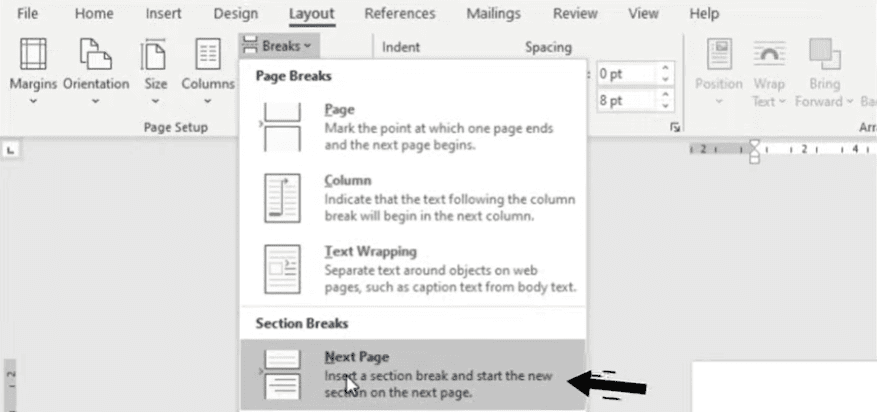
Step 2: Insert a Next Page Section Break
To rotate one page in Word, you need section breaks — not page breaks. Section breaks are what let Word apply layout changes to part of a document only.
- Go to the Layout tab
- Click Breaks
- Choose Next Page under “Section Breaks”
👉 Use:
- Next Page = creates a clean section break and starts a new page
- Avoid Continuous = won’t allow orientation changes
Step 3: Change the Orientation to Landscape
Now that you’ve isolated the section, you can rotate one page in Word safely:
- Place your cursor on the page you want to rotate
- Go to the Layout tab
- Click Orientation
- Select Landscape

The page now flips to landscape — but every page after it will also be landscape unless you finish the next two steps.
Step 4: Insert a Second Section Break After the Page
To make sure only one page rotates, you need a second section break after it.
- Click at the end of the rotated page
- Go to Layout → Breaks
- Choose Next Page again
This creates a third section that you can return to portrait — without disturbing the rotated page.
Step 5: Return Following Pages to Portrait
Now finish the process so the rest of your document stays portrait:
- Place your cursor on the next page (the one after the rotated page)
- Go to Layout → Orientation
- Select Portrait

👉 Always check your document in Print Preview (Ctrl + P) before saving or exporting to confirm the rotation worked correctly.
How to Change Orientation of One Page in Word (Same Method)
If you searched for “how to change orientation of one page in Word” instead of “rotate”, the technique is identical. Whether you call it rotating or changing orientation, the steps are the same:
- Insert a Next Page section break before the page
- Change the orientation to Landscape (or Portrait)
- Insert another Next Page section break after the page
- Return the next page to its original orientation
Section breaks are the key to changing the orientation of just one page in Word — without them, every page in your document will flip.
Common Mistakes When Rotating a Page in Word
Avoid these common mistakes when learning how to rotate one page in Word:
Mistake 1: Using a page break instead of a section break
Page breaks only move content to a new page. They don’t allow layout changes. You must use a Next Page section break for the rotation to work on just one page.
Mistake 2: Choosing Continuous instead of Next Page
Continuous section breaks don’t start a new page, which prevents Word from applying orientation changes properly. Always pick Next Page.
Mistake 3: Forgetting the second section break
Without a second section break after the rotated page, every page that follows will also be in landscape. This is the most common mistake when trying to rotate one page in Word.
Mistake 4: Skipping Print Preview
Always check your document in Print Preview (Ctrl + P) before printing or exporting to PDF. This catches any orientation issues before they reach the final output.
FAQs
How do I rotate one page in Word to landscape?
To rotate one page in Word to landscape, insert a Next Page section break before and after the page, then go to Layout → Orientation → Landscape. The section breaks ensure only that page is rotated.
How do I change the orientation of just one page in Word?
The technique is identical to rotating: insert section breaks before and after the page, then change the orientation. Section breaks let Word apply layout changes to one section only.
How do I rotate only one page in Word without affecting the others?
You must use Next Page section breaks. Without them, Word will rotate every page in your document because the entire file is treated as one section.
How do I flip the orientation of one page in Word?
Flipping orientation is the same as rotating — use section breaks to isolate the page, then go to Layout → Orientation and choose Landscape or Portrait.
Why does rotating the page affect the whole document?
Microsoft Word applies orientation changes to entire sections, not individual pages. If your document only has one section, the change affects every page. Adding section breaks fixes this.
What’s the difference between a section break and a page break?
A page break simply moves content to a new page. A section break allows layout changes (like orientation, margins, or page numbers) for just that portion of the document.
Can I rotate more than one page at a time in Word?
Yes. As long as the pages are in the same section, any orientation changes apply to all of them. Insert section breaks before the first page and after the last page you want rotated. Section breaks also let you use different footers on different pages within the same document.
Will the rotated page show correctly when I print or export to PDF?
Yes. If you set the section breaks and orientation properly, the rotated pages will appear correctly in print and in exported PDFs. You may also want to insert different page numbers for each section if your document mixes portrait and landscape pages.
Conclusion
Now that you know how to rotate one page in Word in 5 easy steps — placing your cursor, inserting a section break, changing orientation, inserting a second section break, and returning to portrait — you can switch any single page to landscape without affecting the rest of your document.
Section breaks are the key. Without them, Word treats your entire document as one section and any orientation change applies to every page. With this guide, you’ll never accidentally flip a whole document again — and you can pair this technique with the right margins in Word for full layout control.
Related Tutorials
- How to Adjust Margins in Word
- How to Insert Different Page Numbers in Microsoft Word
- Different Footers on Different Pages

Recent Microsoft Word Tutorials

Looking for more help with Microsoft Word? Browse all step-by-step Word tutorials covering formatting, layout, pages, and document setup.
👉 View all Microsoft Word tutorials: https://wordmadeeasy.org/microsoft-word/
👉 Need more support – check out the official guidance: https://support.microsoft.com/en-au

Prefer watching instead of reading? Many Word tutorials are also available as short, step-by-step videos on the Word Made Easy YouTube channel.


Leave a Reply