Adding a bottom border in Word is one of the cleanest ways to separate headings, finish off a title, or organise sections without resorting to underlined text. It takes seconds once you know where to look — and pairs neatly with how to add a page border in Microsoft Word when you want a fully framed layout.
In this guide, you’ll learn three reliable methods to apply a bottom border — using the Home tab, the Borders and Shading dialog, and a keyboard shortcut — plus how to fix the most common problems that stop the border from appearing properly.
Why Use a Bottom Border in Word
A bottom border improves layout and readability — it draws the eye to important text and creates clear visual separation between sections. It’s commonly used to:
- Highlight headings, titles, or section openers
- Separate logical sections of content cleanly
- Create a professional document style — often used alongside how to add a page border in Microsoft Word for a fully framed layout
- Replace basic underlining with a cleaner, more polished design
Watch the Video Tutorial
If you prefer to see this in action, the full video walkthrough is below, showing each method step by step.
How to Add a Bottom Border in Word: Step-by-Step
There are three ways to add a bottom border in Word. Use the Home tab when you want a quick visual click, Borders and Shading when you need a custom line style or thickness, and the keyboard shortcut when you want a full-width line in one keystroke.
Method 1: How to Add a Bottom Border in Word from the Home Tab
This is the fastest visual method — everything happens from the Home tab where you already format text.
Steps:
- Select the text or place your cursor in the paragraph where you want the border
- Go to the Home tab
- In the Paragraph group, click the small dropdown arrow next to the Borders icon
- Select Bottom Border from the menu
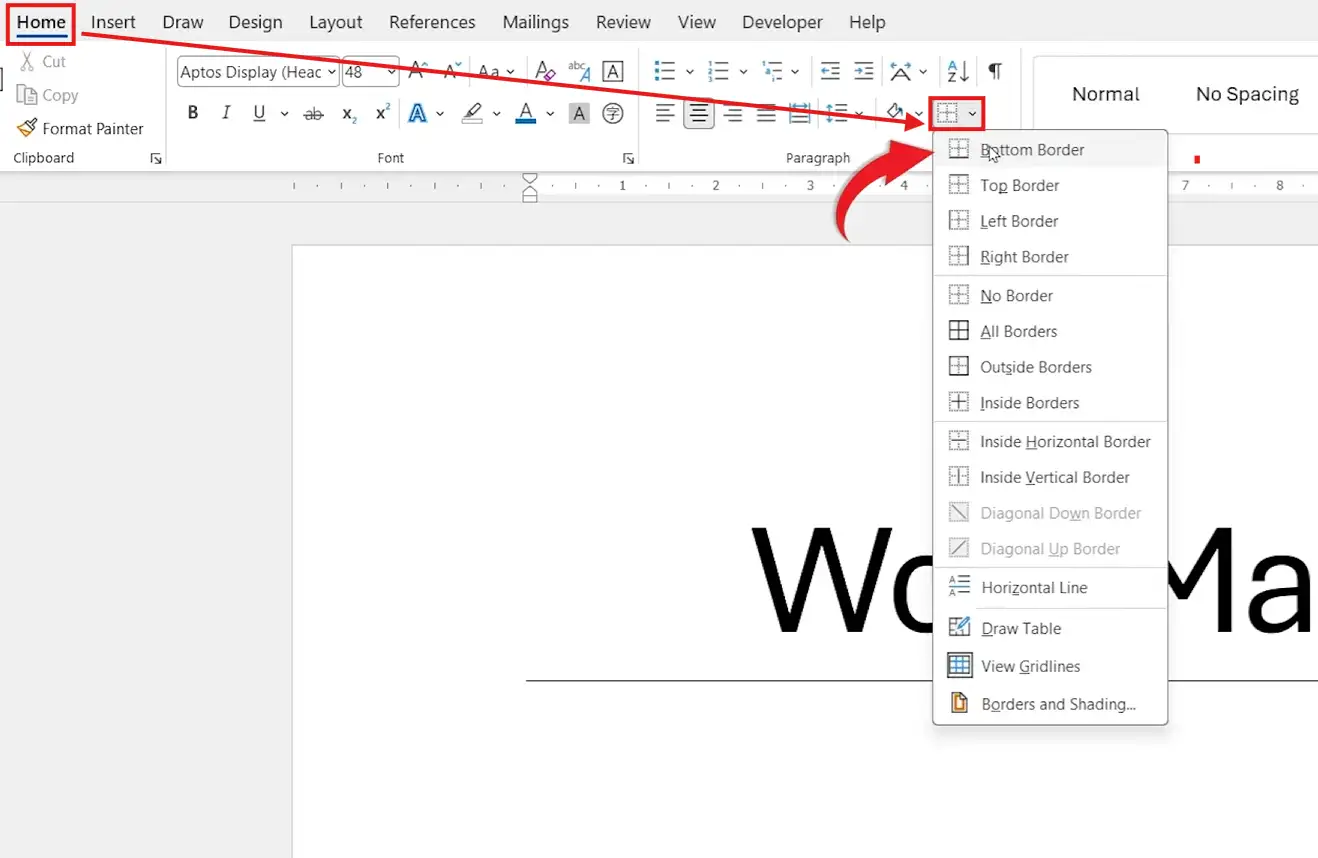
👉 A line appears directly below the selected text or paragraph.
Method 2: How to Add a Bottom Border in Word Using Borders and Shading
If you want a thicker line, a coloured border, or a dotted style, Borders and Shading gives you full control over the look — useful when matching brand colours or document styling.
Steps:
- Select the text or paragraph
- On the Home tab, click the Borders dropdown arrow in the Paragraph group
- Click Borders and Shading at the bottom of the menu

- In the dialog box, choose Custom under Setting
- Adjust the Style (solid, dotted, dashed, or double)
- Pick a Color and increase the Width for a thicker line
- In the Preview pane, click the bottom edge only to apply the border to that side
- Click OK

👉 The customised bottom border applies immediately — only to the side you clicked in the preview.
Method 3: How to Add a Bottom Border in Word Using the Keyboard Shortcut
For a fast, full-width line beneath any paragraph, Word has a built-in autoformat shortcut — and for more line-creation tricks, see how to add lines in Microsoft Word.
Steps:
- Place your cursor on the line directly below your text

- Type three hyphens:
--- - Press Enter
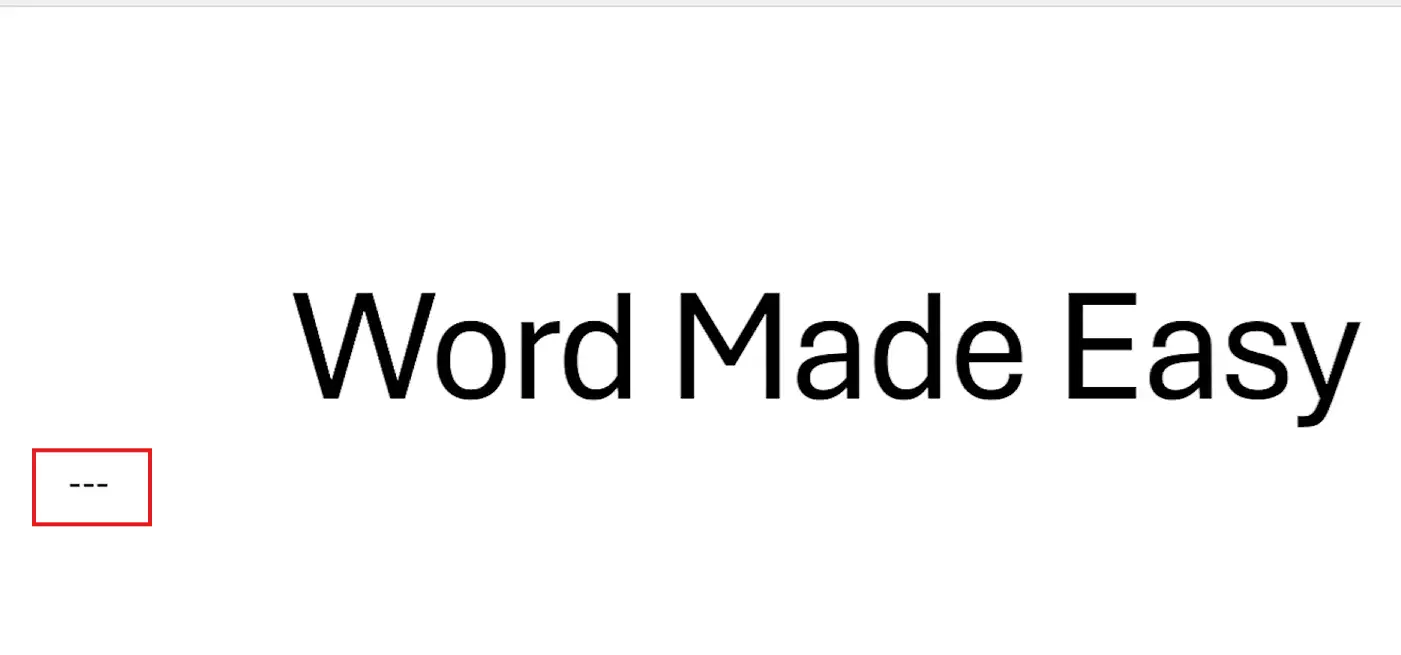
👉 Word automatically converts the hyphens into a full-width bottom border across the page.
Which Method Should You Use?
Every method produces a bottom border — pick the one that matches what you’re trying to achieve.
| Method | Best For | Speed |
|---|---|---|
| Home tab dropdown | Quick, precise borders below a paragraph | Fast |
| Borders and Shading | Custom line style, thickness, and colour | Slower but flexible |
| Three hyphens + Enter | Instant full-width line beneath text | Fastest |
Common Problems When Adding a Bottom Border in Word
If your border isn’t appearing the way you expect, one of these four issues is usually behind it.
The bottom border doesn’t appear after I click it
Your cursor isn’t in the right paragraph, or no text is selected. Click inside the paragraph first, then reapply the bottom border from the Home tab dropdown.
The border applied to the wrong paragraph
Word applies paragraph borders to whichever paragraph the cursor sits in. Click in the correct paragraph, then use Home → Borders dropdown → No Border on the wrong paragraph to clear it.
The three-hyphen shortcut isn’t creating a line
AutoFormat is switched off. Go to File → Options → Proofing → AutoCorrect Options → AutoFormat As You Type, then tick Border lines under Apply as you type.
I can’t delete the line created by the hyphen shortcut
It’s a paragraph border, not text. Click in the paragraph above the line, then go to Home → Borders dropdown → No Border to remove it.
Pro Tips
- Use a bottom border under headings instead of underlining text — it sits below the descenders of letters like g, p, and y, giving a much cleaner result.
- Keep borders thin (½ pt to 1 pt) for professional documents — anything thicker pulls attention away from the text and can look dated.
- Combine a bottom border with consistent alignment for a tidy, professional finish — see how to align text in Microsoft Word for the full set of alignment controls.
- If you use the same bordered heading style repeatedly, save it as a Quick Style so you can apply it in one click rather than reformatting every time.
FAQs
What is a bottom border in Word?
A bottom border in Word is a horizontal line that appears directly below a paragraph or selected text. It’s used to highlight headings, separate sections, or create a cleaner alternative to underlining.
What is the keyboard shortcut for a bottom border in Word?
Place your cursor on a new line, type three hyphens ---, and press Enter. Word’s AutoFormat feature automatically converts the hyphens into a full-width bottom border.
Can I change the thickness of a bottom border?
Yes. Open Home → Borders dropdown → Borders and Shading, then adjust the Width dropdown. Values range from ¼ pt up to 6 pt.
Why is my bottom border not showing?
The cursor isn’t in the right paragraph, or no text is selected. Click inside the correct paragraph and reapply the border. If the three-hyphen shortcut isn’t working, check that AutoFormat As You Type has Border lines enabled.
Is a bottom border better than underlining text?
In most cases, yes. A bottom border sits below the entire line of text, so descenders like g, p, and y aren’t cut through — it gives a much cleaner, more professional look than the underline button.
Can I change the colour of a bottom border in Word?
Yes. Open Borders and Shading from the Home tab, choose a Color from the dropdown, then click the bottom edge in the Preview pane and click OK.
How do I remove a bottom border in Word?
Click in the paragraph that has the border, go to Home → Borders dropdown, and select No Border. The border disappears immediately.
Does the three-hyphen shortcut work the same way in every version of Word?
Yes. Typing three hyphens and pressing Enter creates a full-width bottom border in Word 2016, 2019, 2021, Microsoft 365, and Word for Mac, provided AutoFormat As You Type is enabled.
Conclusion
Adding a bottom border in Word takes seconds once you know the right route — the Home tab dropdown for speed, Borders and Shading for full control over style and thickness, or the three-hyphen shortcut for an instant full-width line.
If you want to take this further, learn how to build complete horizontal lines using shapes and autoformat in how to draw a line in Microsoft Word — it pairs perfectly with the bottom border techniques covered here.
Related Tutorials
- How to Add a Page Border in Microsoft Word
- How to Add Lines in Microsoft Word
- Microsoft Word Keyboard Shortcuts Cheat Sheet

Recent Microsoft Word Tutorials

Looking for more help with Microsoft Word? Browse all step-by-step Word tutorials covering formatting, layout, pages, and document setup.
👉 View all Microsoft Word tutorials: https://wordmadeeasy.org/microsoft-word/
👉 Need more support – check out the official guidance: https://support.microsoft.com/en-au

Prefer watching instead of reading? Many Word tutorials are also available as short, step-by-step videos on the Word Made Easy YouTube channel.


Leave a Reply