
If you regularly work with A4 paper, learning how to set A4 as default in Word saves you from resizing every new file by hand — much like when you first decide to change the page size in Word. Microsoft Word lets you lock A4 in once so every future document opens at the right size.
In this guide, you’ll learn two reliable methods to set A4 as the default paper size, how to confirm the change stuck, and how to fix the common reasons Word keeps reverting to Letter.
What Is Paper Size in Word?
Paper size sets the page dimensions of your document. Different regions and organisations use different standards, but the two you’ll meet most often are:
| Paper Size | Dimensions |
|---|---|
| A4 | 210 × 297 mm |
| Letter | 8.5 × 11 inches |
Your chosen paper size affects printing layout, margins, page formatting, and overall document appearance — so getting it right once is worth the two minutes.
Why Set A4 as the Default Paper Size?
A4 is the international (ISO 216) standard used by businesses, schools, and governments across most of the world. Making it your default offers a few clear benefits:
- Saves time on every new document
- Keeps formatting consistent across files
- Reduces printing errors and re-prints
- Removes the need to change page size manually
A4 also pairs neatly with your other page settings — if you’re standardising your layout, it’s worth learning how to adjust the margins in Word at the same time.
Watch the Video Tutorial
If you prefer to see this in action, the full video walkthrough is below, showing each method step by step.
How to Set A4 as Default in Word: Step-by-Step
There are two ways to set A4 as default in Word. Use Method 1 to make A4 permanent for every new document, or Method 2 if you only need A4 for the file you’re working on right now.
Method 1: How to Set A4 as Default in Word Using the Page Setup Dialog
This is the permanent method. It tells Microsoft Word to open every new document in A4 from now on.
Select A4 from the Layout Tab
- Open Word (a blank or existing document is fine)
- Go to the Layout tab on the ribbon
- Click Size, then select A4 from the dropdown

👉 Your current document now uses A4 dimensions. The next steps make that choice permanent.
Open the Page Setup Dialog Box
Look for the small diagonal arrow in the bottom-right corner of the Page Setup group, then click it to open the full dialog box.
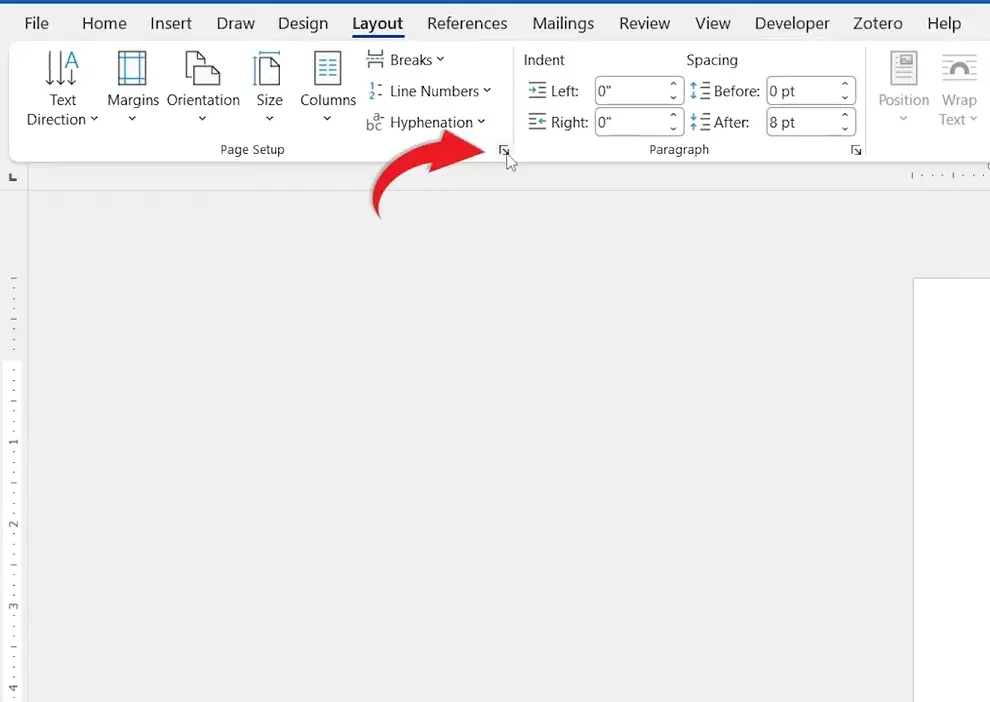
👉 The Page Setup window opens with extra page-formatting options.
Click Set As Default
- Select the Paper tab
- Confirm Paper Size is set to A4
- Set Apply To to Whole Document
- Click Set As Default, then confirm with Yes

👉 Word now saves A4 as the default paper size for all future documents. To verify, close Word, open a new blank document, and check Layout → Size — A4 should already be selected.
Method 2: How to Set A4 in Word for a Single Document
If you only need A4 for the file in front of you — not every future document — skip the dialog box entirely.
- Open the Layout tab
- Click Size and choose A4
- Do not click Set As Default — close and carry on
👉 The current document switches to A4, while every other document keeps its existing size. This is the quickest way to set A4 in Word for one-off files.
Which Method Should You Use?
- Want A4 on every new document? Use Method 1 and click Set As Default.
- Only need A4 for the current file? Use Method 2 and pick A4 from Layout → Size.
- On a shared or IT-managed PC? Use Method 1, but expect to re-apply it if your profile resets.
Common Problems When Setting A4 as Default in Word
A4 Does Not Stay as the Default
You likely selected A4 from the ribbon but didn’t open the Page Setup dialog. Only the Set As Default button makes the change permanent.
New Documents Still Open in Letter Size
Close and reopen Word after applying the change. The new default loads when Word next starts from a fresh session.
Printed Documents Look Different from the Screen
Your printer may be overriding Word. Check the printer’s own paper-size setting, as some printers default to Letter regardless of the document.
The Set As Default Button Is Missing or Greyed Out
Make sure you’ve opened the full Page Setup dialog using the launcher arrow, not just the Size dropdown. The button only appears inside the dialog box.
Pro Tips for Default Paper Size in Word
- Set your margins and orientation before clicking Set As Default — those settings save into the default too.
- Word remembers other defaults the same way — you can also change the default font in Word using its dialog box’s Set As Default button.
- Preview before printing so a printer override doesn’t surprise you on the page.
- If you share templates with a team, apply A4 inside the template so everyone inherits it.
FAQs
How do I set A4 as default in Word?
To set A4 as default in Word, open the Layout tab, choose A4 under Size, open the Page Setup dialog, then click Set As Default and confirm with Yes.
Why does Word keep defaulting to Letter instead of A4?
Word defaults to Letter when regional settings, the installed template, or the printer favour it. Setting A4 as the default through Page Setup overrides this for new documents.
Will setting A4 as default change my existing documents?
No. Existing documents keep their current paper size. The default only applies to documents you create after making the change.
How do I set A4 as the default paper size in Microsoft 365?
The steps are identical in Microsoft 365: Layout → Size → A4, then Set As Default in the Page Setup dialog. It works the same across recent versions of Word.
What is the difference between A4 and Letter paper?
A4 measures 210 × 297 mm and Letter measures 8.5 × 11 inches. A4 is slightly taller and narrower, which can shift margins and line breaks when you switch.
Why is A4 the standard paper size in many countries?
A4 is part of the ISO 216 international paper standard, which is used across Europe, Asia, and most of the world for official and business documents.
Can printer settings override the A4 paper size in Word?
Yes. Some printers apply their own default paper size, so always check the printer preferences before printing an important document.
Conclusion
Learning how to set A4 as default in Word is a one-time, two-minute change that keeps every new document consistent and print-ready.
Use the Page Setup dialog with Set As Default when you want A4 every time, or the quick Layout → Size route for a single file. Once your default is set, you can move straight to writing — and when you’re ready to share, simply save a Word document as a PDF.
Related Tutorials
Word Tutorials
Recent Microsoft Word Tutorials
Browse the complete collection for help with formatting, layout, pages, tables, images, and document setup.
For Microsoft support documentation, visit the official Microsoft guidance.
Leave a Reply