If you want to learn how to change the default font in Word, this guide covers the 3 easy steps. Knowing how to change the default font in Word means every new document opens with your preferred font automatically — no more changing from Aptos to Times New Roman every single time you start typing. You’ll learn how to change the default font in Word using the Font dialog box, the Ctrl + D shortcut, and the Normal template method.
If you often open Word and immediately change the font from Aptos to Century Gothic, Times New Roman, or Arial, you’re not alone. This guide is beginner-friendly, works for all modern Word versions including Word 365, Word 2021, and Word 2019, and includes troubleshooting tips if the change doesn’t stick.
What Is the Default Font in Word?
Before you learn how to change the default font in Word, it helps to understand what it is. The default font is the font Word uses automatically every time you create a new blank document. For Word 365 and recent versions, the default font is:
- Font: Aptos
- Style: Regular
- Size: 12
When you change the default font in Word, you’re modifying the Normal template — the master file that controls formatting for every new document.
Why Change the Default Font in Word?
There are several practical reasons users want to change the default font in Word:
- Save time by avoiding manual font changes for every new document
- Meet school, university, or workplace formatting requirements (e.g., Times New Roman 12pt for academic submissions)
- Improve readability and reduce eye strain
- Maintain consistency across all your documents
- Match a brand style guide or personal writing preference
- Avoid the new Aptos font if you prefer Calibri or another classic option
If you write frequently, changing the default font can save hours over time.
Before You Start: 4 Things to Know
Before you change the default font in Word, keep these points in mind:
- Changes affect new documents only — existing files won’t update automatically
- The change is stored in the Normal template (Normal.dotm)
- You can apply the change to one document only or all future documents
- If Word is in read-only or protected mode, the change won’t save permanently
Watch the Video Tutorial
If you prefer to see this in action, the full video walkthrough is below, showing each method step by step.
How to Change the Default Font in Word: Step-by-Step
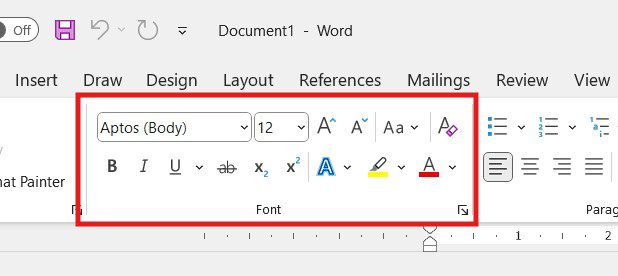
Step 1: Open the Font Dialog Box
The first step to change the default font in Word is opening the Font dialog box. You have two options:
- Click the small arrow in the bottom-right corner of the Font group on the Home tab
- OR press Ctrl + D on your keyboard (faster shortcut)
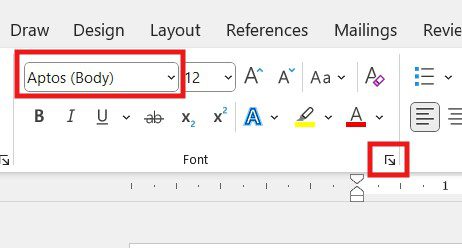
This opens the Font dialog box — the central place where you change the default font in Word.
Step 2: Choose Your Font, Style, and Size
Inside the Font dialog box:
- Select your preferred Font (e.g., Century Gothic, Times New Roman, Calibri, Arial)
- Choose Font Style (Regular, Bold, Italic, or Bold Italic)
- Select Font Size (e.g., 11, 12, 14)

You’ll see a live preview of how the text looks at the bottom of the dialog box.
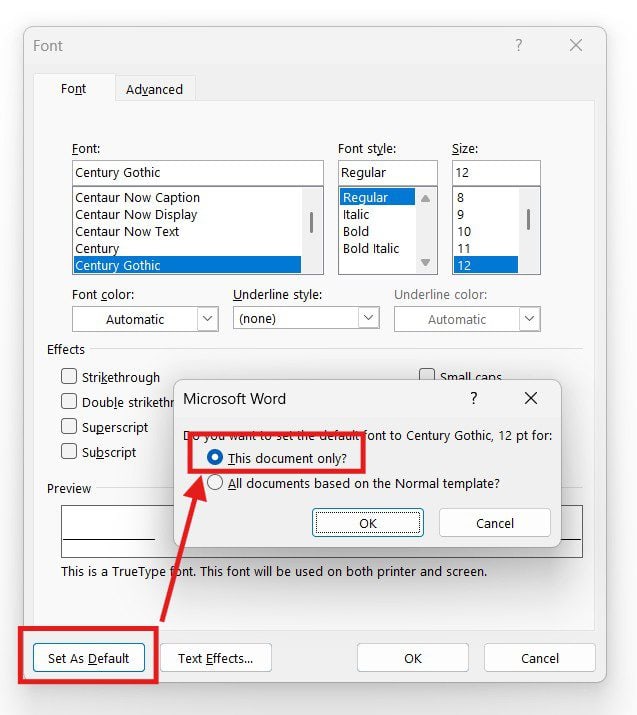
Step 3: Set as Default for All Documents
The final step to change the default font in Word permanently is to apply your choice to the Normal template. At the bottom of the Font dialog box, click Set As Default.
Word presents two options:
- This document only — applies the font to the current file only
- All documents based on the Normal template — applies the font to every future document ✅
Select All documents based on the Normal template, then click OK.
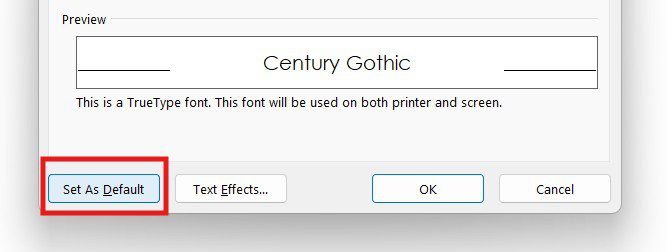
A confirmation message will appear. Click Yes to confirm. The default font in Word is now changed permanently.
Faster Method: Use the Ctrl + D Shortcut
If you want to change the default font in Word as fast as possible, the keyboard shortcut method takes the same 3 steps but skips clicking through menus:
- Press Ctrl + D to open the Font dialog instantly
- Choose your font, style, and size
- Click Set As Default
- Select All documents based on the Normal template
- Click OK
That’s the fastest way to change the default font in Word — under 10 seconds once you know the shortcut.
Understanding the Normal Template (Normal.dotm)
The Normal template (Normal.dotm) is the master file that controls every new document in Word. When you change the default font in Word, you’re modifying this template. The Normal template controls:
- Default font, style, and size
- Default paragraph spacing and line spacing
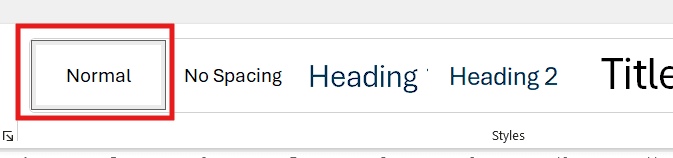
- Built-in styles (Heading 1, Heading 2, Normal, etc.)
- Default page margins and orientation
Once you save changes to the Normal template, the new default font applies to every future Word document on your computer.
How to Change the Default Font for One Document Only
If you only want to change the font for the current Word file (not every future document), use the same Font dialog but pick the other option:
- Open the Font dialog box (Ctrl + D)
- Choose your preferred font settings
- Click Set As Default
- Select This document only
- Click OK
This keeps your global default font unchanged but applies the new font to the current document.
How to Test If the Default Font Has Changed
To confirm your changes worked:
- Close Microsoft Word completely
- Choose Don’t Save if prompted
- Reopen Word
- Click Blank Document
If the new document opens with your selected font and size, you’ve successfully changed the default font in Word.
Common Problems When Changing the Default Font (And Fixes)
Font Didn’t Change After Closing Word
You probably selected “This document only” instead of “All documents based on the Normal template”. Repeat the steps and pick the second option.
Font Reverts Back to Aptos After Restart
Word may be running in read-only mode, or the Normal template may be locked. Try closing all Office apps, opening Word as administrator (right-click → Run as administrator), and reapplying the settings.
Selected Font Is Missing From the List
Make sure the font is installed on your system. On Windows, check Settings → Personalisation → Fonts. On Mac, check Font Book.
Default Font Changed but Existing Documents Still Show Old Font
This is normal. Changing the default font in Word only affects new documents — existing files keep their original formatting. To update an old document, open it, press Ctrl + A to select all, and apply the new font.
Default Font Differences Across Word Versions
The default font in Word has changed several times over the years. Here’s a quick comparison:
| Word Version | Default Font | Default Size |
|---|---|---|
| Word 2003 and earlier | Times New Roman | 12 |
| Word 2007–2013 | Calibri | 11 |
| Word 2016–2021 | Calibri | 11 |
| Word 365 (2024+) | Aptos | 12 |
The steps to change the default font in Word remain nearly identical across all of these versions.
Best Fonts to Set as Default in Word
Once you know how to change the default font in Word, choosing the right font matters. Here are the most popular choices and when to use each:
- Calibri — Balanced and versatile (Word’s default 2007-2021)
- Times New Roman — Academic and formal documents (the standard for essays)
- Arial — Simple and professional (great for business reports)
- Century Gothic — Clean and modern (good for personal use)
- Georgia — Easy to read on screens (good for digital reading)
- Verdana — Highly readable at small sizes
- Aptos — Microsoft’s new modern default (replaces Calibri in Word 365)
Choose based on your purpose: academic work usually requires Times New Roman or Arial; modern business documents look great in Calibri or Aptos; personal writing has more freedom.
FAQs
How do I change the default font in Word?
Press Ctrl + D to open the Font dialog box. Choose your font, style, and size. Click Set As Default, select All documents based on the Normal template, and click OK. Every new document from now on will open with your chosen font.
How do I change the default font in Word permanently?
To permanently change the default font in Word, you must select All documents based on the Normal template when prompted. This saves the change to the Normal.dotm template file, applying it to every future document.
Will changing the default font affect old Word documents?
No. Only new documents are affected. Existing files keep their original formatting. To update an old document, open it, press Ctrl + A to select all text, then apply the new font manually.
How do I set the default font in Word on Mac?
On Mac, the steps are similar: open the Font dialog (Format → Font), choose your settings, click Default…, and confirm “Yes” when prompted to apply changes to all documents based on the Normal template.
Why didn’t my default font change after closing Word?
Three common causes: (1) you selected “This document only” instead of “All documents based on the Normal template”; (2) Word couldn’t save the Normal template due to permissions — try running Word as administrator; (3) the Normal template file is read-only.
Can I set different default fonts for different Word templates?
Yes. Each Word template has its own default font. You can create custom templates with different defaults — useful for separate work, academic, or personal documents.
What is the fastest way to change the default font in Word?
Press Ctrl + D, choose your font, click Set As Default, select “All documents based on the Normal template”, and click OK. Total time: under 10 seconds.
How do I change the default font back to Aptos or Calibri?
Press Ctrl + D, select Aptos (or Calibri), set size to 12 (or 11), click Set As Default, and choose “All documents based on the Normal template”. This resets your default font to Word’s original setting.
Conclusion
Now that you know how to change the default font in Word in 3 easy steps — opening the Font dialog box, choosing your font, and saving it to the Normal template — you’ll never have to manually change the font for every new document again.
For the fastest result, use the Ctrl + D keyboard shortcut. For most users, picking Calibri 11pt or Times New Roman 12pt is the best default — but the right choice depends on your purpose. Whether you’re a student, professional, or casual writer, setting a default font that suits your needs saves time and improves consistency every single time you open Word.

Recent Microsoft Word Tutorials

Looking for more help with Microsoft Word? Browse all step-by-step Word tutorials covering formatting, layout, pages, and document setup.
👉 View all Microsoft Word tutorials: https://wordmadeeasy.org/microsoft-word/
👉 Need more support – check out the official guidance: https://support.microsoft.com/en-au

Prefer watching instead of reading? Many Word tutorials are also available as short, step-by-step videos on the Word Made Easy YouTube channel.
11111111111111111


Leave a Reply