If you want to learn how to add the developer tab in Word, this guide covers the 5 easy steps. Knowing how to add the developer tab in Word unlocks hidden tools for building interactive forms, inserting clickable checkboxes, recording macros, and customising documents in ways the default ribbon doesn’t allow. You’ll learn how to add the developer tab in Word using the Customize Ribbon settings — and once you’ve enabled it, you can use those tools to create a fillable form in Microsoft Word.
In this guide, you’ll learn the exact steps to add the developer tab, what each developer feature does, how to hide the tab when you no longer need it, and how to fix the most common issues that stop the tab from appearing.
What Is the Developer Tab in Word?
Before you learn how to add the developer tab in Word, it helps to understand what it actually does. The Developer tab is a hidden ribbon tab that gives you access to advanced tools most users never see — interactive form controls, macro recording, content controls, and the Visual Basic editor.
The Developer tab provides access to:
- Fillable forms for surveys, contracts, and applications
- Clickable checkboxes for interactive checklists
- Drop-down lists and combo boxes
- Macro recording for repetitive tasks
- Content controls for structured documents
- VBA (Visual Basic for Applications) scripting
Microsoft hides the tab by default because these tools are aimed at developers and power users rather than everyday document editing. The tab takes 30 seconds to enable.
Watch the Video Tutorial
If you prefer to see this in action, the full video walkthrough is below, showing each method step by step.
How to Add the Developer Tab in Word: Step-by-Step
Adding the Developer tab takes 5 quick steps inside the Word Options menu. The tab stays enabled until you turn it off — you only need to do this once per machine.
Step 1: Open the File Menu
Open Microsoft Word, then click the File tab in the top-left corner of the ribbon.

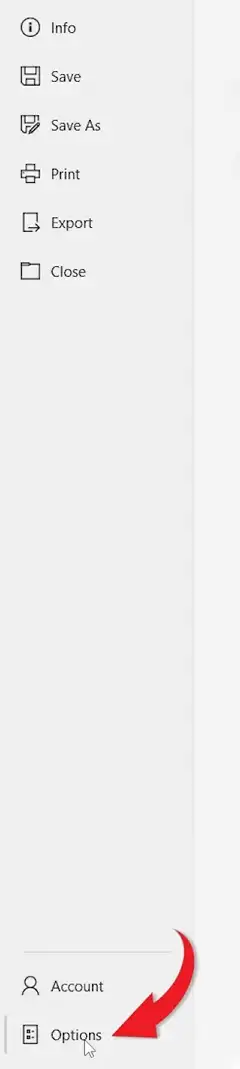
Step 2: Open Word Options
In the File menu sidebar, click Options at the bottom-left. The Word Options window opens.
Step 3: Click Customize Ribbon
In the Word Options window, click Customize Ribbon in the left-hand sidebar. The right panel shows all available tabs.
Step 4: Tick the Developer Checkbox
In the right-side panel under Main Tabs, scroll down until you see Developer. Tick the checkbox next to it.
Step 5: Click OK
Click OK to save the change and close the Word Options window.

👉 The Developer tab now appears in the ribbon between View and Help. That’s it — no restart, no menus, no further setup.
What You Can Do After You Add the Developer Tab in Word
Once you add the developer tab in Word, four groups of tools become available.
Controls Group
The Controls group includes clickable checkboxes, combo boxes, date pickers, drop-down lists, and rich text content controls. These are the building blocks of any interactive Word document.
Code Group
The Code group gives you access to macro recording, the Visual Basic editor, and add-in management. Use this for automating repetitive tasks or running custom scripts.
XML Mapping Tools
The XML Mapping pane lets you link content controls to XML data sources. Useful for advanced document automation and data integration.
Protect Group
The Protect group includes Restrict Editing and Block Authors — essential when distributing forms or templates you don’t want recipients to modify.
Why Add the Developer Tab in Word?
The Developer tab is worth enabling if you build any of the following:
- Business forms — application forms, feedback forms, HR templates
- Surveys and questionnaires with drop-downs and checkboxes
- Reusable document templates with locked fields
- Automated workflows using macros
- Interactive documents for training, onboarding, or assessment
How to Hide the Developer Tab in Word
If you no longer need the Developer tab, hiding it takes 3 steps:
- Go to File > Options > Customize Ribbon
- Untick the Developer checkbox under Main Tabs
- Click OK
The tab disappears immediately. Re-enabling it later takes the same steps as adding it in the first place.
Common Problems When Adding the Developer Tab in Word
Developer Tab Doesn’t Appear After Clicking OK
Confirm the Developer checkbox is actually ticked under Main Tabs (not under “All Tabs” or another list). If it is ticked and the tab still doesn’t show, close Word completely and reopen it.
Developer Checkbox is Greyed Out
The Customize Ribbon settings may be locked by your IT administrator. This is common on corporate or school computers. Contact your IT team or use a personal device.
Macros Are Blocked After Enabling Developer Tab
Macros require separate permission. Go to File > Options > Trust Center > Trust Center Settings > Macro Settings and select your preferred macro security level. Use “Disable all macros with notification” for a safe default.
Developer Tab Missing on Word for Mac
On Mac, the path is slightly different. Go to Word > Preferences > Ribbon & Toolbar, then tick Developer under Main Tabs and click Save.
Pro Tips for Using the Developer Tab in Word
- Use content controls (not legacy form fields) for new documents — they’re better supported across Word versions
- Save fillable documents as .dotx templates so the form structure stays intact
- Test macros on a copy of the document first — undo doesn’t always work on macro-driven changes
- Protect your form with Restrict Editing before sharing — and once you’ve built one, see the guide on how to create a fillable form in Microsoft Word for the full workflow
FAQs
How do I add the developer tab in Word?
To add the developer tab in Word, go to File > Options > Customize Ribbon, tick the Developer checkbox under Main Tabs, and click OK. The tab appears immediately in the ribbon between View and Help.
Where is the Developer tab in Word?
The Developer tab is hidden by default. Once enabled through Word Options > Customize Ribbon, it appears in the ribbon between View and Help.
Why can’t I see the Developer tab in Word?
Microsoft hides the Developer tab by default because its tools are aimed at advanced users. You need to enable it through File > Options > Customize Ribbon before it appears.
What is the Developer tab used for in Word?
The Developer tab is used for building fillable forms, inserting clickable checkboxes, recording macros, accessing the VBA editor, and using content controls for structured documents.
Can I add checkboxes using the Developer tab?
Yes. The Developer tab includes clickable checkbox controls under the Controls group. These are interactive — users can click to tick and untick them inside the document.
Is the Developer tab available in all versions of Word?
Yes for all desktop versions — Word 2016, 2019, 2021, and Microsoft 365 all include the Developer tab. Word Online (the browser version) does not have it.
How do I add the developer tab in Word on Mac?
On Mac, go to Word > Preferences > Ribbon & Toolbar, tick Developer under Main Tabs, and click Save. The path differs from Windows but the result is the same.
How do I remove the Developer tab in Word?
Go to File > Options > Customize Ribbon, untick the Developer checkbox, and click OK. The tab disappears immediately and can be re-enabled the same way.
Conclusion
Now that you know how to add the developer tab in Word in 5 easy steps — opening File, opening Options, clicking Customize Ribbon, ticking the Developer checkbox, and clicking OK — you have access to the advanced tools Microsoft hides from the default ribbon.
The Developer tab unlocks form controls, macros, content controls, and the VBA editor — all the tools needed to build interactive, automated, and professional Word documents. Once enabled, the natural next step is to add a clickable checkbox in Word using the controls you’ve just unlocked.
Related Tutorials
- How to Create a Fillable Form in Microsoft Word
- How to Add a Clickable Checkbox in Word
- Microsoft Word Keyboard Shortcuts Cheat Sheet

Recent Microsoft Word Tutorials

Looking for more help with Microsoft Word? Browse all step-by-step Word tutorials covering formatting, layout, pages, and document setup.
👉 View all Microsoft Word tutorials: https://wordmadeeasy.org/microsoft-word/
👉 Need more support – check out the official guidance: https://support.microsoft.com/en-au

Prefer watching instead of reading? Many Word tutorials are also available as short, step-by-step videos on the Word Made Easy YouTube channel.


Leave a Reply