When working in Microsoft Word, you may want to place text over an image or soften an image so it doesn’t overpower the content on the page. Unfortunately, Word does not include a simple “make image transparent” button for pictures inserted directly into a document.
The good news is that there is a reliable workaround.
In this guide, you’ll learn how to make an image transparent in Microsoft Word using shapes and picture fill. This method works in modern desktop versions of Word and gives you full control over transparency levels.
Why Make an Image Transparent in Word?
Making an image transparent is useful when:
- Placing text over an image
- Creating watermarks or background graphics
- Designing worksheets, posters, or handouts
- Softening images so text remains readable
- Creating professional-looking layouts
Transparency allows images to support your content without distracting from it.
Can You Make Images Transparent Directly in Word?
Not exactly.
Microsoft Word does not currently allow you to adjust transparency on a standard inserted picture. If you click an image and look through the Picture Format tab, you won’t find a true transparency slider.
Instead, Word requires you to place the image inside a shape. This unlocks the transparency controls we need — and if you want to go further with shaped images, you can also learn how to insert a picture into a shape in Word to crop photos into circles, stars, and other designs.
How to Make an Image Transparent in Microsoft Word (Step-by-Step)
Follow these steps carefully. Once you’ve done it once, the process becomes very quick.
Watch the Video Tutorial
If you prefer to see this in action, the full video walkthrough is below, showing each method step by step.
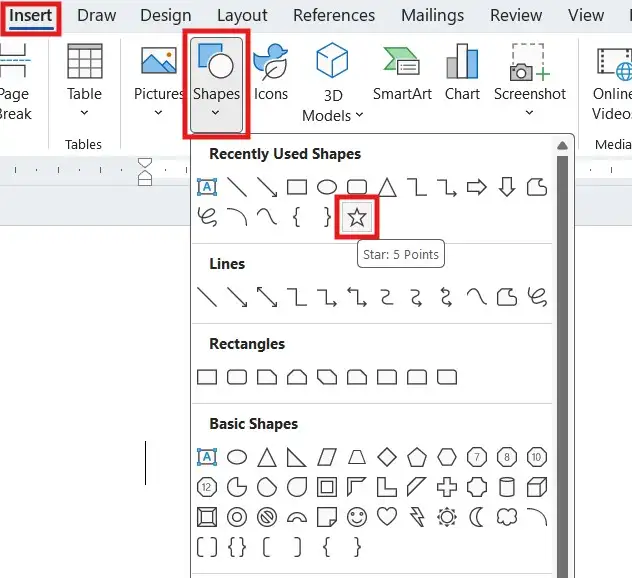
Step 1: Insert a Shape
- Click Insert in the top menu
- Select Shapes
- Choose a shape of your choosing
- Draw the shape across the area where you want the image
The size doesn’t need to be perfect—you can adjust it later. If you find the shape is locked in place alongside your text, see the guide on how to move an image freely in Word to unlock full positioning control.
Step 2: Open the Format Shape Panel
- Click the shape so the sizing handles appear
- Right-click the shape
- Select Format Shape
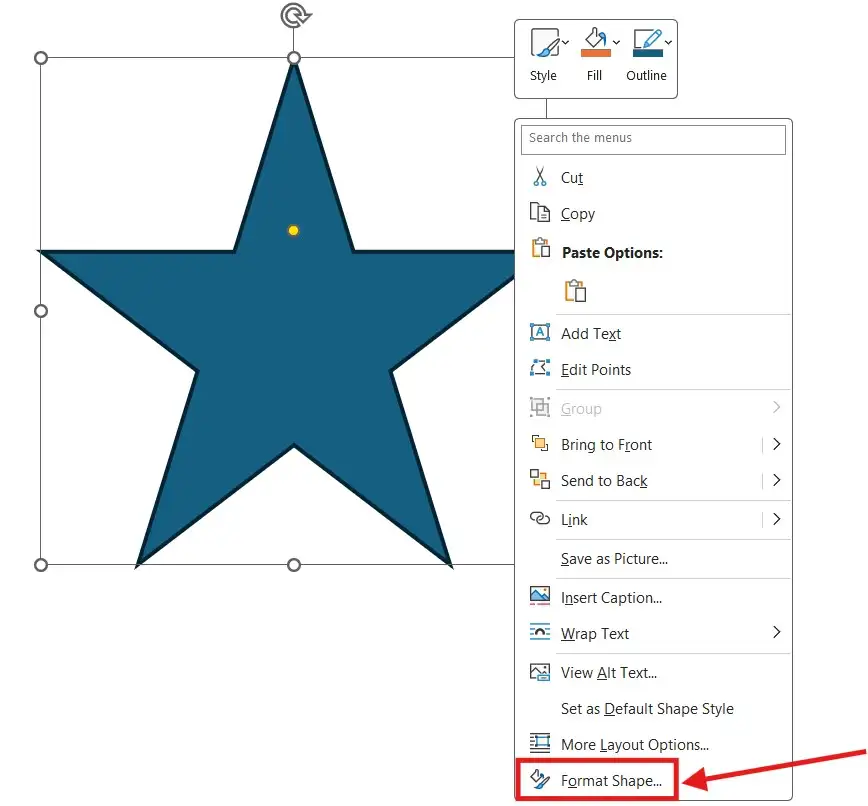
The Format Shape panel will open on the right-hand side of Word.
Step 3: Insert the Image Into the Shape
- In the Format Shape panel, click Fill
- Select Picture or texture fill
- Scroll down to Picture source
- Click Insert
- Choose From a File
- Select the image you want to make transparent
- Click Insert
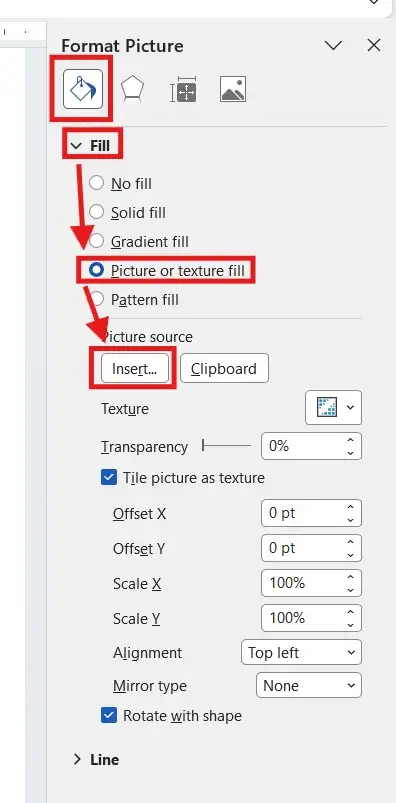
Your image will now appear inside the shape.
Adjusting the Transparency Level
With the image still selected:
- Stay in the Fill section of the Format Shape panel
- Find the Transparency slider
- Drag the slider left or right until the image looks right
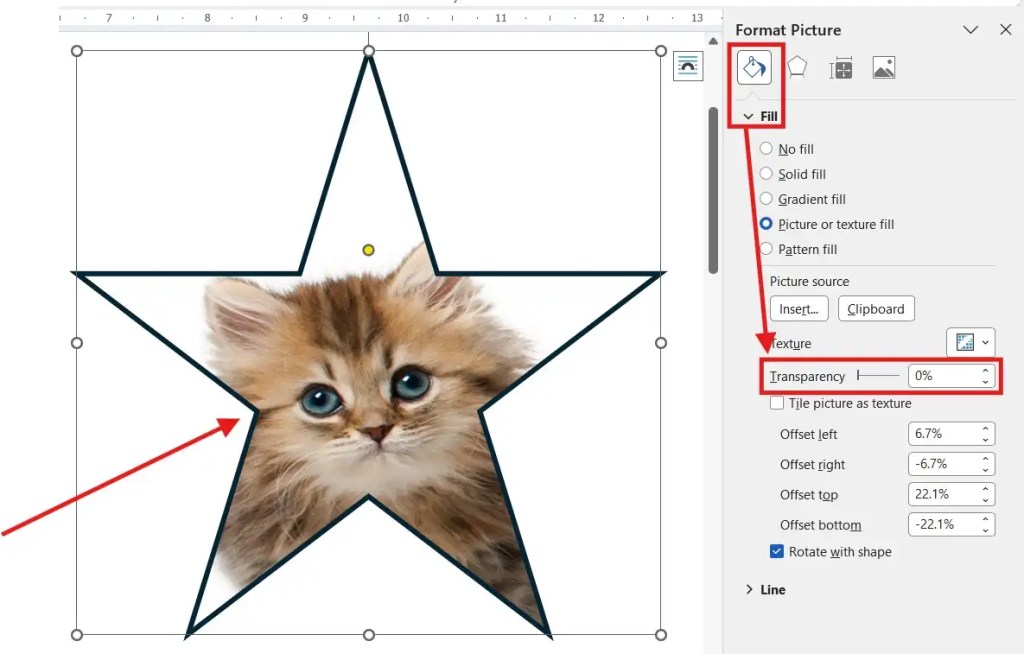

You can fine-tune the transparency depending on how visible you want the image to be.
Removing the Border Around the Image
By default, Word adds a border around the shape.
To remove it:
- In the Format Shape panel, click Line
- Select No line

The border disappears, leaving only the transparent image.
Adding Text Over a Transparent Image
Once the image is transparent, you can place text over it easily. For a full walkthrough of both methods for overlaying text, see the guide on how to add text over an image in Microsoft Word.
You can either:
- Insert a Text Box and place it on top
- Or double click inside the shape and type directly (if appropriate)

This is ideal for headings, quotes, or background designs.
Common Mistakes to Avoid
- Inserting the image directly instead of using a shape
- Forgetting to remove the shape’s border
- Making the image too transparent so it becomes unclear
- Trying to adjust transparency from the Picture Format tab (it won’t work)
If transparency controls aren’t visible, double-check that the image is inside a shape.
FAQs
Can I make any image transparent in Word?
Yes. As long as the image is placed inside a shape using picture fill, you can adjust transparency.
Does this work in all versions of Word?
This works in most modern desktop versions of Microsoft Word. Some older versions may have limited options.
Can I adjust transparency later?
Yes. You can reopen the Format Shape panel at any time and change the transparency level.
Will the transparent image print correctly?
Yes. The transparency is preserved when printing or exporting to PDF.
Can I use this for watermarks?
Yes. This method works well for creating custom watermark-style images.
Can I layer multiple transparent images?
Yes. You can stack shapes and control their order using Bring Forward and Send Backward.
Conclusion
Although Microsoft Word doesn’t offer a direct transparency tool for images, using shapes with picture fill provides a reliable and flexible solution.
Once you understand the process, you can quickly create transparent images for backgrounds, overlays, and professional document layouts. This method works consistently and gives you full control over how your images appear.
Related Tutorials
- How to Add Text Over an Image in Microsoft Word
- How to Move an Image Freely in Word
- How to Insert a Picture into a Shape in Word

Recent Microsoft Word Tutorials

Looking for more help with Microsoft Word? Browse all step-by-step Word tutorials covering formatting, layout, pages, and document setup.
👉 View all Microsoft Word tutorials: https://wordmadeeasy.org/microsoft-word/
👉 Need more support – check out the official guidance: https://support.microsoft.com/en-au

Prefer watching instead of reading? Many Word tutorials are also available as short, step-by-step videos on the Word Made Easy YouTube channel.


Leave a Reply