Double line spacing is one of the most common formatting requirements. It is needed in school, university, and professional documents. Yet many users still waste time hunting through menus to set it up — just like with indenting text in Word, which is another formatting step that trips people up unnecessarily.
In this quick guide, I’ll show you three fast and reliable ways to apply double line spacing in Microsoft Word. These techniques work on Windows versions of Word and take seconds once you know where to look.
Before You Start: Select Your Text
Before applying double spacing, you need text to format.
- Highlight the text you want to change
- Or press Ctrl + A to select everything in your document
Once your text is selected, you’re ready to apply double line spacing.
Watch the Video Tutorial
If you prefer to see this in action, the full video walkthrough is below, showing each method step by step.
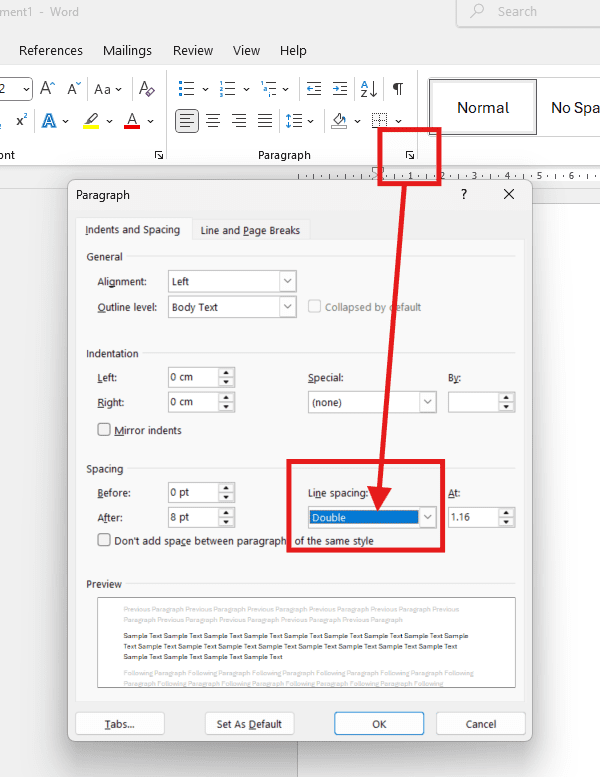
Method 1: Use Paragraph Settings (Most Precise)
This method gives you the most control and is ideal for formal documents.
- Select your text (Ctrl + A)
- Go to the Home tab
- Click the small arrow in the Paragraph section
- Find Line spacing
- Select Double
- Click OK
This ensures your spacing is applied cleanly and consistently across the document — and for best results, combine it with properly set margins in Word to get a fully polished layout.
Method 2: Use the Keyboard Shortcut (Fastest)
If speed matters, this is the method you should be using.
- Select your text (Ctrl + A)
- Press Ctrl + 2
That’s it. Word instantly switches your document to double line spacing.
No menus. No clicks. No wasted time.
Method 3: Use the Line Spacing Button (Most Visual)
This choice is useful if you prefer clicking over shortcuts.
- Select your text (Ctrl + A)
- Go to the Home tab
- Click the Line and Paragraph Spacing icon (two arrows: one up, one down)
- Choose 2.0

This is especially helpful for beginners who want a clear visual confirmation.
Which Method Should You Use?
- Writing essays or reports? Use Paragraph Settings
- Working fast? Use Ctrl + 2
- Teaching or demonstrating? Use the Line Spacing button
All three techniques achieve the same result — the difference is speed and precision.
Summary: How to Apply Double Line Spacing in Microsoft Word
Double line spacing is a common formatting need in academic and professional writing, yet it often causes unnecessary confusion. This guide outlines three quick and effective ways to apply double line spacing in Word:
- Paragraph Settings – Ideal for formal documents where you want precise formatting control.
- Keyboard Shortcut (Ctrl + 2) – The fastest method for experienced users who want instant results.
- Line Spacing Button – A visual, beginner-friendly approach using the toolbar in the Home tab.
Before applying any method, simply select your text or press Ctrl + A to select all content. Each technique achieves the same result — the choice depends on your preference for speed, precision, or ease of use. Once your spacing is set, aligning your text in Word is the natural next step for a clean, professional finish.
Related Tutorials
- How to Indent Text in Microsoft Word
- How to Adjust Margins in Word
- How to Align Text in Microsoft Word

Recent Microsoft Word Tutorials

Looking for more help with Microsoft Word? Browse all step-by-step Word tutorials covering formatting, layout, pages, and document setup.
👉 View all Microsoft Word tutorials: https://wordmadeeasy.org/microsoft-word/
👉 Need more support – check out the official guidance: https://support.microsoft.com/en-au

Prefer watching instead of reading? Many Word tutorials are also available as short, step-by-step videos on the Word Made Easy YouTube channel.


Leave a Reply