When working in Microsoft Word, formatting plays a key role in making your documents look professional and visually appealing.
One classic formatting feature is the drop cap a large decorative letter at the beginning of a paragraph, commonly seen in books, magazines, and reports.
In this guide, you’ll learn how to add, customize, and remove a drop cap in Word.
What Is a Drop Cap?
A drop cap is a formatting style where the first letter of a paragraph is enlarged and extends down across multiple lines.
It is often used to:
- Add a professional, editorial look
- Highlight the beginning of a section
- Improve visual appeal in long documents
Watch the Video Tutorial
If you prefer to see this in action, the full video walkthrough is below, showing each method step by step.
How to Add a Drop Cap in Word
Adding a drop cap is quick and easy.
Steps:
- Select the paragraph (or just the first letter)
- Go to the Insert tab
- Click Drop Cap
- Select Dropped
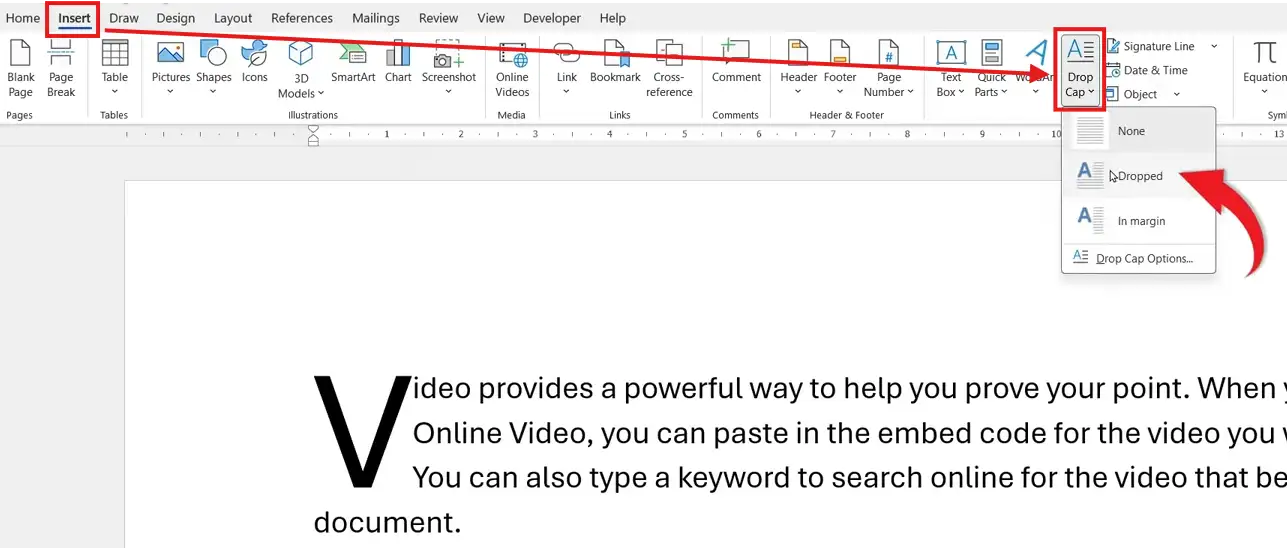
👉 The first letter will now become larger and extend down across multiple lines of text.
Customize Your Drop Cap
You can adjust the appearance of your drop cap to match your document style.
To customize:
- Click on the drop cap letter
- Go to Insert → Drop Cap → Drop Cap Options
From here, you can change:
- Position (Dropped or In margin)
- Font (e.g., heading styles or custom fonts) — and if you want your drop cap to match your document’s default font, see the guide on how to change the default font in Microsoft Word.
- Lines to drop (how tall the letter appears)
- Distance from text (spacing between letter and paragraph)

👉 For example, increasing the number of lines makes the drop cap more prominent.
How to Remove a Drop Cap
If you no longer want a drop cap, removing it is simple.
Steps:
- Click inside the paragraph or select the drop cap letter
- Go to Insert → Drop Cap
- Select None

👉 The text will return to its normal formatting instantly.
When to Use Drop Caps
Drop caps are best used in:
- Articles and blog posts
- Reports and presentations
- Books and eBooks
- Newsletters and magazines
They help draw attention to the start of content and create a polished, structured look — and if you are formatting a report or academic document, you may also want to check the guide on how to use double line spacing in Microsoft Word.
Pro Tips for Using Drop Caps Effectively
- Use them sparingly typically only at the start of sections
- Match the font with your document style
- Avoid overly large drop caps in short paragraphs
- Adjust spacing for better readability — and for equally clean results throughout your document, it is also worth learning how to align text in Microsoft Word.
FAQs
Can I apply a drop cap to any letter?
Yes, but it’s typically used for the first letter of a paragraph.
What is the difference between “Dropped” and “In Margin”?
- Dropped: sits within the paragraph
- In Margin: appears in the left margin area
Why isn’t my drop cap working?
Make sure your text is formatted as a paragraph and not inside certain elements like text boxes.
Can I change the drop cap font?
Yes, use Drop Cap Options to select any font you like.
Do drop caps work in all versions of Word?
Yes, most modern versions of Microsoft Word support drop caps.
Conclusion
Adding a drop cap in Microsoft Word is a simple way to elevate the design of your document.
With just a few clicks, you can create a professional, publication-style layout. And with customization options, you can tailor the drop cap to perfectly match your content.
Use it thoughtfully, and it can make your documents stand out instantly.
Related Tutorials
- How to Change the Default Font in Microsoft Word
- How to Align Text in Microsoft Word
- How to Use Double Line Spacing in Microsoft Word

Recent Microsoft Word Tutorials

Looking for more help with Microsoft Word? Browse all step-by-step Word tutorials covering formatting, layout, pages, and document setup.
👉 View all Microsoft Word tutorials: https://wordmadeeasy.org/microsoft-word/
👉 Need more support – check out the official guidance: https://support.microsoft.com/en-au

Prefer watching instead of reading? Many Word tutorials are also available as short, step-by-step videos on the Word Made Easy YouTube channel.


Leave a Reply