
If you want to learn how to remove formatting marks in Word, this guide covers the 5 easy methods. Knowing how to remove formatting marks in Word lets you clear distracting paragraph symbols, tab arrows, and section break indicators from your document — making it easier to focus on writing without losing the underlying structure. You’ll learn how to remove formatting marks in Word using the Show/Hide button, Word Options, keyboard shortcuts, and direct deletion.
When working in Microsoft Word, formatting marks can sometimes make your document look cluttered and hard to read. These hidden symbols include paragraph marks, tab arrows, section breaks, and other layout indicators that show up only on screen — never in print.
Why Formatting Marks Appear in Word
Before you learn how to remove formatting marks in Word, it helps to understand what they are. Formatting marks (also called paragraph marks or pilcrows) are non-printing characters that show how your document is structured. They include:
- Paragraph symbols (¶)
- Tab arrows (→)
- Space dots (·)
- Page breaks
- Section breaks
- Object anchors

They’re useful when troubleshooting layout issues — for example, section breaks are essential when you need to rotate one page in Word without changing the rest of the document. But they feel distracting when you simply want to focus on writing.
Watch the Video Tutorial
If you prefer to see this in action, the full video walkthrough is below, showing each method step by step.
Method 1: Use the Show/Hide Button to Remove Formatting Marks in Word
The most common reason formatting marks appear is the Show/Hide feature. This is the fastest way to remove formatting marks in Word.
- Go to the Home tab
- Locate the backward P symbol (¶) in the Paragraph group
- Click it once to toggle off
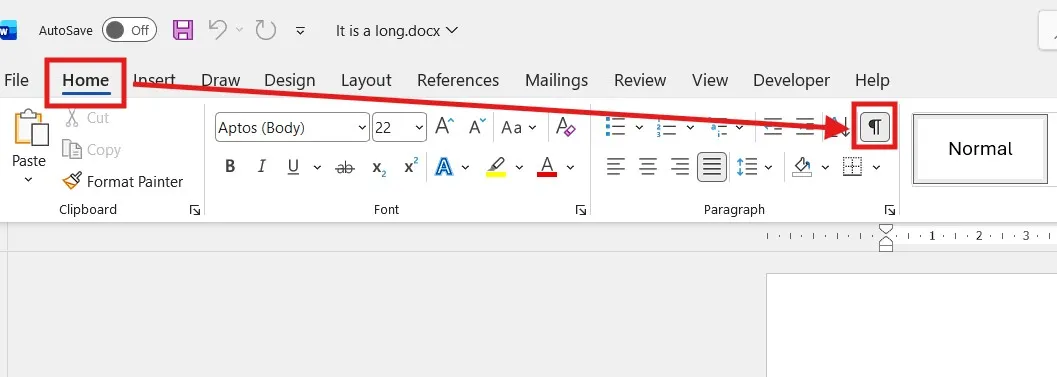
The backward P symbol is called the Show/Hide button. Once toggled off, all visible formatting marks disappear from your document. If they remain visible, continue to Method 2 — Word Options is forcing them on.
Method 2: Remove Formatting Marks in Word Options
If the Show/Hide button doesn’t work, formatting marks are forced on in Word’s display settings. Here’s how to permanently remove formatting marks in Word from those settings:
- Click File
- Select Options
- Click Display
- Under “Always show these formatting marks on the screen”
- Untick any boxes that are selected (Tab characters, Spaces, Paragraph marks, Hidden text, Optional hyphens, Object anchors)
- Click OK

If formatting marks are still visible after this, make sure the Show/Hide (¶) button on the Home tab is also turned off. Once both settings are disabled, the symbols won’t appear again.
Method 3: Use the Keyboard Shortcut
The fastest way to remove formatting marks in Word is with a keyboard shortcut. This is also a common reason why formatting marks suddenly appear — users press the shortcut by accident.
Press Ctrl + Shift + 8
This toggles all formatting marks on and off instantly. If your document suddenly looks cluttered, this shortcut is usually the cause — press it once to clear the marks.
On Mac: Cmd + 8
Method 4: Remove Section Breaks Permanently
If your goal is not just to hide formatting marks but to permanently remove section breaks (which are a type of formatting mark), you can delete them directly:
- Turn on Show/Hide (¶) so you can see the section break
- Scroll until you find the section break
- Place your cursor directly before it
- Press Delete

The section break is removed and your document layout adjusts accordingly.
⚠️ Be careful when removing section breaks — they can affect page orientation, headers, and formatting. If a section break is causing a blank page to appear, see the guide on how to delete an empty page in Microsoft Word.
Method 5: Remove Page Breaks
Page breaks are another type of formatting mark you can permanently remove in Word.
- Turn on Show/Hide (¶)
- Locate the page break line
- Click directly before it
- Press Delete

The extra page disappears immediately.
How to Remove Extra Paragraph Marks in Word
Sometimes you don’t want to hide formatting marks — you want to delete extra paragraph marks (¶) that are creating unwanted spacing in your document.
- Turn on Show/Hide (¶) to see the extra paragraph marks
- Click directly before each extra ¶ symbol
- Press Delete
For documents with many extra paragraph marks, use Find and Replace:
- Press Ctrl + H to open Find and Replace
- In “Find what” type ^p^p (two paragraph marks)
- In “Replace with” type ^p (one paragraph mark)
- Click Replace All
This replaces every double paragraph mark with a single one — a quick way to clean up documents that have been badly formatted with multiple Enter presses.
FAQs
How do I remove formatting marks in Word?
The fastest way to remove formatting marks in Word is to press Ctrl + Shift + 8, or click the Show/Hide (¶) button in the Home tab Paragraph group. This toggles all formatting marks off instantly.
How do I remove paragraph marks in Word?
To hide paragraph marks (¶), click the Show/Hide button in the Home tab. To permanently delete extra paragraph marks, turn on Show/Hide first, then position your cursor before each ¶ and press Delete. Use Find and Replace (Ctrl + H) with ^p^p → ^p to remove duplicates in bulk.
How do I hide formatting marks in Word permanently?
Go to File → Options → Display, then untick all boxes under “Always show these formatting marks on the screen”. Click OK. This stops formatting marks from appearing automatically in any document.
How do I view a document in Word with no formatting marks?
Press Ctrl + Shift + 8 to toggle formatting marks off, or click the Show/Hide (¶) button in the Home tab. The document will display cleanly without any non-printing characters.
What is the paragraph symbol in Word?
The paragraph symbol (¶), also called a pilcrow, represents the end of a paragraph. It shows where you pressed Enter and helps reveal the structure and spacing of your document.
Why can’t I turn off formatting marks in Word?
Formatting marks may be force-enabled in Word Options under Display settings. Even if you toggle the Show/Hide button off, ticked boxes in File → Options → Display will keep specific marks visible. Untick them all to fully remove formatting marks.
Do formatting marks print in Word?
No. Formatting marks are non-printing characters and never appear in your printed document or exported PDF. They only show on screen as a visual aid for editing.
What happens if I delete a section break?
Deleting a section break may change page layout, margins, headers, or orientation — this is especially relevant if you have set up different footers on different pages, as removing a section break will merge those sections together. Review your document carefully after removing one.
Conclusion
Now that you know how to remove formatting marks in Word in 5 easy methods — using the Show/Hide button, adjusting Word Options, the Ctrl + Shift + 8 shortcut, deleting section breaks, and removing page breaks — you can clear distracting symbols from any Word document in seconds.
For most situations, the keyboard shortcut (Ctrl + Shift + 8) is the fastest. If formatting marks keep coming back, adjust them permanently in Word Options. And if you need to delete section breaks or extra paragraph marks specifically, use Show/Hide first to find them.
Understanding how to manage formatting marks keeps your workspace clean while preserving your document structure underneath.
Related Tutorials
- How to Delete an Empty Page in Microsoft Word
- Different Footers on Different Pages
- Rotate One Page in Word
Word Tutorials
Recent Microsoft Word Tutorials
Browse the complete collection for help with formatting, layout, pages, tables, images, and document setup.
For Microsoft support documentation, visit the official Microsoft guidance.
Leave a Reply