If you want to learn how to create a table of contents in Word, this guide shows you the exact steps. Knowing how to create a table of contents in Word instantly makes your document look more professional and easier to navigate. In just a few seconds, you’ll learn how to create a table of contents in Word using your headings — no manual formatting required.
Why Your Headings Aren’t Working (Yet)
Simply typing headings into your document isn’t enough.
Even if your text looks like headings to you, Word doesn’t recognize them unless you apply proper styles.
This means:
- You won’t be able to learn how to create a table of contents in Word automatically
- Word can’t track or update your sections automatically
To fix this and learn how to create a table of contents in Word, you need to use Word’s built-in heading styles.
Watch the Video Tutorial
If you prefer to see this in action, the full video walkthrough is below, showing each method step by step.
How to Create a Table of Contents in Word: Step-by-Step
Step 1: Apply Heading Styles in Word
Before you learn how to create a table of contents in Word, you must format your headings correctly.

How to apply heading styles:
- Go to the Home tab
- Locate the Styles panel
- Highlight your main headings (e.g., Introduction, Heading 2, etc.)
- Click Heading 1
- Highlight subheadings (e.g., 3.1, 4.1, etc.)
- Click Heading 2
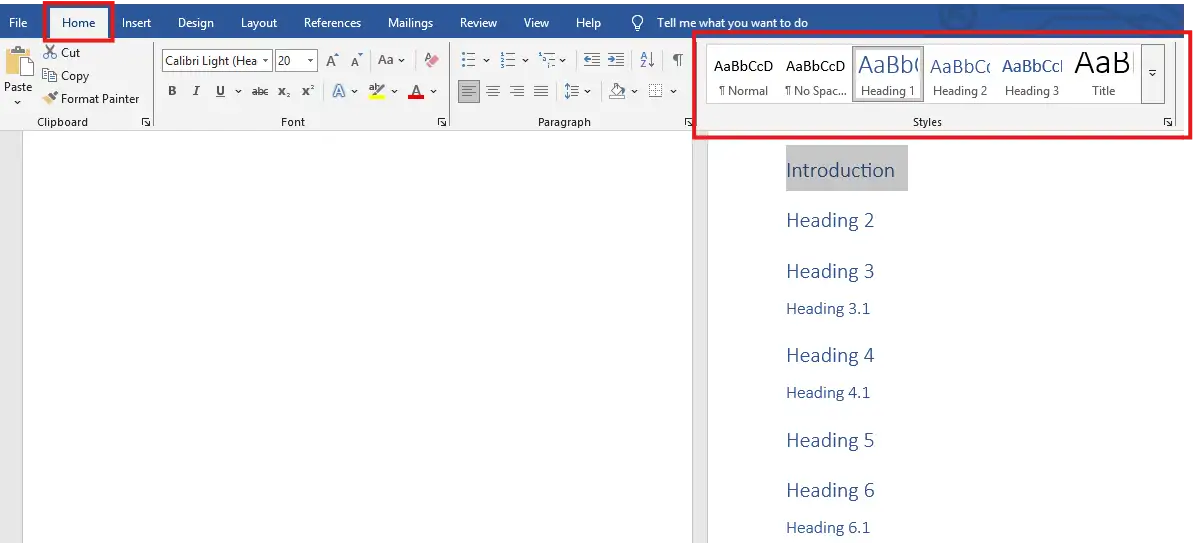
👉 Use:
- Heading 1 = Main sections
- Heading 2 = Subsections
Once applied, Word now understands your document structure — and if you want each heading to start on its own page automatically, see the guide on how to create automatic chapters in Microsoft Word.
Step 2: Insert an Automatic Table of Contents in Word
Now that your headings are styled, here is how to create a table of contents in Word instantly.
Steps:
- Place your cursor where you want the table of contents
- Go to the References tab
- Click Table of Contents
- Select Automatic Table 1 (or Automatic Table 2)
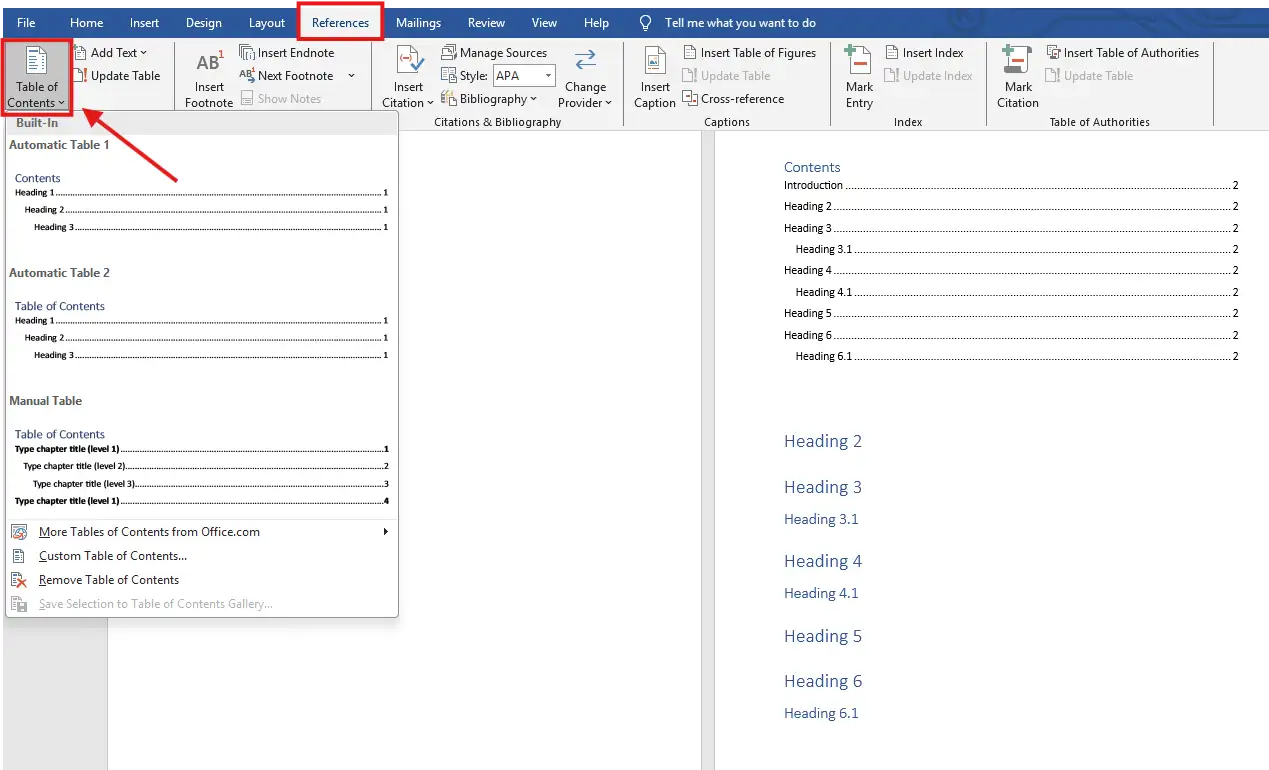
👉 Word will automatically:
- Pull in all your headings
- Add page numbers — and if your document needs different numbering formats in different sections, such as Roman numerals for front matter, see the guide on how to insert different page numbers in Microsoft Word.
- Create clickable navigation links
You can hold Ctrl and click any entry to jump directly to that section.
Step 3: Update Your Table of Contents in Word
Once you know how to create a table of contents in Word, you may need to update it as you edit your document.
For example:
- Headings move to different pages
- You rename sections
- You delete or add headings
To update your table:
- Click anywhere inside the table of contents
- Click Update Table
- Choose one option:
- Update page numbers only (quick fix)
- Update entire table (recommended)
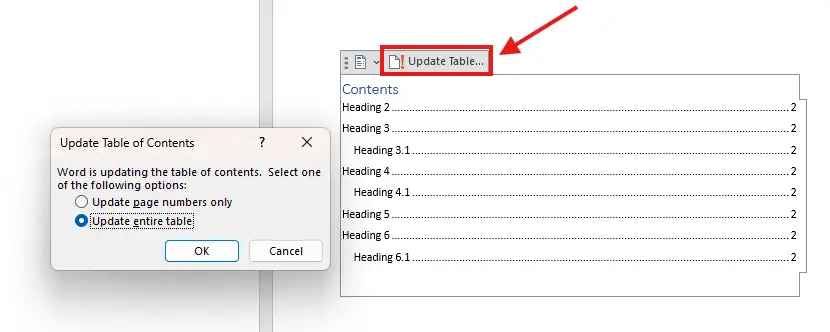
👉 Always choose Update entire table if you’ve changed headings or structure.
Step 4: Editing Headings After Creating the TOC
You can still modify your document after you learn how to create a table of contents in Word.
Example:
- Rename a heading (e.g., change “Heading 6” to “Conclusion”)
- Remove a subheading
If formatting is lost:
- Highlight the updated heading
- Reapply the correct style (Heading 1 or Heading 2)
Then:
- Go back to your table of contents
- Click Update Table → Update entire table
Your TOC will instantly reflect the changes.
Benefits of an Automatic Table of Contents in Word
Once you learn how to create a table of contents in Word, the automatic version gives you:
- ✅ Instant navigation for long documents
- ✅ Automatic page number updates
- ✅ Professional formatting
- ✅ Clickable links for digital documents
- ✅ Easy editing and maintenance
Pro Tips for Better Results
Follow these tips on how to create a table of contents in Word to get cleaner, more reliable results:
- Always apply styles before creating your TOC
- Stick to a consistent heading hierarchy
- Use Heading 1, 2, and 3 for deeper structure
- Update your table before finalizing your document — and once it is complete, you may also want to learn how to password protect a Word document before sharing it.
- Keep your headings short and clear
Common Mistakes When Creating a Table of Contents in Word
Many beginners run into the same issues when they first learn how to create a table of contents in Word. Avoid these mistakes to save yourself time and frustration.
Mistake 1: Using bold text instead of heading styles
Bold text looks like a heading, but Word doesn’t treat it as one. If you only bold your section titles, your table of contents will be empty. Always apply Heading 1 or Heading 2 from the Styles panel — that is the only way Word recognises a heading.
Mistake 2: Forgetting to update the table
If you add new sections, rename headings, or rearrange content, your table of contents will be out of date. Word does not refresh it automatically. Click inside the table and select Update Table whenever you make structural changes.
Mistake 3: Mixing manual and automatic entries
If you manually type entries into your table of contents, the next update will overwrite them. Stick with automatic entries generated from heading styles for a reliable, professional result.
Mistake 4: Using too many heading levels
Just because Word offers Heading 1 through Heading 9 doesn’t mean you should use them all. For most documents, Heading 1 and Heading 2 are enough. Adding too many levels makes your table of contents cluttered and hard to scan.
When to Use a Table of Contents in Word
Not every document needs a table of contents. Knowing when to add one keeps your work clear and professional rather than cluttered.
A table of contents in Word is most useful for documents over five pages with multiple sections. Common examples include dissertations, business reports, training manuals, e-books, and company policies. For short letters, single-page memos, or simple emails, a table of contents would be unnecessary and distracting.
If you’re producing a document for printing, the table of contents helps readers find sections quickly. For digital documents shared as PDFs, the clickable links make navigation even easier — readers can jump to any section instantly.
A good rule of thumb: if your document has three or more major sections that someone might want to skip to directly, you should include a table of contents in Word.
FAQs
Why isn’t my table of contents showing all headings?
You likely haven’t applied heading styles. Word only includes properly styled headings.
Can I customize my table of contents in Word?
Yes. You can modify formatting, levels, and appearance from the Table of Contents options.
Do table of contents links work in PDFs?
Yes—if you export your document correctly, the links remain clickable.
What happens if I don’t update the table?
Your page numbers and headings may become incorrect or outdated.
Can I remove a heading from the table of contents?
Yes. Either remove its heading style or adjust TOC settings to exclude certain levels.
Conclusion
Learning how to create a table of contents in Word is one of the fastest ways to improve document structure and usability.
By simply applying heading styles and using the built-in TOC feature, anyone who knows how to create a table of contents in Word can generate a fully interactive and automatically updating navigation system in seconds.
Once you get used to it, you’ll never go back to manual tables again.
Whether you’re working on a thesis, business report, manual, or long document, knowing how to create a table of contents in Word saves time and makes your content easier to navigate. Once you’ve used heading styles a few times, the process becomes second nature — and your documents will look polished and professional every time.
Related Tutorials
- How to Create Automatic Chapters in Microsoft Word
- How to Insert Different Page Numbers in Microsoft Word
- How to Password Protect a Word Document

Recent Microsoft Word Tutorials

Looking for more help with Microsoft Word? Browse all step-by-step Word tutorials covering formatting, layout, pages, and document setup.
👉 View all Microsoft Word tutorials: https://wordmadeeasy.org/microsoft-word/
👉 Need more support – check out the official guidance: https://support.microsoft.com/en-au

Prefer watching instead of reading? Many Word tutorials are also available as short, step-by-step videos on the Word Made Easy YouTube channel.


Leave a Reply