Knowing how to add a background in Word turns a plain white page into something that looks designed — perfect for certificates, flyers, branded reports, and any document where the visual matters as much as the words.
In this guide, you’ll learn three reliable methods to add a background in Microsoft Word — the quick Page Color option, the cleaner header-based approach, and the fully customisable shapes method that gives you proper transparency control. To take the image side further, pair this with the guide on how to make an image transparent in Word.
Why Add a Background in Word?
A background isn’t decoration for its own sake — it sets tone, reinforces brand, and lifts a document out of the generic Word default. The trick is choosing the right method so the background supports the text rather than fighting it.
Backgrounds earn their place in:
- Certificates, awards, and diplomas
- Flyers, invitations, and event posters
- Branded reports and client deliverables
- Stationery, letterheads, and proposal covers
- Watermarked drafts and confidential documents
Watch the Video Tutorial
If you prefer to see this in action, the full video walkthrough is below, showing each method step by step.
How to Add a Background in Word: Step-by-Step
There are three reliable routes to a Word background, and the right one depends on what you’re building. Page Color is fastest for solid colours and basic textures, the header method gives you cleaner image placement, and the shapes method unlocks transparency so your text stays readable.
Method 1: How to Add a Background in Word Using Page Color
This is the quickest route — two clicks for a solid colour, four for an image fill. Best for simple jobs where you don’t need precise transparency control.
Steps:
- Go to the Design tab
- Click Page Color
- Pick a colour from the palette
- For custom shades, click More Colors

👉 To use an image instead of a solid colour, click Page Color and choose Fill Effects at the bottom of the menu.

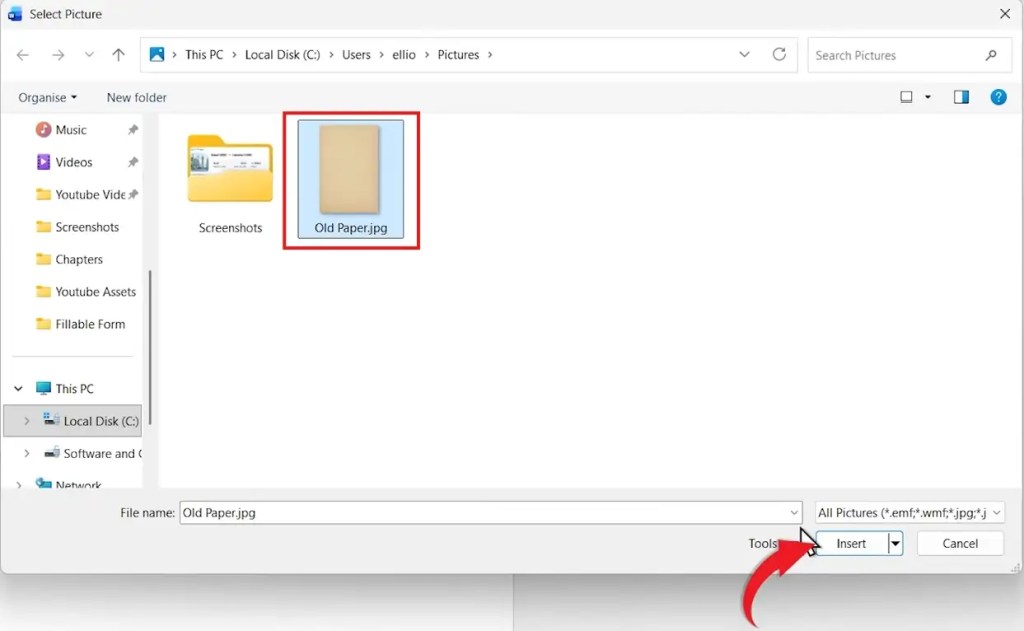
- Open the Picture tab
- Click Select Picture
- Choose your image and click OK
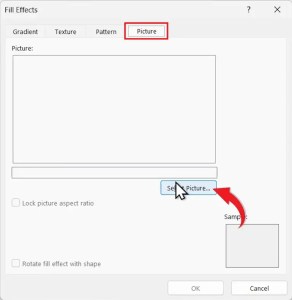
👉 The background applies to every page in the document. The downside: there’s no transparency slider, so any image you pick fills the page at full opacity — readable text becomes a problem fast unless the image is already faded.
Method 2: How to Add a Background in Word Using the Header
This method places the image inside the document header, which puts it on every page automatically and lets you position, resize, and layer it behind the text more precisely than Page Color allows.
Steps:
- Double-click the top of the page to open the header area
- Go to Insert → Pictures and choose your image source

- Select your image and click Insert

- Click the image, then choose Wrap Text → Behind Text
- Use Position → Center to align it, then drag the corner handles to fill the page
- Press Esc to close the header

👉 Because the image lives in the header, it repeats on every page automatically — and because it sits behind text, you can edit body copy without disturbing it. The trade-off: transparency is still limited unless your image is pre-faded.
Method 3: How to Add a Background in Word Using Shapes
This is the professional route. Shapes give you proper transparency control, so you can fade an image to whatever opacity keeps your text readable — essential for serious documents.
Steps:
- Go to Insert → Shapes
- Choose the Rectangle
- Draw it across the full page
- Open the Shape Format tab
- Click Shape Outline → No Outline
- Click Shape Fill → Picture, then insert your image
- Right-click the shape and choose Format Shape
- Adjust the Transparency slider until your text reads cleanly
- Set Wrap Text → Behind Text

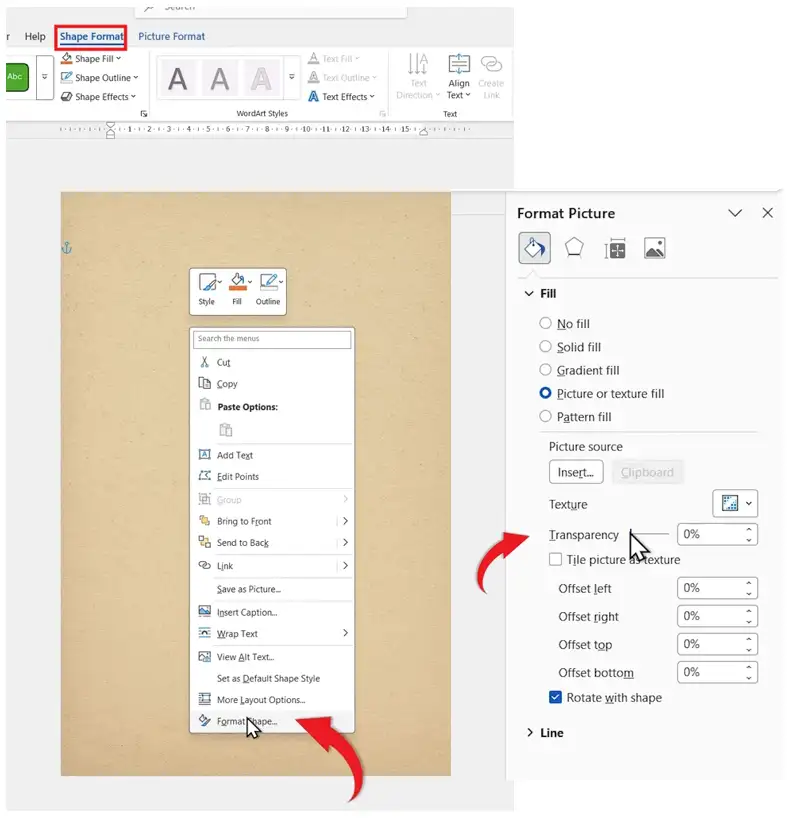
👉 Transparency between 60% and 80% usually hits the sweet spot — visible enough to read as a background, faded enough that body text stays sharp. For a deep dive on transparency itself, see the guide on how to make an image transparent in Word.
Which Method Should You Use?
| Method | Best For | Transparency Control |
|---|---|---|
| Page Color | Solid colours or quick texture fills | None |
| Header image | Clean full-page images that repeat per page | Limited |
| Shapes | Professional documents needing readable text | Full |
Common Problems When Adding a Background in Word
The background makes text unreadable
Page Color and header methods don’t offer transparency. Switch to the shapes method (Method 3) and drop transparency to 70-80% — the image stays visible, the text becomes legible again.
The background colour won’t print
Word disables background printing by default to save ink. Go to File → Options → Display and tick Print background colors and images, then send to print again.
The background image looks stretched or distorted
This happens when the image aspect ratio doesn’t match A4 or Letter dimensions. Use an image that’s at least 2480 × 3508 pixels (A4 at 300 DPI) or crop it to portrait orientation before inserting.
The background only shows on the first page
If you used the header method and the document has section breaks, each section has its own independent header. Open each section’s header and either insert the image again, or unlink from the previous section to inherit it. See how to put different footers on each page in Word for how section break headers behave.
Pro Tips
- Use light, low-contrast images for backgrounds — busy photos compete with body text and make documents look amateur
- For brand work, stick to a single colour or subtle texture rather than a full image — it reads more professionally
- Always print a test page before running a large job — screen colours rarely match printed output exactly
- For text-heavy documents with image backgrounds, consider a watermark instead — it’s lighter, repeats per page automatically, and never blocks text. See how to add a watermark in Word for the full method
FAQs
Can I add a background image in Word?
Yes. You can add a background in Word three ways — using Design → Page Color → Fill Effects, by inserting an image into the document header, or by drawing a shape and filling it with a picture for full transparency control.
Why is my background image hard to read text over?
The Page Color and header methods don’t allow transparency control. Use the shapes method (Method 3) to adjust transparency to 70-80% so your text stays sharp over the image.
Do Word backgrounds print?
Yes, but only if you enable it. Go to File → Options → Display and tick Print background colors and images. Without this setting, backgrounds show on screen but vanish on the printed page.
Which method is best for transparency?
The shapes method (Method 3) is the only option that offers a full transparency slider. Page Color and header images both apply at 100% opacity.
Can I use different backgrounds on each page?
Yes, but it requires section breaks. Insert a section break between pages, unlink the headers, then add a different image to each section’s header. The same principle applies to footers — see how to put different footers on each page in Word.
How do I remove a background in Word?
Go to Design → Page Color → No Color to remove a Page Color background. For header or shape backgrounds, open the header or click the shape and press Delete.
What image size should I use for a Word background?
For A4 documents, use an image at least 2480 × 3508 pixels (300 DPI). For Letter size, use 2550 × 3300 pixels. Anything smaller will pixelate when stretched to fill the page.
Conclusion
Knowing how to add a background in Word opens up a much wider range of document types — certificates, flyers, branded reports, anything that benefits from looking designed rather than typed.
Page Color for speed, headers for clean image placement, shapes for full transparency control — pick the method that fits the job and pair it with how to add a watermark in Word for the lightest possible background option when text readability matters most.
Related Tutorials
- How to Make an Image Transparent in Word
- How to Add a Watermark in Word
- How to Put Different Footers on Each Page in Word

Recent Microsoft Word Tutorials

Looking for more help with Microsoft Word? Browse all step-by-step Word tutorials covering formatting, layout, pages, and document setup.
👉 View all Microsoft Word tutorials: https://wordmadeeasy.org/microsoft-word/
👉 Need more support – check out the official guidance: https://support.microsoft.com/en-au

Prefer watching instead of reading? Many Word tutorials are also available as short, step-by-step videos on the Word Made Easy YouTube channel.


Leave a Reply