
Learning how to hide the Ribbon in Word is one of those quiet productivity wins — collapse the toolbar, gain about 15% more vertical screen space, and the document you’re actually working on becomes the whole view. The Ribbon holds every command Word offers (Home, Insert, Layout, References, and the rest), but most of the time you only need it for a few seconds before going back to typing. Hiding it gets it out of the way and brings it back on demand. It pairs naturally with other workspace tweaks like switching off dark mode.
In this guide, you’ll learn four ways to hide the Ribbon in Word — the right-click trick, the Ctrl + F1 shortcut, how to peek at it temporarily while it’s collapsed, and how to pin it back permanently when you need every tool on screen.
What Is the Ribbon in Word?
The Ribbon is the wide command bar that runs across the top of every Microsoft Word window. It groups every tool into tabs, and each tab swaps in a different set of controls — fonts and paragraph formatting on Home, tables and pictures on Insert, margins and orientation on Layout. It’s the same control surface you’d use to adjust page margins or change paper size.
The standard tabs you’ll see are:
- File — open, save, print, account settings
- Home — fonts, paragraphs, styles
- Insert — tables, pictures, links, headers
- Design — themes, page colour, watermarks
- Layout — margins, orientation, size, columns
- References — table of contents, footnotes, citations
- View — zoom, layout modes, focus mode
Watch the Video Tutorial
If you prefer to see this in action, the full video walkthrough is below, showing each method step by step.
How to Hide the Ribbon in Word: Step-by-Step
There are four ways to hide the Ribbon in Word — the right-click menu, the keyboard shortcut, the temporary peek (when it’s already collapsed), and the permanent pin to bring it back for good. Each method below covers one stage in full.
Method 1: How to Hide the Ribbon in Word Using Right-Click
This is the most discoverable method — no shortcut to remember, no menu to dig through. Just right-click anywhere on the Ribbon itself and pick the option from the context menu.
- Right-click anywhere on the Ribbon — directly on a button, a group label, or empty space between groups.
- Select Collapse the Ribbon from the context menu that appears.

👉 Result: The Ribbon collapses immediately. Only the tab labels (Home, Insert, Layout, and so on) stay visible at the top of the window.
Method 2: How to Hide the Ribbon in Word With the Ctrl + F1 Shortcut
If you toggle the Ribbon often, the keyboard shortcut is the fastest method by a long way — no menus, no clicks, just one keystroke that works as both hide and show.
- With Word open, press Ctrl + F1 to collapse the Ribbon.
- Press Ctrl + F1 again to bring it back.
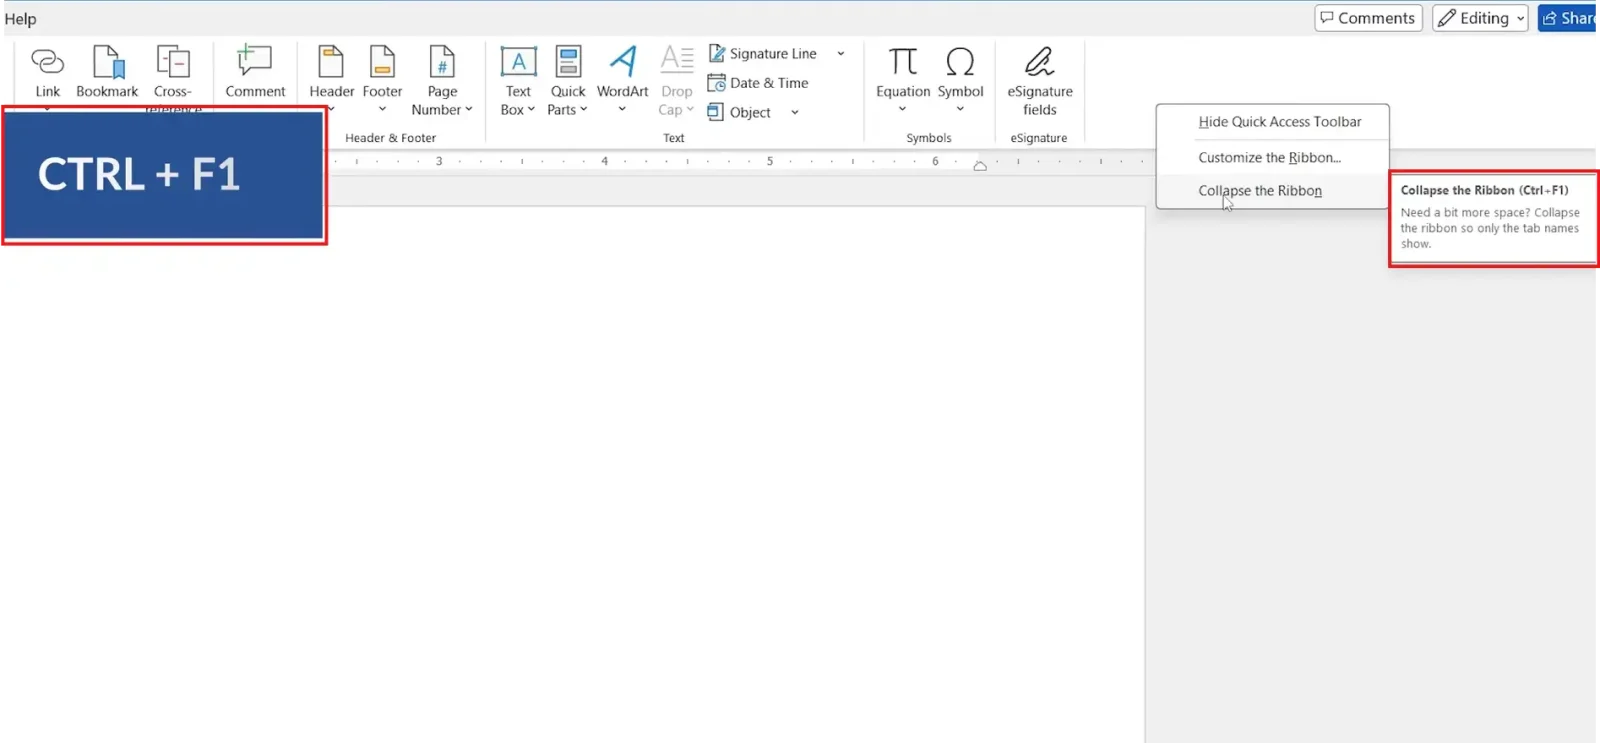
👉 Result: The Ribbon toggles between hidden and visible with each press. This is the same shortcut Word has used for over a decade, so it works in every modern version.
Method 3: How to Hide the Ribbon in Word and Still Access It Temporarily
Hiding the Ribbon doesn’t lock you out of it. When it’s collapsed, a single tab click brings it back just long enough to use one tool — then it disappears again the moment you click into the document.
- With the Ribbon collapsed, click any tab name (Home, Insert, Layout, etc.) at the top of the window.
- The full Ribbon appears temporarily. Use whatever tool you need.
- Click back into your document. The Ribbon collapses again automatically.
[SCREENSHOT NEEDED #1 — filename: word-ribbon-temporary-show-by-clicking-tab.webp | alt: Microsoft Word with collapsed Ribbon expanded temporarily by clicking the Home tab to hide the Ribbon in Word workflow.]
👉 Result: You get the screen space of a hidden Ribbon and on-demand access to every tool without committing to either state.
Method 4: How to Hide the Ribbon in Word and Pin It Back Permanently
When you need the Ribbon back for good — say you’re formatting a complex document and reaching for tools every few seconds — unpin the auto-collapse and Word will keep it visible until you actively hide it again.
- Click any tab to bring the collapsed Ribbon into view temporarily.
- Right-click any empty space on the now-visible Ribbon.
- Click Collapse the Ribbon in the context menu to remove the tick next to it.
[SCREENSHOT NEEDED #2 — filename: word-uncheck-collapse-the-ribbon-pin-permanently.webp | alt: Microsoft Word right-click menu with Collapse the Ribbon unchecked to pin the Ribbon permanently visible in Word.]
👉 Result: The Ribbon stays pinned in place. It won’t disappear when you click into the document, and it survives closing and reopening Word.
Which Method Should You Use?
| Method | Best For | Time Needed |
|---|---|---|
| Method 1 — Right-click | One-off hiding when you don’t remember the shortcut | 5 seconds |
| Method 2 — Ctrl + F1 shortcut | Frequent toggling between writing and editing modes | 1 keystroke |
| Method 3 — Temporary peek | Quick tool access without un-hiding the Ribbon | 2 seconds |
| Method 4 — Pin permanently | Complex editing where you need every tool always visible | 10 seconds |
Most people end up using a combination — Ctrl + F1 for fast toggling, the temporary peek for one-off tool access, and the permanent pin only when working on document-heavy projects.
Common Problems When Hiding the Ribbon in Word
The Ribbon keeps disappearing after every click
That’s the auto-collapse setting in action — the Ribbon is set to show temporarily and then hide again. To stop it, follow Method 4: bring the Ribbon up, right-click it, and untick Collapse the Ribbon. It’ll stay put after that.
Ctrl + F1 doesn’t do anything
On most laptops, function keys default to brightness, volume, or media controls. Hold the Fn key while pressing Ctrl + F1, or toggle the function-key behaviour in your laptop’s BIOS or keyboard settings.
Can’t find the “Collapse the Ribbon” option
You’re likely right-clicking on the wrong area. Make sure you’re clicking directly on the Ribbon itself — on a button, an icon, or empty space inside the Ribbon — not on the title bar, the document, or below the Ribbon.
The Ribbon is completely gone, including the tabs
That’s Auto-hide mode, not the collapsed state. Click the small icon in the top-right corner of the Word window (the Ribbon Display Options button) and choose Show Tabs and Commands to bring everything back at once.
Pro Tips for Better Workspace Management
- Pair a hidden Ribbon with Focus mode (View > Focus) for distraction-free writing — strips out everything except the page.
- Keep the Ribbon pinned when working with images, tables, and headers — you’ll save more time than you lose by reaching for tools constantly.
- On small laptop screens (13″ and under), hiding the Ribbon recovers enough vertical space to see roughly two extra lines of text — meaningful when you’re scrolling through long documents.
- Combine a hidden Ribbon with other clean-up moves like turning off formatting marks to get the cleanest possible writing view.
FAQs
How do I hide the Ribbon in Word?
To hide the Ribbon in Word, right-click anywhere on the Ribbon and select Collapse the Ribbon, or press Ctrl + F1. The Ribbon disappears and only the tab labels remain visible.
What is the shortcut to hide the Ribbon in Word?
The shortcut to hide and show the Ribbon in Word is Ctrl + F1. The same shortcut toggles the Ribbon back into view.
Why does the Ribbon disappear automatically in Word?
The Ribbon disappears automatically because the auto-collapse setting is enabled. Right-click the Ribbon and untick Collapse the Ribbon to keep it permanently visible.
Can I keep the Ribbon permanently visible in Word?
Yes. Click any tab to bring the Ribbon up, right-click an empty area on the Ribbon, and untick Collapse the Ribbon. The Ribbon will stay pinned in place across sessions.
How do I show the Ribbon in Word after hiding it?
Press Ctrl + F1, or click any tab name and then right-click the Ribbon and untick Collapse the Ribbon to bring it back permanently.
What’s the difference between collapsed and auto-hidden Ribbon?
Collapsed shows the tab labels but hides the commands underneath. Auto-hide removes the entire Ribbon including the tabs, giving you a full-screen view. Use the Ribbon Display Options button in the top-right to switch modes.
Does hiding the Ribbon affect printing or saving documents?
No. Hiding the Ribbon is a display setting only — it doesn’t affect document content, formatting, printing, or saving. All keyboard shortcuts (including Ctrl + S and Ctrl + P) continue to work normally.
Conclusion
Four ways to hide the Ribbon in Word, four use cases — right-click for discoverability, Ctrl + F1 for speed, the temporary peek for one-off access, and the permanent pin for editing-heavy work. Once you know all four, you can tune Word’s interface to match whatever you’re doing in the moment.
For a cleaner writing environment overall, pair a collapsed Ribbon with a few other tweaks — start with how to remove formatting marks in Word to strip out the last of the visual noise.
Related Tutorials
- How to Remove Formatting Marks in Word
- How to Turn Off Dark Mode in Word
- Microsoft Word Keyboard Shortcuts Cheat Sheet
Word Tutorials
Recent Microsoft Word Tutorials
Browse the complete collection for help with formatting, layout, pages, tables, images, and document setup.
For Microsoft support documentation, visit the official Microsoft guidance.
Leave a Reply