
Learning how to change font size in Word is the foundation of every well-formatted document — it controls readability, hierarchy, and how professional the final page looks before anyone reads a single word.
In this guide, you’ll learn four reliable methods — the ribbon, keyboard shortcuts, custom sizes beyond the preset list, and how to lock in a new default. If you also want to change the typeface itself, pair this with the guide on how to change the default font in Word.
Why Font Size Matters in Word
Font size isn’t just a styling choice — it’s the single biggest lever you have over how a document reads on screen and on the page. Too small and the reader strains; too big and the layout breaks. The right size sits in the middle and disappears.
Getting it right affects:
- Readability on screens and printed pages
- Visual hierarchy between headings, body text, and captions
- Professional appearance in reports, CVs, and proposals
- Accessibility for readers with low vision
- Page count and print layout for long documents
Watch the Video Tutorial
If you prefer to see this in action, the full video walkthrough is below, showing each method step by step.
How to Change Font Size in Word: Step-by-Step
Word offers four ways to control font size, and each fits a different workflow. The ribbon is the most visual, shortcuts are the fastest, custom sizes unlock anything outside the preset list, and the default setting saves you from resetting every new document.
Method 1: How to Change Font Size in Word Using the Ribbon
This is the default method and works identically across every modern version of Word — Microsoft 365, Word 2021, Word 2019, and Word Online.
Steps:
- Select the text you want to resize — click and drag, or press Ctrl + A to select the whole document
- Go to the Home tab
- Find the Font Size box in the Font group
- Click the dropdown arrow and pick a size from the preset list
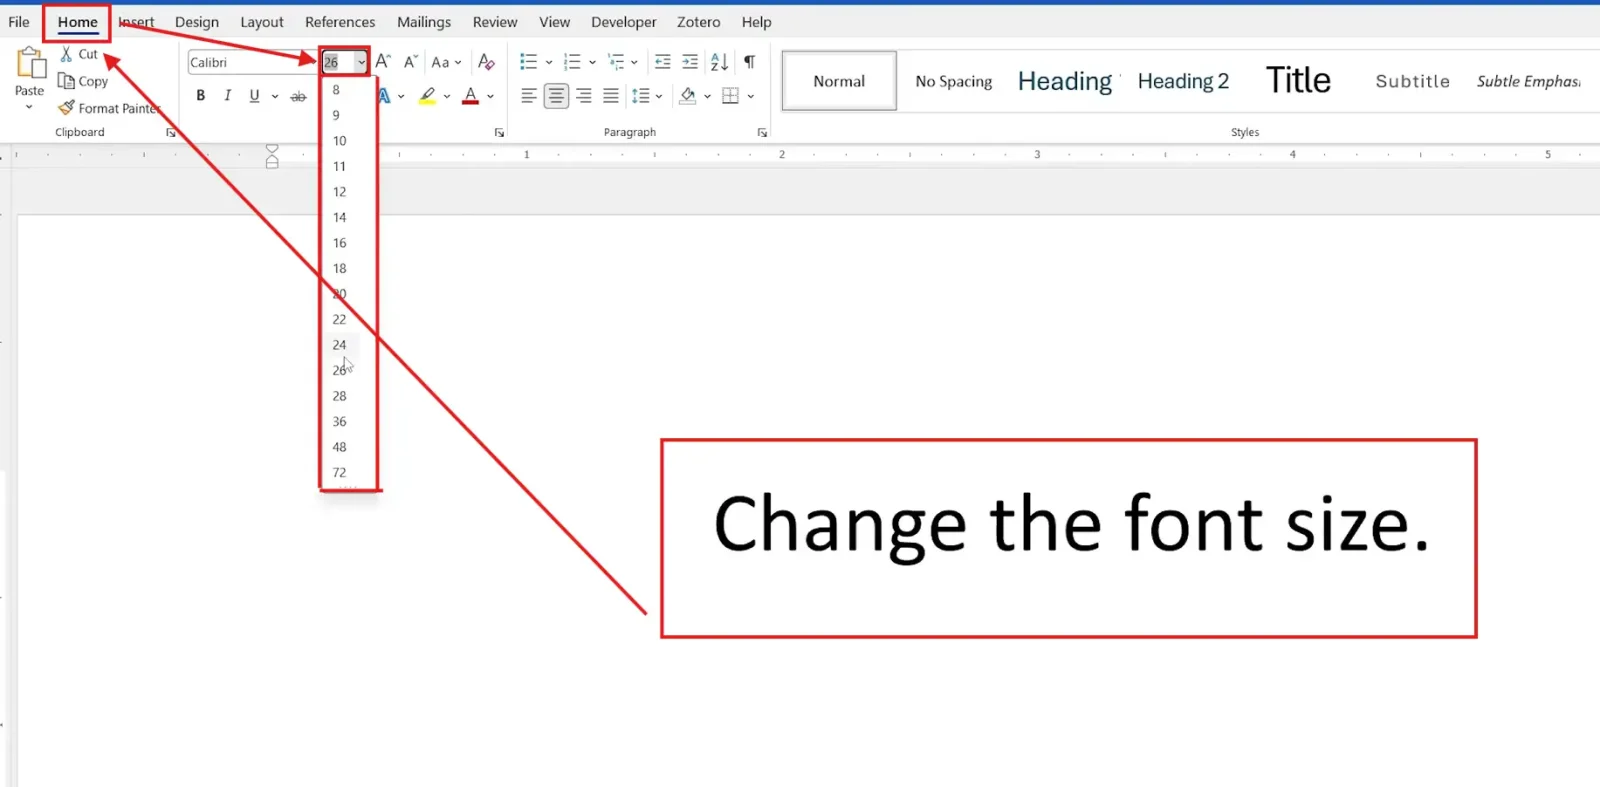
👉 The preset list runs from 8 pt up to 72 pt. Most modern Word documents default to 11 pt or 12 pt for body text — 11 pt is the Microsoft 365 standard, 12 pt is the older Word 2007 default still used in most academic and legal templates.
Method 2: How to Change Font Size in Word Using Keyboard Shortcuts
If you resize text often, the keyboard shortcuts are dramatically faster than reaching for the mouse. Word has two pairs — one for incremental changes, one for single-point precision.
Increase font size:
- Ctrl + Shift + > — jumps up to the next preset size
- Ctrl + ] — increases by exactly 1 point
Decrease font size:
- Ctrl + Shift + < — drops down to the previous preset size
- Ctrl + [ — decreases by exactly 1 point
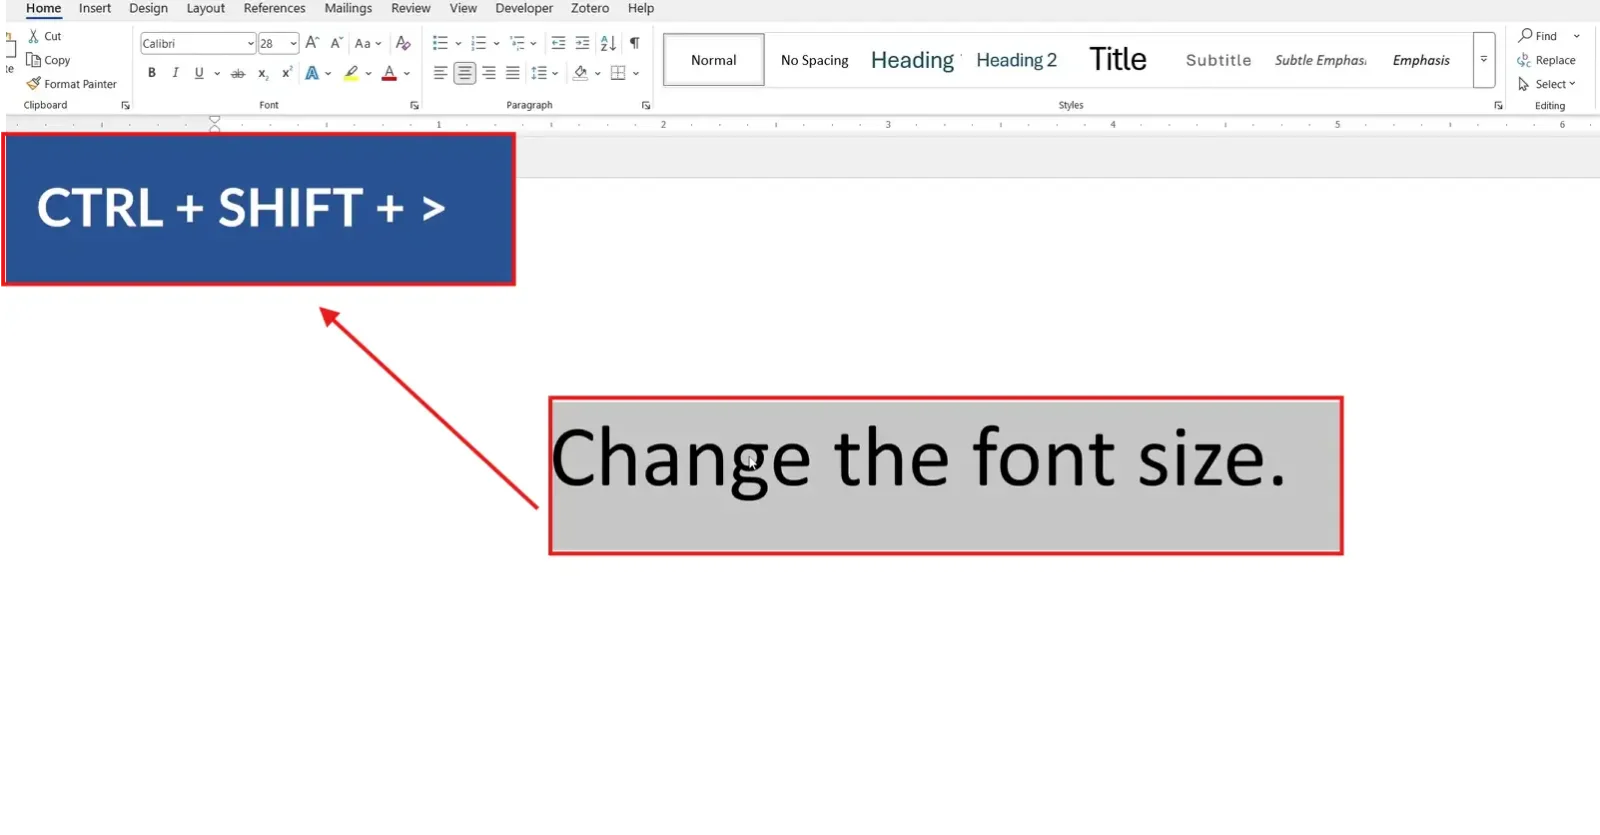
👉 Use the bracket shortcuts (Ctrl + ] and Ctrl + [) when you need to nudge a heading or caption by a single point — handy for matching an existing house style without retyping the size.
The Home tab also has two visual buttons that mirror the preset-jump shortcuts — a large A (Grow Font) and a small A (Shrink Font) in the Font group. Both behave identically to Ctrl + Shift + > and Ctrl + Shift + <.
Method 3: How to Change Font Size in Word Using Custom Sizes
The preset dropdown caps at 72 pt and skips half-points, but you’re not actually limited to either. Word accepts any size from 1 pt to 1638 pt in 0.5-point increments.
Steps:
- Select the text you want to resize
- Click directly inside the Font Size box
- Delete the current number
- Type your custom size — for example, 100, 9.5, or 250
- Press Enter
👉 Custom sizes unlock everything the preset list doesn’t — half-point sizes like 10.5 pt for tight CVs, oversized 200 pt+ text for posters and banners, and tiny 6 pt text for footnotes or legal disclaimers.
Method 4: How to Change Font Size in Word as the Default
If you always reset to the same size, set it as the default once and Word will use it for every new document going forward. This change writes to the Normal template, so it sticks across restarts.
Steps:
- Open the Font dialog box — press Ctrl + D, or click the small arrow in the bottom-right of the Font group
- Choose your preferred font size from the Size list
- Click Set As Default at the bottom-left
- Choose All documents based on the Normal template
- Click OK
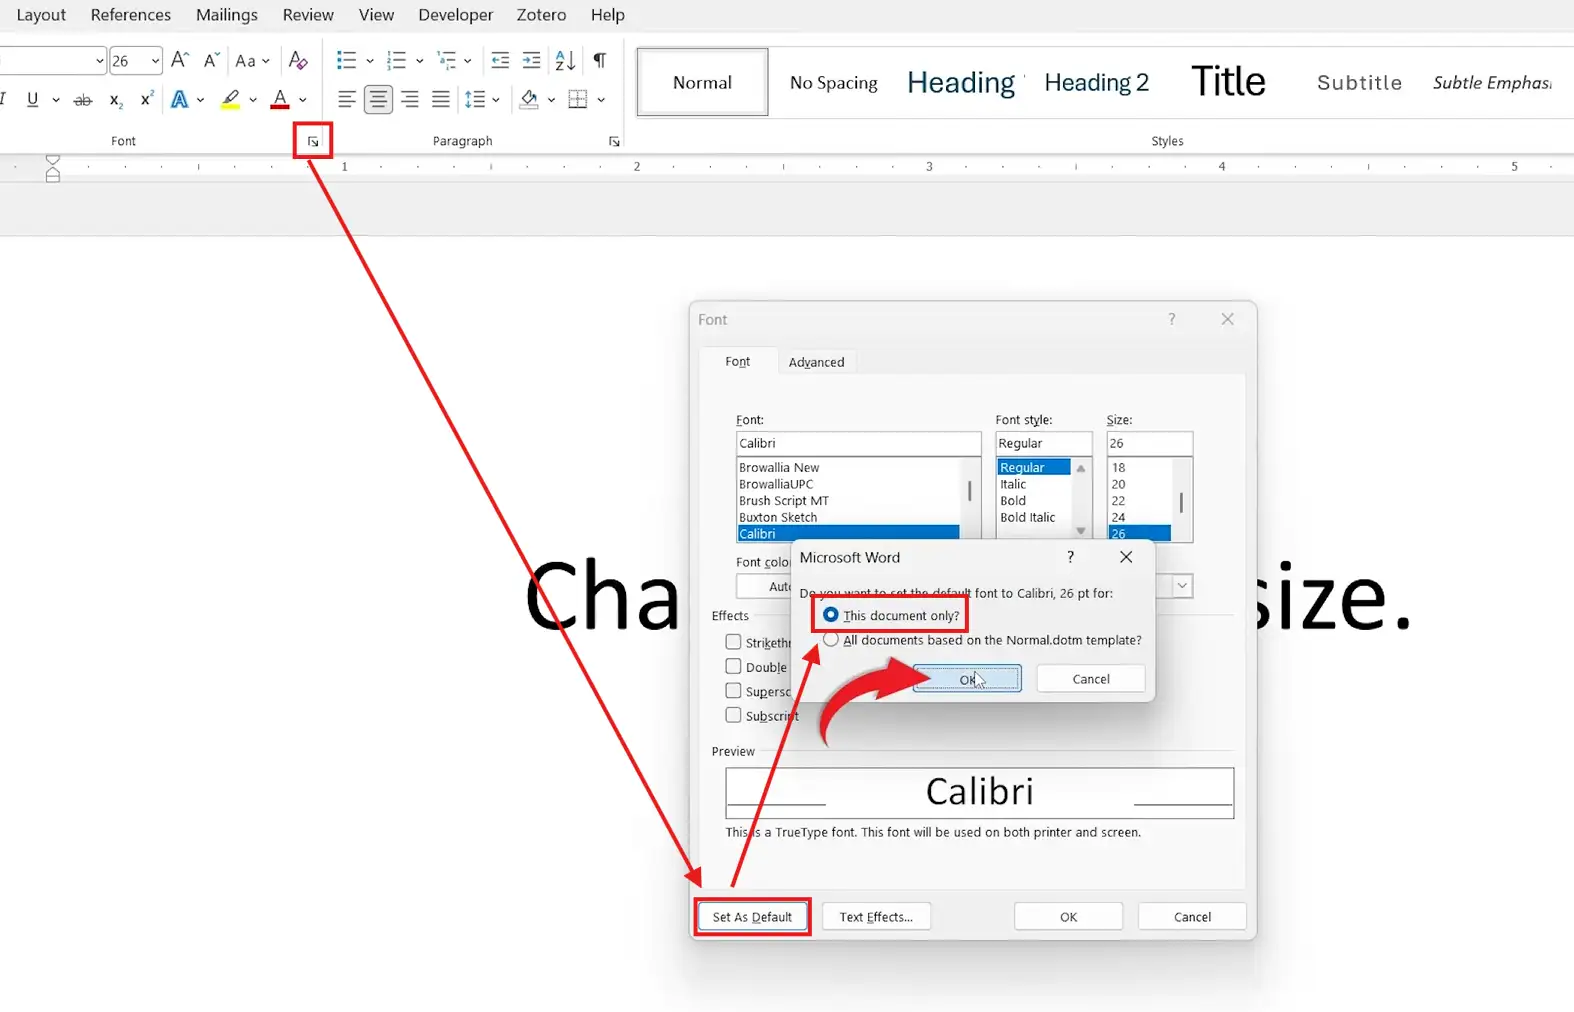
👉 The two scope options matter. This document only changes the current file. All documents based on the Normal template updates the master template so every blank document you open from now on uses the new size.
Which Method Should You Use?
| Method | Best For | Speed |
|---|---|---|
| Ribbon dropdown | Picking a preset size visually | Medium |
| Keyboard shortcuts | Fast resizing while editing | Fastest |
| Custom sizes | Half-points or sizes above 72 pt | Medium |
| Set As Default | Locking a size for all new documents | One-time setup |
Common Problems When Changing Font Size in Word
The font size won’t change
Nine times out of ten this means no text is selected. The font size box only applies to highlighted text — click into the document, drag-select your text, then change the size.
Text sizes look inconsistent across the document
Different paragraph styles carry their own font sizes — Heading 1 might be 16 pt while Normal sits at 11 pt. To fix it document-wide, edit the style itself rather than changing each paragraph manually.
The font size resets when I start a new paragraph
The active style is overriding your manual change. Either update the style to your preferred size, or set the new size as default for the document via the Font dialog (Method 4).
Set As Default doesn’t save across documents
Word needs write access to the Normal.dotm template file. If you’re on a managed work device, the template may be locked — contact IT, or save your preferred size as a custom template via File → Save As → Word Template instead.
Pro Tips
- Use 11 pt or 12 pt for body text — anything smaller strains the eye on screen, anything larger reads as informal
- Headings should sit 2-4 points above body text to create clear hierarchy without shouting
- For CVs and one-page documents, drop body text to 10.5 pt with custom sizing to fit more content without sacrificing readability
- Combine font size with line spacing for cleaner layouts — see the guide on how to change line spacing in Word for the full treatment
FAQs
How do I change font size in Word quickly?
The fastest way to change font size in Word is to select your text and press Ctrl + Shift + > to increase or Ctrl + Shift + < to decrease — both jump to the next preset size instantly.
What is the shortcut to increase font size in Word?
Press Ctrl + Shift + > to jump up to the next preset size, or Ctrl + ] to increase by exactly 1 point.
Can I use font sizes larger than 72 in Word?
Yes. Click into the font size box, type any number up to 1638, and press Enter. Word supports custom sizes well beyond the preset dropdown for posters, banners, and oversized headings.
How do I make a font size the default in Word?
Press Ctrl + D to open the Font dialog box, pick your preferred size, click Set As Default, and choose All documents based on the Normal template.
What is the default font size in Word?
Microsoft 365 and Word 2019 onwards default to 11 pt Calibri. Older versions and many legal or academic templates still use 12 pt Times New Roman.
Can I use half-point font sizes in Word?
Yes. Type any half-point value like 10.5 or 14.5 directly into the font size box and press Enter. Word accepts any 0.5-point increment.
How do I change font size for the whole document at once?
Press Ctrl + A to select all text, then pick your new size from the ribbon dropdown or type a custom value into the font size box.
Conclusion
Knowing how to change font size in Word goes well beyond clicking a dropdown — the right method saves time, the right size saves the layout, and the default setting saves you from ever resetting it again.
Pick the method that fits how you work — the ribbon for visual control, shortcuts for speed, custom sizes for precision, or Set As Default for permanence — and pair it with the Microsoft Word keyboard shortcuts cheat sheet to speed up the rest of your formatting workflow.
Related Tutorials
- How to Change the Default Font in Word
- How to Change Line Spacing in Word
- Microsoft Word Keyboard Shortcuts Cheat Sheet
Word Tutorials
Recent Microsoft Word Tutorials
Browse the complete collection for help with formatting, layout, pages, tables, images, and document setup.
For Microsoft support documentation, visit the official Microsoft guidance.
Leave a Reply