Skip to content
Word Made Easy
Home Word Tutorials PowerPoint Tutorials YouTube Videos

Formatting text (Chapter 4)

HomeMicrosoft Word Beginners HubChapter 4

Chapter 4 of 12 · about 12 minutes

04

Formatting text

Change how your words look: Font, size, bold, colour and highlight. Formatting text never changes the words, only how they look.

In this chapter

  • Make text bold, italic or underlined
  • Change the font and its size
  • Colour and highlight text
  • Change text to capitals or small letters
  • Copy formatting with Format Painter and clear formatting

Before you start: Open wme-guide-chapter-04-start.docx. The steps in this chapter use it.

Using your own document? The steps use the practice newsletter, but they work the same on any document. Wherever a step names part of the newsletter, such as the title or the date, use the matching text in your own document.

Formatting means changing how text looks. It never changes the words themselves. All the buttons in this chapter are on the Home tab.

This guide uses the US English button names, such as Font Color. If your Word is set to UK English, you may see Font Colour instead.


Make text bold

Bold text stands out, so use it for titles and important words. Word only formats text that you have selected.

  1. Select the newsletter title (or your own heading), Riverside Community News. Click three times quickly on it to select the whole line.The title is shaded grey.
    Example of selected text in Microsoft Word: The newsletter title Riverside Community News is shaded grey to show it is selected.
    You should see: The title is selected, so it is shaded grey.
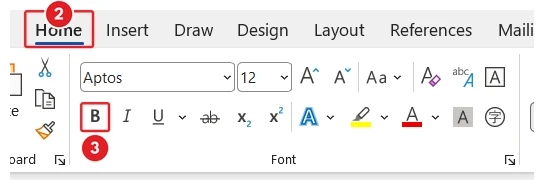
  2. Click the Home tab.
    Making text bold in Microsoft Word: The Home tab is marked 2 and the Bold button in the Font group is marked 3.
    Open the Home tab (2), then click Bold in the Font group (3).
  3. In the Font group, click Bold (the B button).The title turns bold.
Watch it happen: Select the text, click Bold, and it turns thick and dark.

Italic and underline work the same way. Select the text, then click Italic (the slanted I button) or Underline (the U button). Both sit next to Bold.

Tip

Press Ctrl + B for bold, Ctrl + I for italic and Ctrl + U for underline. Press the same keys again to remove it.


Change the font and its size

The font is the style of the letters. A bigger size makes a title stand out.

  1. Select the newsletter title (or your own heading).
  2. In the Font group, click the arrow beside the Font box (it shows the font name, such as Aptos).
    The Font group on the Home tab in Microsoft Word: The arrow beside the Font box is marked 2 and the arrow beside the Font Size box is marked 4.
    Open the Font list (2), then the Font Size list (4).
    A long list of fonts opens.
  3. Click a font, such as Georgia.The title changes to that font. The pictures in this guide keep the standard Aptos font, so press Ctrl + Z if you want your page to match them.
  4. Click the arrow beside the Font Size box (it shows 12).A list of sizes opens.
  5. Click 28.The title grows much bigger.
    Example of how to format text in Word: The title Riverside Community News is now bold and 28 point, much larger than the date below it.
    You should see: The title is now 28 pt, so it stands out.

Hover over a font or size in the list to preview it. The text only changes for good when you click.

Tip

Good defaults: Use 11 or 12 pt for normal text and 14 to 20 pt for headings. Use 24 to 28 pt for a title. Stick to one or two fonts in a document. To make text a step bigger, press Ctrl + Shift + >. To make it a step smaller, press Ctrl + Shift + <.


Colour and highlight text

Font colour changes the colour of the letters. Highlight puts a bright band behind them, like a highlighter pen.

  1. Select the newsletter title (or your own heading).
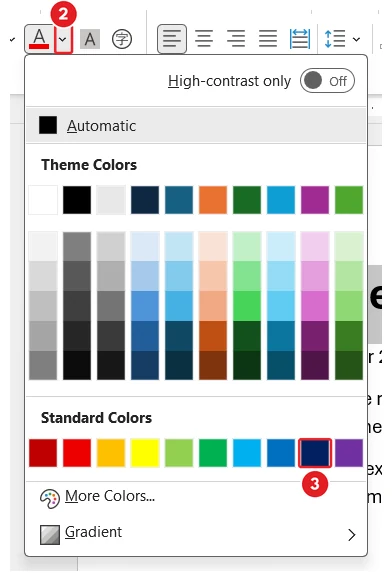
  2. In the Font group, click the arrow beside Font Color (the A with a coloured bar under it).
    The Font Color menu in Microsoft Word: The arrow beside the Font Color button is marked 2 and Dark Blue under Standard Colors is marked 3.
    Open the Font Color menu (2), then click Dark Blue (3).
    A box of colours opens.
  3. Under Standard Colors, click Dark Blue.The title turns dark blue.
  4. Select the date (or any line of text).
  5. Click the arrow beside Text Highlight Color (the pen with a yellow bar under it).
    The Text Highlight Color menu in Microsoft Word: The arrow beside the Text Highlight Color button is marked 5 and Yellow is marked 6.
    Open the Text Highlight Color menu (5), then click Yellow (6).
    A set of highlight colours opens.
  6. Click Yellow.The date now has a yellow band behind it.
    Example in Microsoft Word: The date Saturday 24 October 2026 has a yellow highlight behind it, below the dark blue title.
    You should see: The date is highlighted in yellow.
Watch it happen: Point at each colour and the text previews it before you choose.

To remove a highlight, select the text, open the Text Highlight Color menu and click No Color.


Change text to capitals or small letters

If you typed something in the wrong case, you don’t need to type it again. Change Case fixes it for you.

  1. Select the date (or any line of text).
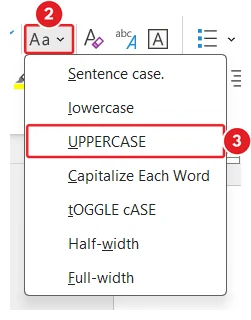
  2. In the Font group, click Change Case (the Aa button).
    The Change Case menu in Microsoft Word: The Change Case button in the Font group is marked 2 and the UPPERCASE option is marked 3.
    Click Change Case (2), then click UPPERCASE (3).
    A short menu opens.
  3. Click UPPERCASE.The date is now all in capital letters.
    Example in Microsoft Word: The date now reads SATURDAY 24 OCTOBER 2026 in capital letters.
    You should see: The date in UPPERCASE.
  4. Press Ctrl + Z to put it back.The date returns to normal.
Watch it happen: Choose UPPERCASE from Change Case and the selected text turns into capitals.

The menu has five main choices. (If your Word also lists Half-width and Full-width, those are for Asian languages and you can ignore them.) Sentence case. gives a capital at the start only. lowercase and UPPERCASE change every letter. Capitalize Each Word gives each word a capital. tOGGLE cASE swaps capitals and small letters.

Tip

Select the text and press Shift + F3. Each press moves through capitals, small letters and a capital on each word.


Copy formatting with Format Painter

Format Painter copies the look of some text onto other text. It saves you doing the same steps twice.

Get ready first: Double-click £640 in the first paragraph to select it. Press Ctrl + B, then use Font Color > Dark Blue, as you did above.

  1. Click anywhere inside £640.
  2. On the Home tab, in the Clipboard group, click Format Painter (the paintbrush button).
    The Clipboard group on the Home tab in Microsoft Word: The Format Painter paintbrush button is marked 2.
    Click Format Painter in the Clipboard group (2).
    The pointer turns into a paintbrush.
  3. Drag across 10am in the next paragraph.10am becomes bold and dark blue, like £640.
    Example in Microsoft Word: Both £640 and 10am are bold and dark blue after using Format Painter.
    You should see: 10am now matches £640.

Tip

Double-click Format Painter to paint several places in a row. Press Esc when you have finished.


Clear formatting

To remove all the formatting you added, use Clear All Formatting. The text goes back to plain text.

Watch out

Before you clear formatting, note that Clear All Formatting does not remove highlighting. Use Text Highlight Color > No Color for that.

  1. Select the paragraph that starts The garden opens next month.
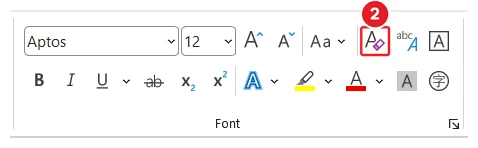
  2. In the Font group, click Clear All Formatting (the A with a pink eraser).
    The Font group on the Home tab in Microsoft Word: The Clear All Formatting button is marked 2.
    Click Clear All Formatting (2).
    The paragraph goes back to plain text, and 10am is no longer bold or blue.

Mac and Word for the web: The buttons are in the same places on the Home tab. On a Mac, use Cmd instead of Ctrl, for example Cmd + B.

Video: formatting text with bold, italic and underline

Formatting text: How To Bold, Italic & Underline Text in Microsoft Word video thumbnail1:32

See it done in Word: How To Bold, Italic & Underline Text in Microsoft Word.

Try it

Open wme-guide-chapter-04-start.docx. Make the newsletter title bold, 28 pt and Dark Blue. Then highlight the date in yellow. Compare your page with wme-guide-chapter-04-finished.docx.

Check yourself

Which shortcut makes text bold?

Ctrl + B

What must you do before clicking Bold?

Select the text you want to change.

What is the difference between font colour and highlight?

Font colour changes the letters. Highlight puts a coloured band behind them.

How do you copy formatting to several places in a row?

Double-click Format Painter, paint each place, then press Esc.

Which button turns text into capital letters without retyping it?

Change Case (the Aa button), then UPPERCASE.

Key terms

Font
The style of the letters, such as Aptos or Times New Roman.
Font size
How big the letters are, measured in points (pt).
Formatting
How text looks, such as its font, size and colour.
Highlight
A coloured band behind text, like a highlighter pen.
Format Painter
A tool that copies the look of text onto other text.

Learn more on Word Made Easy

  • Bold, italic and underline in Word
  • How to change the font in Word
  • How to highlight text in Word
  • How to change text case in Word
  • How to use Format Painter in Word
← Chapter 3Typing and editingBeginners HubChapter 5 →Paragraphs, lists and styles

Meet the Author

Patrick Elliott standing outdoors holding his dog.

I’m Patrick Elliott, the creator of Word Made Easy. I’m an educator and Inclusion Lead, and I use Microsoft Word and PowerPoint daily for planning, documentation, and classroom resources.

Every guide is tested step-by-step before publishing (usually in Microsoft 365). You’ll also find practical walkthroughs on my YouTube channel.

Browse

  • Word TutorialsStep-by-step guides for every feature
  • Beginners HubFree 12-chapter Word course
  • Word TemplatesFree, editable downloads
  • Shortcut Cheat SheetsFree printable PDFs
  • PowerPoint TutorialsClear, simple slide guides
  • YouTube VideosWatch the video walkthroughs

Watch on YouTube

Prefer to watch? Most guides have a short video walkthrough on the Word Made Easy channel.

  • 147videos
  • 1.88Mviews
  • 8,000+subscribers
Subscribe on YouTube

Recently Added

  • Free Lined Paper Templates for Word: 32 Easy Printable RulingsOctober 14, 2026
  • Free Graph Paper Templates for Word: 24 Easy Printable GridsOctober 14, 2026
  • Microsoft Word Glossary: Easy Definitions of 54 TermsOctober 14, 2026
  • Microsoft Word Ribbon: Easy Map of All 11 Tabs (Free PDF)October 14, 2026
  • Page Break vs Section Break in Word: Easy Guide to 3 BreaksOctober 14, 2026
Word Made Easy

Free, step-by-step Microsoft Word tutorials, written and tested by teacher Patrick Elliott.

Subscribe on YouTube

Explore

  • Home
  • Word Tutorials
  • PowerPoint Tutorials
  • YouTube Videos

Categories

  • Page Layout & Sections
  • Tables, Images & Media
  • Word Formatting Basics
  • Word Productivity & Automation
  • Beginners Hub
  • Word Templates
  • Shortcut Cheat Sheets

About

  • About Me
  • Contact
Privacy Policy Cookie Policy Terms of Use
© 2012–2026 Word Made Easy. All rights reserved.
Your privacy choices

We use cookies and similar technologies to make this site work, understand how it is used, and show relevant content and advertising. You can accept all cookies, deny non-essential cookies, or manage your preferences. You can change your choice at any time.

Functional Always active
The technical storage or access is strictly necessary for the legitimate purpose of enabling the use of a specific service explicitly requested by the subscriber or user, or for the sole purpose of carrying out the transmission of a communication over an electronic communications network.
Preferences
The technical storage or access is necessary for the legitimate purpose of storing preferences that are not requested by the subscriber or user.
Statistics
The technical storage or access that is used exclusively for statistical purposes. The technical storage or access that is used exclusively for anonymous statistical purposes. Without a subpoena, voluntary compliance on the part of your Internet Service Provider, or additional records from a third party, information stored or retrieved for this purpose alone cannot usually be used to identify you.
Marketing
The technical storage or access is required to create user profiles to send advertising, or to track the user on a website or across several websites for similar marketing purposes.

  • Manage options
  • Manage services
  • Manage {vendor_count} vendors
  • Read more about these purposes
Manage preferences
  • {title}
  • {title}
  • {title}
Loading Comments...