Line up your paragraphs, space them out, make lists and add headings that Word understands. Neat paragraphs, lists and headings make any document easy to read.
In this chapter
Centre text and indent a paragraph
Change line spacing and the space between paragraphs
Using your own document? The steps use the practice newsletter, but they work the same on any document. Wherever a step names part of the newsletter, such as the title or the date, use the matching text in your own document.
In Word, a paragraph is everything you type before you press Enter. A title, a date or one line of a list each count as a paragraph.
To change one paragraph, click anywhere inside it. You don’t need to select it all. To change several, select them together.
Centre text and indent a paragraph
Centring puts text in the middle of the line, which suits a title. An indent moves a paragraph in from the left edge, so it stands apart.
Click anywhere in the newsletter title (or your own heading).
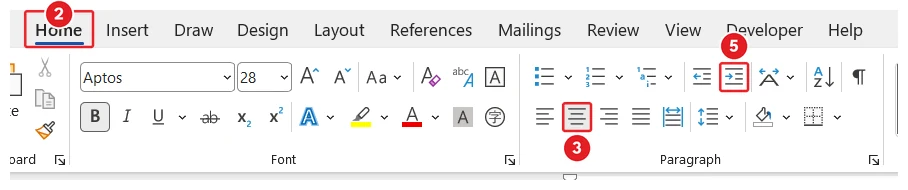
Click the Home tab.Open the Home tab (2), click Center (3), and use Increase Indent (5).
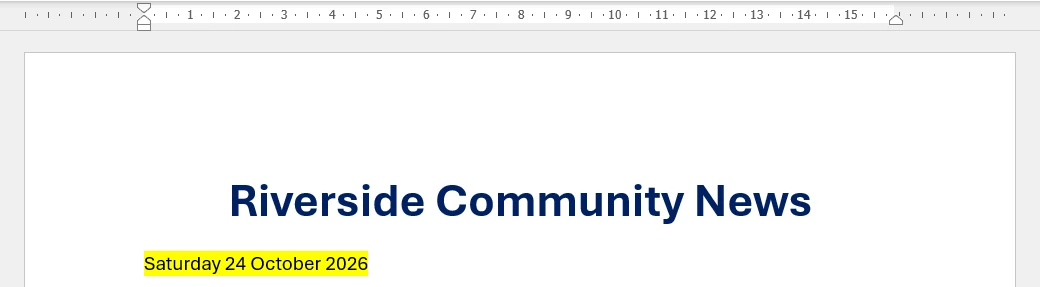
In the Paragraph group, click Center (the button with lines lined up in the middle).The title moves to the middle of the page.You should see: The title is centred.
Click anywhere in the quote that starts It is lovely.
In the Paragraph group, click Increase Indent (lines with an arrow pointing right).The whole paragraph moves in from the left.You should see: The quote is indented from the left.
Watch it happen: Click Center (or press Ctrl + E) and the title moves to the middle of the page.
The other alignment buttons are Align Left, Align Right and Justify. Justify makes both edges straight, like a newspaper. To move an indent back, click Decrease Indent.
This guide uses the US English button names. If your Word is set to UK English, you may see Centre instead of Center.
Change line and paragraph spacing
Line spacing is the gap between lines inside a paragraph. Paragraph spacing is the gap after a paragraph ends. More space makes text more comfortable to read.
Select the two story paragraphs under Library garden news.
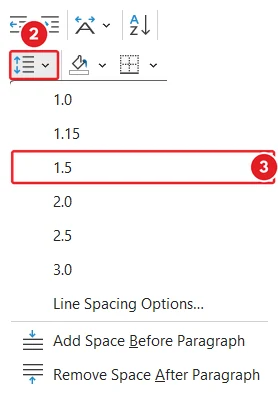
In the Paragraph group, click Line and Paragraph Spacing (lines with an up and down arrow).Click Line and Paragraph Spacing (2), then click 1.5 (3).A list of numbers opens.
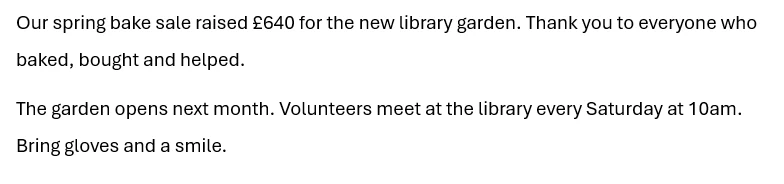
Click 1.5.The lines in both paragraphs move further apart.You should see: The story paragraphs with 1.5 line spacing.
Click the Layout tab.Open the Layout tab (4), then set Spacing After (5).
In the Paragraph group, under Spacing, set the After box to 12 pt. Keep the two paragraphs selected. Click the small up arrow beside the box until it shows 12 pt, or select the number in the box, type 12 and press Enter.There is a bigger gap after each paragraph.
Watch it happen: Point at each spacing in the list to preview it, then click to choose.
You can also use shortcuts for line spacing. Press Ctrl + 1 for single, Ctrl + 5 for 1.5 and Ctrl + 2 for double. Use the number keys above the letters.
Make bulleted and numbered lists
Lists break information into short pieces. Use bullets when the order doesn’t matter and numbers when it does.
Select the three lines under What to bring.
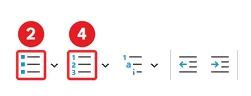
On the Home tab, in the Paragraph group, click Bullets (three dots beside three lines).Click Bullets (2) or Numbering (4).Each line gets a bullet point.You should see: The three lines are now a bulleted list.
Select the three dates under Dates for your diary.
Click Numbering (the numbers 1, 2, 3 beside three lines).The dates are numbered 1, 2 and 3.
Watch it happen: Select the lines, click Bullets, and each line gets a bullet point.
Inside a list, press Enter to add the next item. Press Enter twice to end the list.
Add headings with the Styles gallery
A style is a saved set of formatting with a name. The Heading 1 and Heading 2 styles do more than make text bigger. They tell Word which lines are headings. Text that is only big and bold is not a heading to Word.
That matters for three reasons. You can jump to any heading in the Navigation pane. Word can build a contents page from your headings. People who use screen readers can move from heading to heading. The headings also become bookmarks when you save a PDF.
Click anywhere in Library garden news.
Click the Home tab.
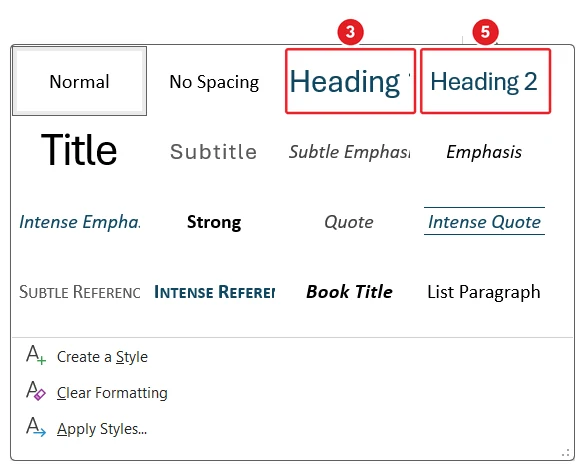
In the Styles group, click Heading 1. Its name may be cut off to Heading. Point at it and the tip shows Heading 1.Click Heading 1 (3) or Heading 2 (5). Open the gallery to see Heading 2.The line changes to a larger, coloured heading.You should see: Library garden news is now a Heading 1.
Click anywhere in What to bring.
In the Styles group, click Heading 2. If you can’t see it, click More (the small arrow at the bottom right of the gallery) to open the gallery first.The line becomes a smaller heading.
Click anywhere in Dates for your diary, then click Heading 1.It becomes a main heading, like Library garden news.
Use Heading 1 for main sections and Heading 2 for smaller parts inside them.
Move around with the Navigation pane
The Navigation pane lists your headings down the left side. Click one to jump straight to it, which helps in a long document.
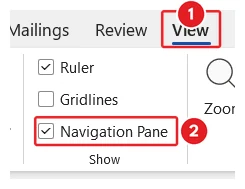
Click the View tab.Open the View tab (1), then tick Navigation Pane (2).
In the Show group, tick Navigation Pane.The Navigation pane opens on the left, showing your headings.
In the pane, click Dates for your diary.Word jumps to that heading.You should see: Click a heading in the pane (3) to jump to it.
If the pane shows search results instead, click Headings at the top of the pane. To close it, untick Navigation Pane or click the X on the pane.
Mac and Word for the web: The alignment, spacing, list and style buttons are on the Home tab in both. On a Mac, use Cmd instead of Ctrl for the alignment shortcuts, such as Cmd + E to centre.
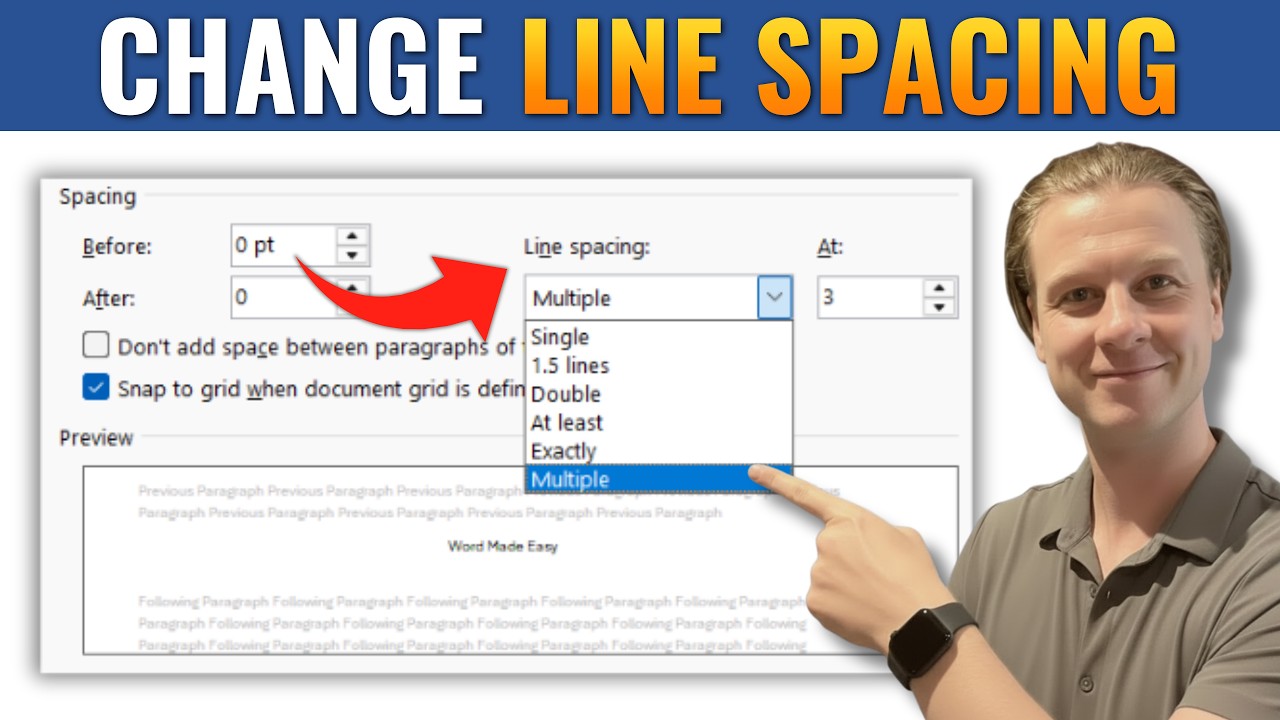
See it done in Word: How To Change Line Spacing in Microsoft Word.
Manage your privacy
To provide the best experiences, we and our partners use technologies like cookies to store and/or access device information. Consenting to these technologies will allow us and our partners to process personal data such as browsing behavior or unique IDs on this site and show (non-) personalized ads. Not consenting or withdrawing consent, may adversely affect certain features and functions.
Click below to consent to the above or make granular choices. Your choices will be applied to this site only. You can change your settings at any time, including withdrawing your consent, by using the toggles on the Cookie Policy, or by clicking on the manage consent button at the bottom of the screen.
Functional
Always active
The technical storage or access is strictly necessary for the legitimate purpose of enabling the use of a specific service explicitly requested by the subscriber or user, or for the sole purpose of carrying out the transmission of a communication over an electronic communications network.
Preferences
The technical storage or access is necessary for the legitimate purpose of storing preferences that are not requested by the subscriber or user.
Statistics
The technical storage or access that is used exclusively for statistical purposes.The technical storage or access that is used exclusively for anonymous statistical purposes. Without a subpoena, voluntary compliance on the part of your Internet Service Provider, or additional records from a third party, information stored or retrieved for this purpose alone cannot usually be used to identify you.
Marketing
The technical storage or access is required to create user profiles to send advertising, or to track the user on a website or across several websites for similar marketing purposes.
To provide the best experiences, we use technologies like cookies to store and/or access device information. Consenting to these technologies will allow us to process data such as browsing behavior or unique IDs on this site. Not consenting or withdrawing consent, may adversely affect certain features and functions.
Functional
Always active
The technical storage or access is strictly necessary for the legitimate purpose of enabling the use of a specific service explicitly requested by the subscriber or user, or for the sole purpose of carrying out the transmission of a communication over an electronic communications network.
Preferences
The technical storage or access is necessary for the legitimate purpose of storing preferences that are not requested by the subscriber or user.
Statistics
The technical storage or access that is used exclusively for statistical purposes.The technical storage or access that is used exclusively for anonymous statistical purposes. Without a subpoena, voluntary compliance on the part of your Internet Service Provider, or additional records from a third party, information stored or retrieved for this purpose alone cannot usually be used to identify you.
Marketing
The technical storage or access is required to create user profiles to send advertising, or to track the user on a website or across several websites for similar marketing purposes.






 2:34
2:34