Skip to content
Word Made Easy
Home Word Tutorials PowerPoint Tutorials YouTube Videos

Page layout (Chapter 6)

HomeMicrosoft Word Beginners HubChapter 6

Chapter 6 of 12 · about 13 minutes

06

Page layout

Set up the page itself: Margins, orientation, paper size, breaks and columns. Get the page layout right before you add more text.

In this chapter

  • Change the margins
  • Turn a page sideways with orientation
  • Choose A4 or Letter paper
  • Start a new page with a page break, and know when to use a section break
  • Put text into columns

Before you start: Open wme-guide-chapter-06-start.docx. The steps in this chapter use it.

Using your own document? The steps use the practice newsletter, but they work the same on any document. Wherever a step names part of the newsletter, such as the title or the date, use the matching text in your own document.

Most of this chapter is on the Layout tab, in the Page Setup group. These settings change every page in the document, so you don’t need to select any text first, except for columns.


Change the margins

Margins are the blank edges around the page. Smaller margins fit more on a page. Bigger margins look calmer and leave room for notes.

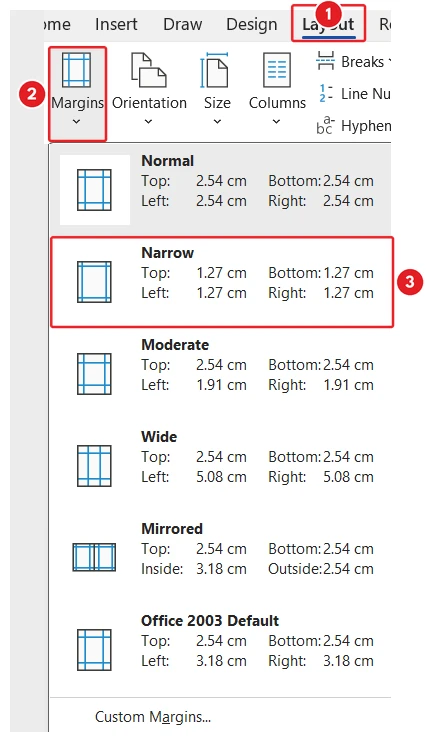
  1. Click the Layout tab.
    The Margins menu on the Layout tab in Microsoft Word: The Layout tab is marked 1, the Margins button is marked 2 and the Narrow option is marked 3.
    Open the Layout tab (1), click Margins (2), then click Narrow (3).
  2. In the Page Setup group, click Margins (a page with grey edges).A list of margin sizes opens.
  3. Click Narrow.The text spreads closer to the edges of the page.
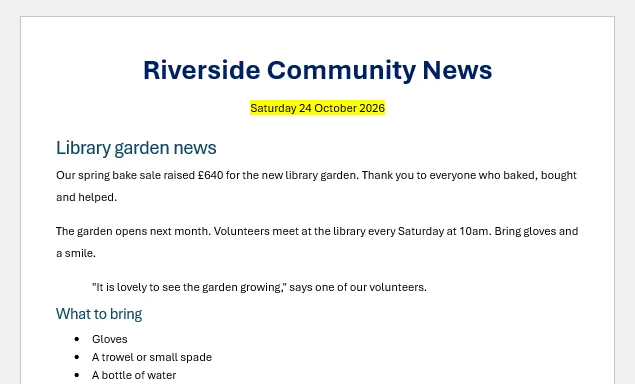
    Example of margins and orientation in Word: The newsletter page with Narrow margins, so the text runs close to the edges of the paper.
    You should see: The page with Narrow margins.

Normal is the usual choice, with 2.54 cm (1 inch) on every side. For your own sizes, click Custom Margins at the bottom of the list. Don’t make them very small. Most printers can’t print right up to the edge of the paper, so text there can be cut off.


Turn a page sideways with orientation

Portrait is a tall page, like a letter. Landscape is a wide page, which suits posters, wide tables and certificates.

  1. On the Layout tab, click Orientation (a tall page and a wide page).
    The Orientation menu on the Layout tab in Microsoft Word: The Orientation button is marked 1 and the Landscape option is marked 2.
    Click Orientation (1), then Landscape (2).
    Two choices appear.
  2. Click Landscape.The page turns sideways.
    Example in Microsoft Word: The newsletter on a wide landscape page, with longer lines of text.
    You should see: The newsletter in landscape.
  3. Click Orientation again.
  4. Click Portrait.The page stands upright again.

Choose A4 or Letter paper

The page in Word should match the paper in your printer. Different countries use different sizes.

A4 (21 × 29.7 cm) is used in most of the world. This includes the UK, Ireland, Australia, New Zealand and India. Letter (8.5 × 11 inches) is used in the US and Canada. Letter is a little wider and shorter than A4.

  1. On the Layout tab, click Size (a page with a ruler).
    The Size menu on the Layout tab in Microsoft Word: The Size button is marked 1 and the A4 paper size is marked 2.
    Click Size (1), then A4 (2).
    A list of paper sizes opens.
  2. Click A4, or Letter if you live in the US or Canada.The page changes to that size.

The list depends on your printer. If you can’t see the size you need, click More Paper Sizes at the bottom.

If it went wrong

If the printer asks you to load Letter paper, or the bottom of the page is cut off, the paper size is wrong. Change it to the size in your printer, then print again.


Start a new page with a page break

A page break sends the text after it to the top of a new page. It stays in the right place, even when you add or delete text above it.

Watch out

Don’t press Enter lots of times to push text onto the next page. When you change the text above, it all moves and the gap ends up in the wrong place. Use a page break instead.

  1. Click at the very start of Volunteer sign-up.
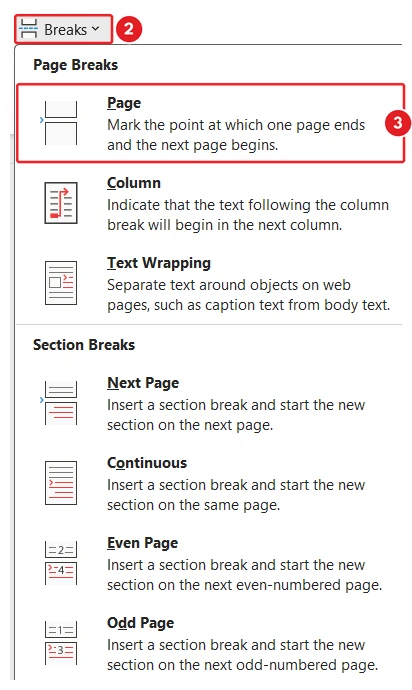
  2. On the Layout tab, click Breaks (two pages with a gap).
    The Breaks menu on the Layout tab in Microsoft Word: The Breaks button is marked 2 and the Page option under Page Breaks is marked 3. Section Breaks are listed lower down.
    Click Breaks (2), then Page (3).
    A list of breaks opens.
  3. Under Page Breaks, click Page.Volunteer sign-up moves to the top of a new page.
  4. On the Home tab, click Show/Hide ¶ (the ¶ button) to see the break.A dotted line labelled Page Break appears.
    Example in Microsoft Word with formatting marks shown: A dotted line labelled Page Break sits at the end of the first page.
    You should see: The page break, shown as a dotted line.

Click Show/Hide ¶ again to hide the marks. To remove a break, click at the left end of the dotted Page Break line, then press Delete.

Tip

Press Ctrl + Enter to add a page break.

Page break or section break?

Use a page break when you only want to start a new page. Everything stays set up the same.

Use a section break when part of the document needs a different layout. For example, one landscape page in a portrait document, or two columns on part of a page. The settings in this chapter then change only that section.

The Breaks menu has four section breaks. Next Page starts the new section on a new page. Continuous starts it on the same page. Even Page and Odd Page are for printed books.


Put text into columns

Columns split text into narrow strips, like a newspaper. Short lines are quick to read, which suits a newsletter.

  1. Select the two story paragraphs under Library garden news.
  2. Click the Layout tab.
    The Columns menu on the Layout tab in Microsoft Word: The Layout tab is marked 2, the Columns button is marked 3 and the Two option is marked 4.
    Open the Layout tab (2), click Columns (3), then click Two (4).
  3. In the Page Setup group, click Columns (a page with two strips of text).A list of column choices opens.
  4. Click Two.The two paragraphs flow into two side-by-side columns.
    Example in Microsoft Word: The two story paragraphs sit in two columns under the Library garden news heading, while the rest of the page stays in one column.
    You should see: The story in two columns.
Watch it happen: Choose Two from Columns and the text flows into two columns.

Because you selected text first, Word adds Continuous section breaks around it for you. That is why the rest of the page stays in one column. To go back, select the text and choose One.

Tip

Click More Columns at the bottom of the list to add a line between the columns or change the gap.

Mac and Word for the web: On a Mac, the same buttons are on the Layout tab. Word for the web can add page breaks but not section breaks. To add a section break, open the document in the desktop app.

Video: page layout and margins in Word

Page layout: Three Ways to Adjust Margins in Word video thumbnail5:54

See it done in Word: Three Ways to Adjust Margins in Word.

Try it

Open wme-guide-chapter-06-start.docx. Change the margins to Narrow. Turn the page to landscape, then back to portrait. Check the paper size is A4. Add a page break before Volunteer sign-up, so the sign-up form has its own page. If you tried two columns, set the story back to One column. Compare your pages with wme-guide-chapter-06-finished.docx.

Check yourself

Which tab has Margins, Orientation and Size?

The Layout tab, in the Page Setup group.

Which paper size is used in the US and Canada?

Letter. Most other countries use A4.

Which shortcut adds a page break?

Ctrl + Enter

You want one landscape page in a portrait document. Which break do you need?

A section break, such as Next Page, so the landscape setting changes only that section.

Why not press Enter many times to start a new page?

The gap moves when you edit the text above. A page break always stays in the right place.

Key terms

Margin
The blank space around the edge of the page.
Orientation
Which way the page faces: Portrait (tall) or landscape (wide).
A4 and Letter
The two common paper sizes. A4 is used in most countries; Letter in the US and Canada.
Page break
A mark that starts a new page at that point.
Section break
A mark that lets part of a document have its own layout.

Learn more on Word Made Easy

  • How to adjust margins in Word
  • How to set A4 as the default in Word
  • Rotate one page in Word
  • How to remove a page break in Word
  • How to add columns in Word
← Chapter 5Paragraphs, lists and stylesBeginners HubChapter 7 →Headers, footers and page numbers

Meet the Author

Patrick Elliott standing outdoors holding his dog.

I’m Patrick Elliott, the creator of Word Made Easy. I’m an educator and Inclusion Lead, and I use Microsoft Word and PowerPoint daily for planning, documentation, and classroom resources.

Every guide is tested step-by-step before publishing (usually in Microsoft 365). You’ll also find practical walkthroughs on my YouTube channel.

Browse

  • Word TutorialsStep-by-step guides for every feature
  • Beginners HubFree 12-chapter Word course
  • Word TemplatesFree, editable downloads
  • Shortcut Cheat SheetsFree printable PDFs
  • PowerPoint TutorialsClear, simple slide guides
  • YouTube VideosWatch the video walkthroughs

Watch on YouTube

Prefer to watch? Most guides have a short video walkthrough on the Word Made Easy channel.

  • 147videos
  • 1.88Mviews
  • 8,000+subscribers
Subscribe on YouTube

Recently Added

  • Free Lined Paper Templates for Word: 32 Easy Printable RulingsOctober 14, 2026
  • Free Graph Paper Templates for Word: 24 Easy Printable GridsOctober 14, 2026
  • Microsoft Word Glossary: Easy Definitions of 54 TermsOctober 14, 2026
  • Microsoft Word Ribbon: Easy Map of All 11 Tabs (Free PDF)October 14, 2026
  • Page Break vs Section Break in Word: Easy Guide to 3 BreaksOctober 14, 2026
Word Made Easy

Free, step-by-step Microsoft Word tutorials, written and tested by teacher Patrick Elliott.

Subscribe on YouTube

Explore

  • Home
  • Word Tutorials
  • PowerPoint Tutorials
  • YouTube Videos

Categories

  • Page Layout & Sections
  • Tables, Images & Media
  • Word Formatting Basics
  • Word Productivity & Automation
  • Beginners Hub
  • Word Templates
  • Shortcut Cheat Sheets

About

  • About Me
  • Contact
Privacy Policy Cookie Policy Terms of Use
© 2012–2026 Word Made Easy. All rights reserved.
Your privacy choices

We use cookies and similar technologies to make this site work, understand how it is used, and show relevant content and advertising. You can accept all cookies, deny non-essential cookies, or manage your preferences. You can change your choice at any time.

Functional Always active
The technical storage or access is strictly necessary for the legitimate purpose of enabling the use of a specific service explicitly requested by the subscriber or user, or for the sole purpose of carrying out the transmission of a communication over an electronic communications network.
Preferences
The technical storage or access is necessary for the legitimate purpose of storing preferences that are not requested by the subscriber or user.
Statistics
The technical storage or access that is used exclusively for statistical purposes. The technical storage or access that is used exclusively for anonymous statistical purposes. Without a subpoena, voluntary compliance on the part of your Internet Service Provider, or additional records from a third party, information stored or retrieved for this purpose alone cannot usually be used to identify you.
Marketing
The technical storage or access is required to create user profiles to send advertising, or to track the user on a website or across several websites for similar marketing purposes.

  • Manage options
  • Manage services
  • Manage {vendor_count} vendors
  • Read more about these purposes
Manage preferences
  • {title}
  • {title}
  • {title}
Loading Comments...