Put the same words and a page number at the top and bottom of every page. Then get back to your main text. Page numbers sit in the footer, so they appear on every page.
In this chapter
Add a header and type in it
Add a footer and type in it
Number your pages
Leave the first page without a header or footer
Close the header and footer and go back to your text
Using your own document? The steps use the practice newsletter, but they work the same on any document. Wherever a step names part of the newsletter, such as the title or the date, use the matching text in your own document.
Add a header
A header is the strip at the top of every page. Anything you type there appears on each page, so you only type it once.
Click the Insert tab.
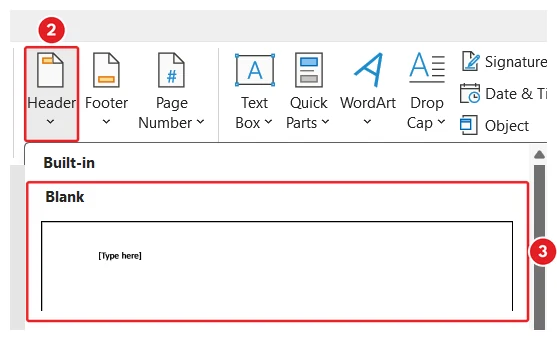
In the Header & Footer group, click Header.On the Insert tab, click Header (2), then choose Blank (3).A list of header designs opens.
Click Blank, the first design in the list.The header area opens at the top of the page. It shows [Type here], and your main text turns pale grey.You should see: The header is open, and your main text is pale grey.
Type Riverside Community News, October 2026.Your words replace [Type here].
While the header is open, a new tab called Header & Footer appears on the ribbon. It holds all the tools for this chapter.
Add a footer
A footer is the strip at the bottom of every page. It is a good place for who made the document and the page number.
Click the Insert tab.
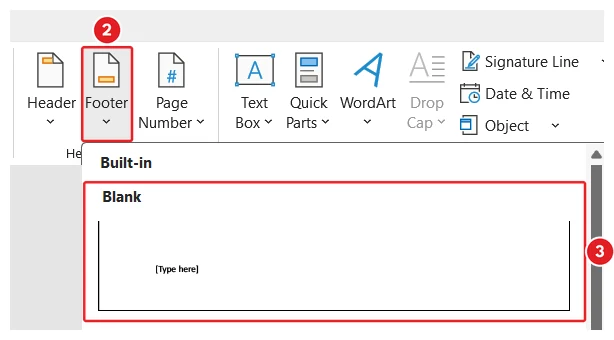
In the Header & Footer group, click Footer.On the Insert tab, click Footer (2), then choose Blank (3).A list of footer designs opens.
Click Blank.The footer area opens at the bottom of the page and shows [Type here].
Type Made by Riverside volunteers. Page and then press the Spacebar once.Your words appear in the footer, ready for a page number.
Already in the header? On the Header & Footer tab, in the Navigation group, click Go to Footer to jump straight down.
Add page numbers
Page numbers help readers keep the pages in order. Word counts the pages for you, so the numbers stay right when you add or remove pages.
Click at the end of your footer text, after Page and the space.The cursor flashes at the end of the footer.
On the Header & Footer tab, in the Header & Footer group, click Page Number.A menu opens.
Point to Current Position.Click Page Number (2), point to Current Position (3), then click Plain Number (4).A list of number designs opens beside the menu.
Click Plain Number, the first design.The number 1 appears after your words. Page 2 shows 2.You should see: The footer now ends with the page number.
Want only a number in the middle of the bottom of each page? Click Insert > Page Number > Bottom of Page, then click Plain Number 2. This replaces anything already typed in the footer.
Leave the first page out
A front page often looks better without a header or footer. The newsletter already has its big title on page 1, so the header is only needed from page 2.
Click in the header at the top of page 1. If the header is closed, double-click it instead.The cursor is in the page 1 header, and the Header & Footer tab shows on the ribbon.
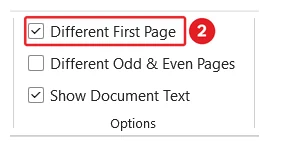
On the Header & Footer tab, in the Options group, tick Different First Page.Tick Different First Page in the Options group (2).The header and footer on page 1 are now empty. Page 2 still shows them.You should see: The bottom of page 1 is now empty. Page 2 keeps its header.
Watch it happen: Tick Different First Page and the first page gets its own header.
Page 2 still shows the number 2. Word keeps counting page 1, even though you can’t see its number.
Close the header and footer
While the header or footer is open, you can’t type in your main text. Close it to get back to your page.
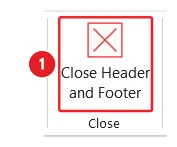
On the Header & Footer tab, in the Close group, click Close Header and Footer (the red X button).Click Close Header and Footer (1).Your main text turns dark again, and the header and footer turn pale grey.You should see: The header is closed, so it is pale grey and your text is dark.
Watch it happen: Click Close Header and Footer and you are back in your main text.
Two faster ways to close: Press Esc, or double-click anywhere in your main text. To change the header later, double-click it again.
Mac and Word for the web: On a Mac the steps are the same, and the tab is also called Header & Footer. In Word for the web, click Insert > Header & Footer. Word for the web can’t give the first page a different header and footer, so use the desktop app for Different First Page.
See it done in Word: How to Add Page Numbers in Word.
Manage your privacy
To provide the best experiences, we and our partners use technologies like cookies to store and/or access device information. Consenting to these technologies will allow us and our partners to process personal data such as browsing behavior or unique IDs on this site and show (non-) personalized ads. Not consenting or withdrawing consent, may adversely affect certain features and functions.
Click below to consent to the above or make granular choices. Your choices will be applied to this site only. You can change your settings at any time, including withdrawing your consent, by using the toggles on the Cookie Policy, or by clicking on the manage consent button at the bottom of the screen.
Functional
Always active
The technical storage or access is strictly necessary for the legitimate purpose of enabling the use of a specific service explicitly requested by the subscriber or user, or for the sole purpose of carrying out the transmission of a communication over an electronic communications network.
Preferences
The technical storage or access is necessary for the legitimate purpose of storing preferences that are not requested by the subscriber or user.
Statistics
The technical storage or access that is used exclusively for statistical purposes.The technical storage or access that is used exclusively for anonymous statistical purposes. Without a subpoena, voluntary compliance on the part of your Internet Service Provider, or additional records from a third party, information stored or retrieved for this purpose alone cannot usually be used to identify you.
Marketing
The technical storage or access is required to create user profiles to send advertising, or to track the user on a website or across several websites for similar marketing purposes.
To provide the best experiences, we use technologies like cookies to store and/or access device information. Consenting to these technologies will allow us to process data such as browsing behavior or unique IDs on this site. Not consenting or withdrawing consent, may adversely affect certain features and functions.
Functional
Always active
The technical storage or access is strictly necessary for the legitimate purpose of enabling the use of a specific service explicitly requested by the subscriber or user, or for the sole purpose of carrying out the transmission of a communication over an electronic communications network.
Preferences
The technical storage or access is necessary for the legitimate purpose of storing preferences that are not requested by the subscriber or user.
Statistics
The technical storage or access that is used exclusively for statistical purposes.The technical storage or access that is used exclusively for anonymous statistical purposes. Without a subpoena, voluntary compliance on the part of your Internet Service Provider, or additional records from a third party, information stored or retrieved for this purpose alone cannot usually be used to identify you.
Marketing
The technical storage or access is required to create user profiles to send advertising, or to track the user on a website or across several websites for similar marketing purposes.






 1:31
1:31