
Knowing how to delete an extra page in Word saves the frustration of a blank sheet that won’t go away no matter how many times you hit Backspace. The fix is almost always a hidden page break or section break — and once you can see them, removing them takes seconds. If you want to keep formatting marks visible permanently afterwards, see how to remove formatting marks in Word.
In this guide, you’ll learn four ways to delete an extra page in Word — turning on Show/Hide to find the culprit, removing page breaks, removing section breaks, and fixing the trailing breaks that tables leave behind.
Why Extra Pages Appear in Word
Before you delete an extra page in Word, it helps to know that empty pages don’t appear from nowhere — they’re caused by hidden formatting elements that don’t show up unless you ask Word to reveal them:
- Page breaks — force content onto a new page
- Section breaks — change layout or formatting and can create a blank page in the process
- Extra paragraph marks — invisible empty lines pushing content to a new page
- Trailing table breaks — Word automatically adds a paragraph after every table, which can spill onto a new page
These elements stay invisible until you turn on formatting tools — and once they’re visible, every fix that follows becomes a two-second job rather than a five-minute hunt.
Watch the Video Tutorial
If you prefer to see this in action, the full video walkthrough is below, showing each method step by step.
How to Delete an Extra Page in Word: Step-by-Step
There are four reliable ways to delete an extra page in Word. Method 1 reveals what’s causing the page so you know what you’re targeting. Methods 2 and 3 handle the two most common causes — page breaks and section breaks — and Method 4 fixes the table-specific case where Word adds a phantom paragraph after a table.
Method 1: How to Delete an Extra Page in Word Using Show/Hide
This isn’t a deletion method on its own — it’s the diagnostic step that makes every other method work. Without Show/Hide on, you’re deleting blind.
Steps:
- Go to the Home tab
- Click the Show/Hide (¶) button — the backwards “P” symbol in the Paragraph group
- Or press Ctrl + Shift + 8 for the keyboard shortcut
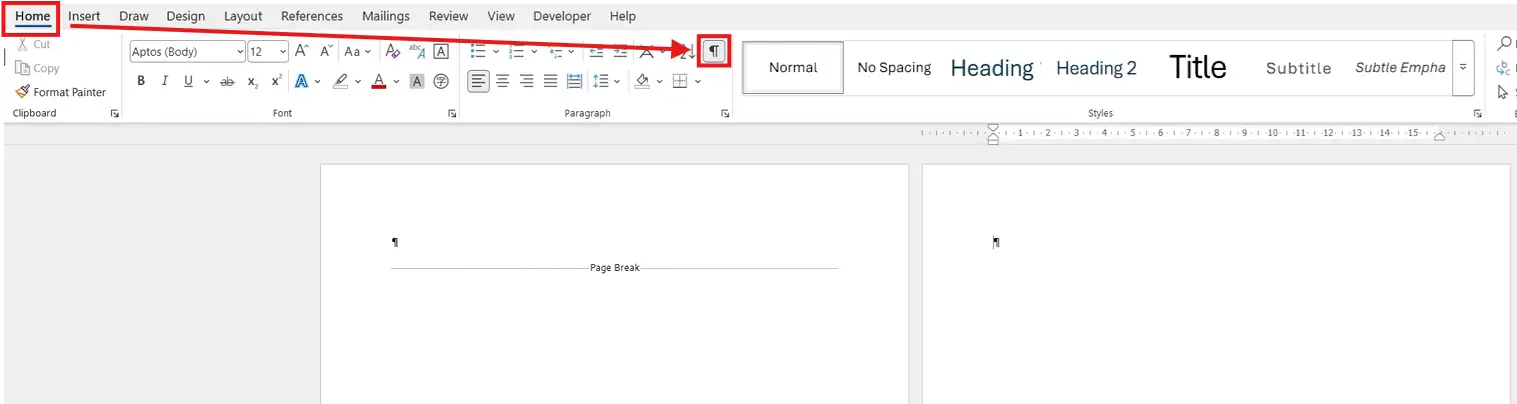
👉 Page breaks, section breaks, and paragraph marks now appear inline. The culprit on your extra page will be one of these — usually a thick dashed line saying “Page Break” or “Section Break”.
Method 2: How to Delete an Extra Page in Word Caused by a Page Break
Page breaks are the most common cause of unwanted blank pages and the easiest to remove.
Steps:
- Place the cursor at the top of the extra page
- Press Backspace once
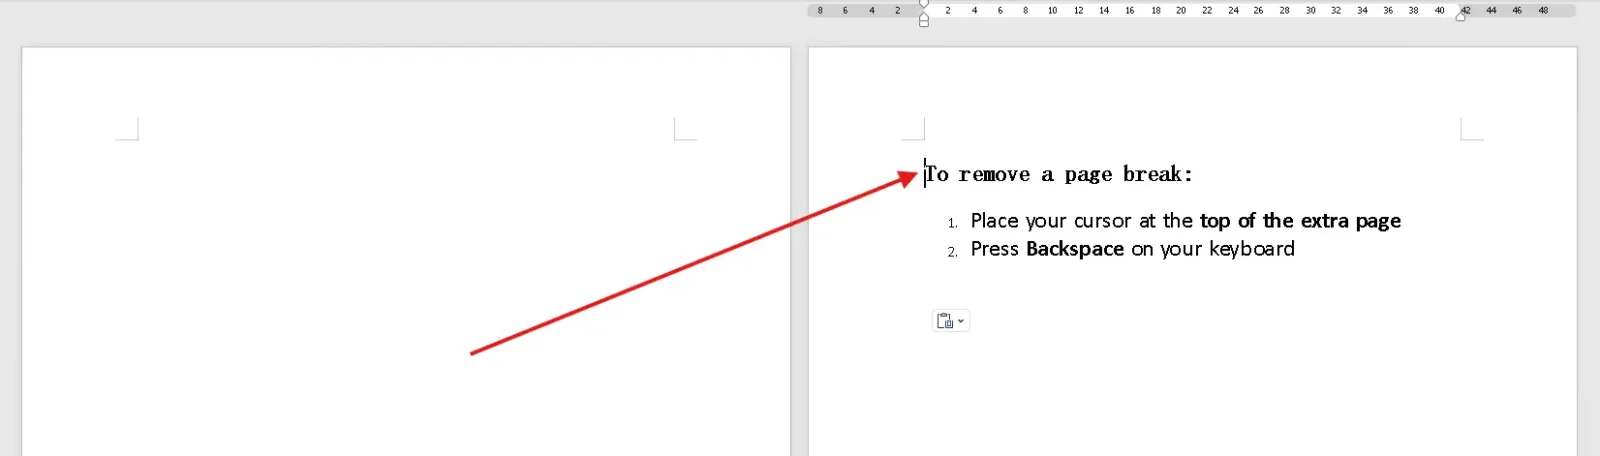
👉 The page break disappears and the extra page collapses. If the page still doesn’t go, the cause is a section break — use Method 3 instead.
Method 3: How to Delete an Extra Page in Word Caused by a Section Break
Section breaks are trickier because they also control layout and formatting — removing one can affect headers, footers, and orientation either side. For a full breakdown of how section breaks behave with headers and footers, see our guide on how to use different page numbers in Word.
Steps:
- Make sure Show/Hide (¶) is on so you can see the section break
- Click immediately before the section break marker
- Press Delete to remove the break
- If the ruler shifts but the page stays, press Backspace as well

👉 The section break removes and the extra page collapses. Check headers and footers after deleting — the layout from the next section becomes the new default for everything above.
Method 4: How to Delete an Extra Page in Word Left by a Table
Word always adds a paragraph mark after a table — there’s no way to disable it. When a table sits at the bottom of a page, that paragraph mark gets pushed to a new page, creating the appearance of an empty page caused by the table.
Steps:
- Turn on Show/Hide (¶)
- Click the paragraph mark on the empty page after the table
- Open Home → Font → Font Size and change the size to 1
- Press Enter

👉 The paragraph mark shrinks small enough to fit beneath the table, and the extra page disappears. This is the standard fix when “the table is creating an extra page” — Word’s invisible trailing paragraph is the real cause.
Which Method Should You Use?
| Method | Best For | Cause | Risk |
|---|---|---|---|
| Method 1 — Show/Hide | Diagnosing the issue first | All causes | None — display only |
| Method 2 — Backspace | Standard page break | Inserted page break | Low |
| Method 3 — Delete | Section break causing the page | Section break | May affect headers/footers |
| Method 4 — Font Size 1 | Extra page after a table | Trailing table paragraph | None |
Always start with Method 1 — once you can see the formatting marks, the right deletion method becomes obvious.
Common Problems When Deleting an Extra Page in Word
Backspace does nothing on the extra page
The cause is a section break, not a page break. Section breaks need Delete rather than Backspace — click immediately before the section break marker and press Delete as shown in Method 3.
Headers or footers change after deleting a section break
Section breaks separate different header/footer settings. When you delete one, the layout from the section below becomes the default for everything above. Press Ctrl + Z to undo, then check whether the section break is doing something you actually need.
An extra page keeps appearing after my table
Word adds an invisible paragraph after every table and you can’t remove it — but you can shrink it. Click the paragraph mark below the table and change its font size to 1 (Method 4). The paragraph stays, but it no longer pushes content onto a new page.
I can’t see any breaks even with Show/Hide on
Check File → Options → Display and make sure All is ticked under “Always show these formatting marks on the screen”. If breaks still don’t appear, the issue is empty paragraph marks rather than breaks — press Backspace repeatedly at the top of the empty page to clear them.
Pro Tips
- Keep Show/Hide on while you’re editing complex documents — it surfaces problems before they multiply, particularly when you’re working alongside our guide on how to remove formatting marks in Word for the final cleanup.
- Press Ctrl + End to jump to the very last position in the document — usually exactly where the rogue paragraph mark is hiding.
- Use Ctrl + Z immediately after deleting a section break if anything looks wrong — it’s easier to undo and try Method 4 than to rebuild a broken header/footer setup.
- Use Print Preview (Ctrl + P) as a final check — what you see there is what actually prints, including any phantom blank pages you might have missed.
FAQs
How do I delete an extra page in Word?
To delete an extra page in Word, turn on Show/Hide (¶) from the Home tab, find the page break or section break causing the empty page, place the cursor at the top of the extra page, and press Backspace for a page break or Delete for a section break.
Why won’t my extra page delete in Word?
The page is almost always caused by a section break rather than a page break. Section breaks need Delete instead of Backspace — click immediately before the section break marker and press Delete.
How do I see hidden formatting in Word?
Click the Show/Hide (¶) button in the Paragraph group of the Home tab, or press Ctrl + Shift + 8. Every break, paragraph mark, tab, and space becomes visible.
Can tables create extra pages in Word?
Not directly. Word adds a hidden paragraph mark after every table — when the table sits low on a page, that paragraph mark spills onto a new page. Shrink the paragraph to font size 1 (Method 4) to fix it.
What is the difference between a page break and a section break?
A page break just moves content to a new page. A section break also moves content to a new page but additionally controls layout, headers, footers, page numbering, and orientation — which is why removing one can affect more than just the extra page.
Do I always need the Show/Hide tool?
No, but it makes the fix a two-second job rather than a five-minute hunt. Without it, you’re guessing where the break is and pressing Backspace blind.
How do I delete an extra page in Word on Mac?
The same methods work — Show/Hide is in the same place on the Home tab, page breaks delete with Backspace, and section breaks delete with Delete (the forward-delete key, Fn + Backspace on most Mac keyboards).
Why is there a blank page at the very end of my document?
It’s almost always either a trailing table paragraph or an extra paragraph mark. Press Ctrl + End to jump to the last position, turn on Show/Hide, and either delete the paragraph mark with Backspace or shrink it to font size 1 if it’s locked beneath a table.
Conclusion
Once you know how to delete an extra page in Word, the process never takes more than a few seconds — turn on Show/Hide, identify the page break, section break, or trailing paragraph causing the issue, and remove it with the right key.
The deeper fix is keeping formatting marks visible while you work so problems never accumulate in the first place — start with our guide on how to remove formatting marks in Word when you’re ready to clean them up at the end.
Related Tutorials
- How to Remove Formatting Marks in Word
- How to Use Different Page Numbers in Word
- How to Merge Tables in Word
Word Tutorials
Recent Microsoft Word Tutorials
Browse the complete collection for help with formatting, layout, pages, tables, images, and document setup.
For Microsoft support documentation, visit the official Microsoft guidance.
Leave a Reply