
Knowing how to delete a row in a table in Word is one of those small skills you’ll use every time you edit a structured document — and there’s a fast way to do it from the keyboard or the mouse. If you ever need to combine data instead of removing it, see our guide on how to merge tables in Word.
In this guide, you’ll learn three ways to delete a row in a table in Word — right-click, the Table Layout tab, and the Backspace shortcut — plus how to fix the most common reasons a row refuses to disappear.
Why You Might Need to Delete a Row
Before you delete a row in a table in Word, it’s worth knowing why this small action matters so often in document editing. You’ll typically reach for it to:
- Clean up unnecessary or outdated data
- Fix formatting issues caused by empty or broken rows
- Adjust the structure of a table after a copy-paste or merge
- Improve readability by removing blank space
It’s a basic skill but one of the most-used in any table workflow — and it pairs naturally with knowing how to merge tables in Word when you need to combine rather than remove rows.
Watch the Video Tutorial
If you prefer to see this in action, the full video walkthrough is below, showing each method step by step.
How to Delete a Row in a Table in Word: Step-by-Step
There are three reliable ways to delete a row in a table in Word. Method 1 is the most discoverable (right-click), Method 2 lives on the ribbon for users who prefer the Table Layout tab, and Method 3 is the fastest if your hand is already on the keyboard.
Method 1: How to Delete a Row in a Table in Word Using Right-Click
This is the most discoverable method and the one most users find first — works the same in every modern version of Word.
Steps:
- Click inside any cell of the row you want to delete
- (Optional) Highlight the entire row to be sure you’re targeting the right one
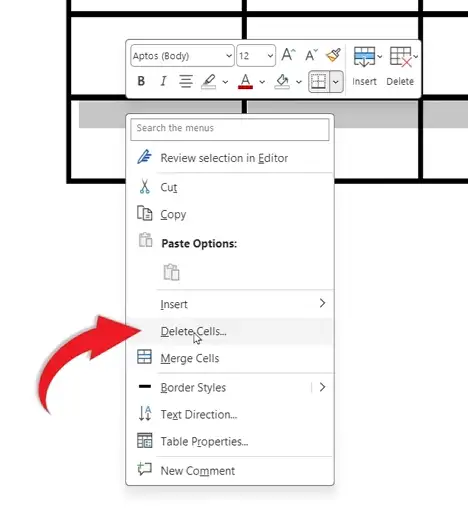
- Right-click the selection
- Click Delete Cells
- In the Delete Cells dialog, select Delete entire row
- Click OK
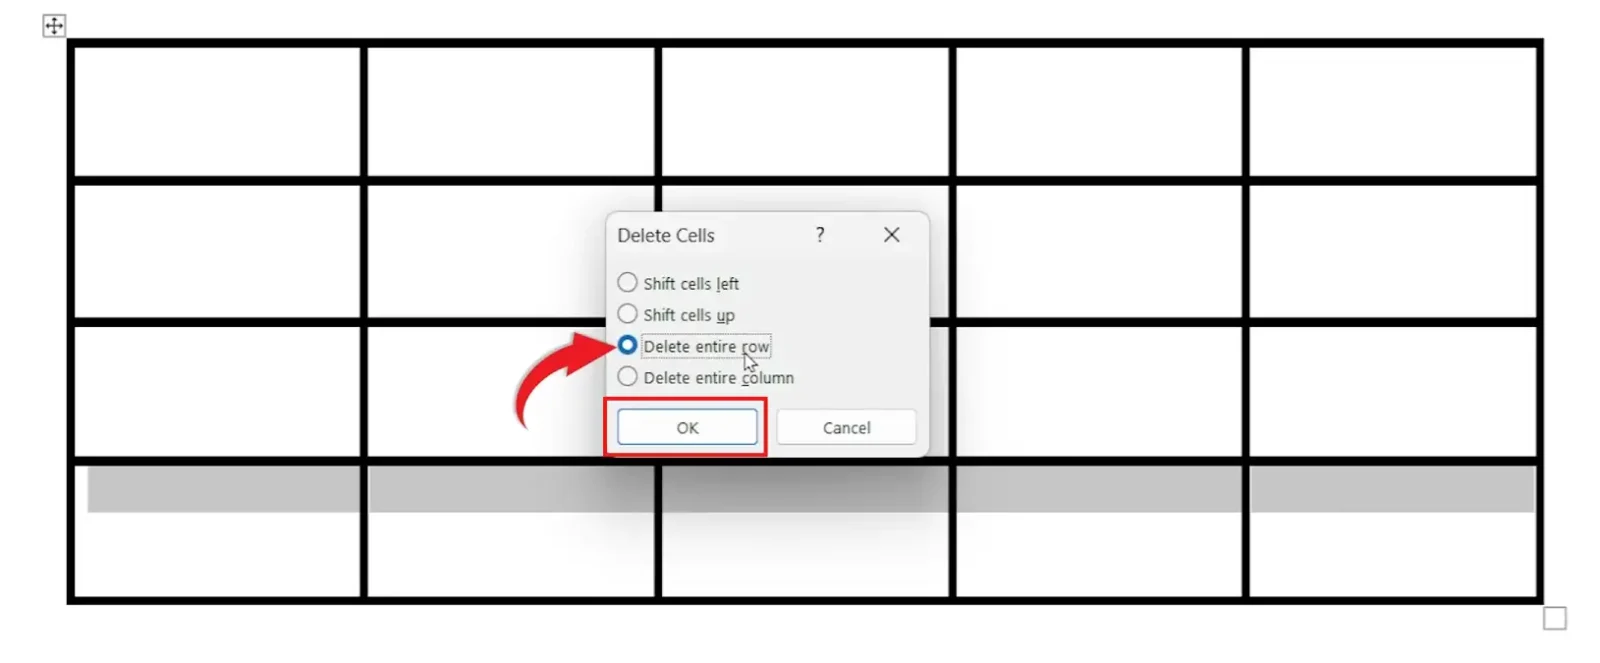
👉 The row vanishes and the remaining rows shift up to close the gap — no manual reformatting required.
Method 2: How to Delete a Row in a Table in Word From the Table Layout Tab
If you’re already working in the Table Layout tab — resizing columns, splitting cells, or formatting borders — deleting a row from the ribbon keeps your hand on the same set of tools.
Steps:
- Click inside the row you want to delete
- Go to the Table Layout tab on the ribbon
- Click Delete in the Rows & Columns group
- Select Delete Rows
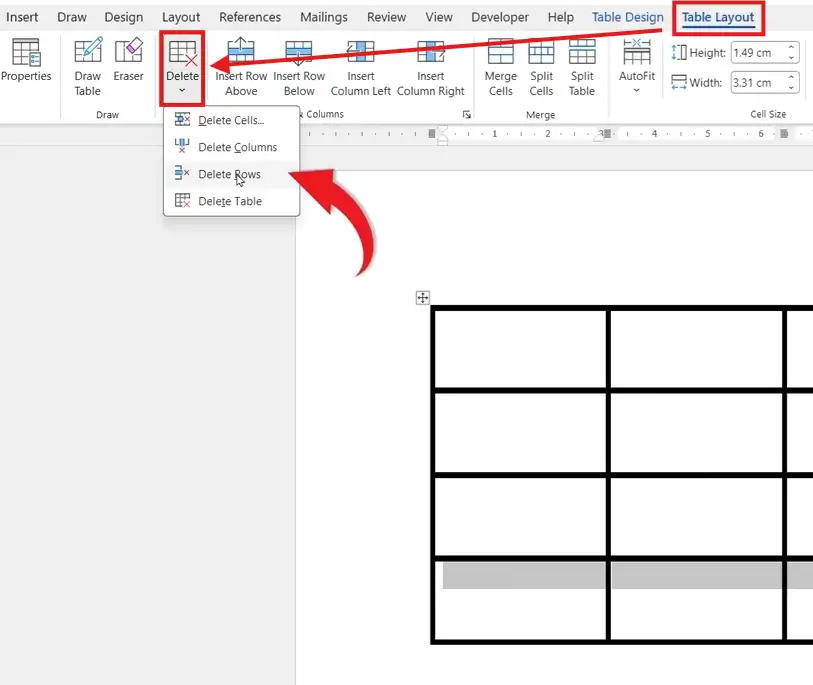
👉 This method is especially useful when you’re already mid-flow with table formatting tools — no need to switch back to the mouse for a right-click.
Method 3: How to Delete a Row in a Table in Word Using Backspace
This is the fastest method once you know it — select the row, hit Backspace, done. The trick is that you must select the entire row first, not just place the cursor inside it.
Steps:
- Hover the cursor to the left of the row until it turns into a black arrow
- Click once to highlight the entire row
- Press Backspace
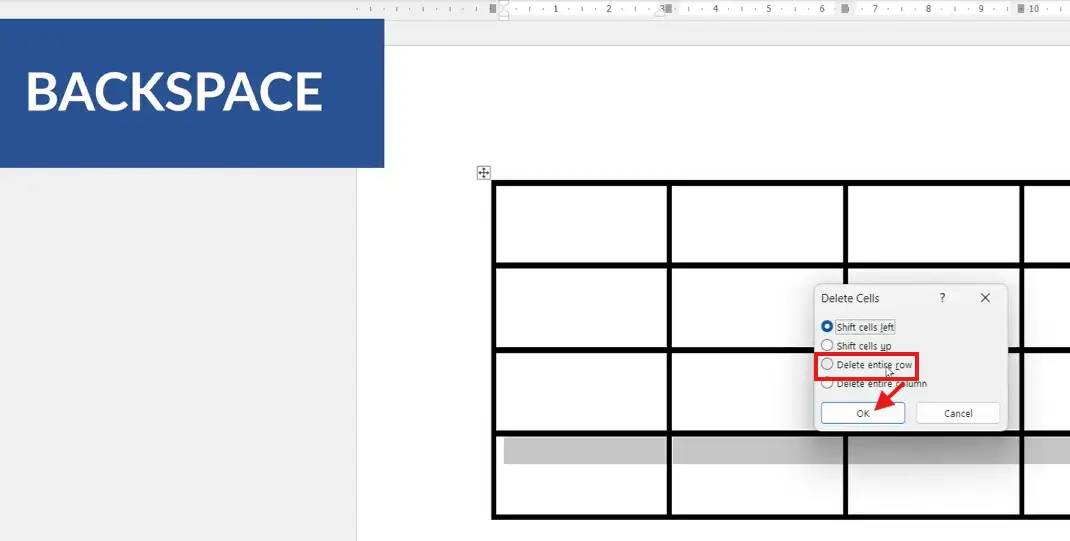
👉 The row deletes immediately, with no dialog box and no extra clicks. If you press Delete instead of Backspace, Word only clears the cell contents — Backspace removes the structure too.
Which Method Should You Use?
| Method | Best For | Speed | Mouse or Keyboard |
|---|---|---|---|
| Method 1 — Right-Click | Beginners, discoverable path | Medium | Mouse |
| Method 2 — Table Layout Tab | Already formatting from the ribbon | Medium | Mouse |
| Method 3 — Backspace | Fast, repeated deletions | Fastest | Keyboard + mouse |
For day-to-day editing, Method 3 is the one to memorise — the time saving compounds when you’re cleaning up large tables with multiple unwanted rows.
Common Problems When Deleting a Row in a Table in Word
Pressing Delete only clears the text, not the row
That’s the difference between Delete and Backspace in Word tables. Delete removes content only. To remove the row itself, select it first and press Backspace, or use Method 1 or 2 instead.
The wrong row gets deleted
You probably clicked inside a cell without highlighting the row, and Word deleted the row containing the cursor. Hover to the left until the cursor turns into a black arrow, then click — that’s the only way to be sure the right row is selected. Press Ctrl + Z to undo.
The Delete button is missing from the ribbon
The Table Layout tab only appears when your cursor is inside a table. Click any cell first and the tab will reappear, with the Delete button in the Rows & Columns group.
Deleted rows leave a blank gap
You cleared the cell contents instead of removing the row. Empty rows still take up vertical space because the structure is still there. Select the row using the left-margin arrow, then press Backspace to remove the row itself.
Pro Tips
- Always double-check the row selection before deleting — particularly in long tables where it’s easy to miscount, and pair it with how to justify text in Word for tidier column alignment afterwards.
- Use Ctrl + Z immediately if you remove a row by mistake — Word’s undo is reliable for table edits.
- To delete several rows at once, select all of them by dragging in the left margin, then use any of the three methods — they all support multi-row deletion.
- If you need to delete every empty row in a long table, use Find & Replace with the cursor in the table and search for empty paragraph marks (^p^p) — far faster than clicking each one.
FAQs
How do I delete a row in a table in Word?
To delete a row in a table in Word, click inside the row, right-click, choose Delete Cells → Delete entire row, and click OK. For the fastest method, select the row from the left margin and press Backspace.
Can I delete multiple rows at once in Word?
Yes. Highlight all the rows you want to remove by dragging in the left margin, then use any of the three methods above to delete them in one go.
What happens to the rest of the table after deleting a row?
The table adjusts automatically — the remaining rows shift up to close the gap, and column widths stay the same. No manual reformatting is required.
Is there a shortcut to delete rows instantly?
There’s no single-key shortcut, but selecting the row from the left margin and pressing Backspace is the fastest method — no dialog box, no extra clicks.
Can I undo a deleted row?
Yes. Press Ctrl + Z immediately after the deletion to restore the row exactly as it was. Word keeps multiple undo steps, so you can also reverse several deletions in sequence.
What’s the difference between Delete and Backspace in Word tables?
Delete clears the cell contents but leaves the row in place. Backspace on a selected row removes the entire row structure. This catches out a lot of users when they try to clean up a table.
How do I delete a row in a table in Word on Mac?
Same paths work on Mac. Right-click Delete Cells → Delete entire row, or use Table Layout → Delete → Delete Rows. The Backspace method also works once the row is selected.
Can I delete a header row in a table in Word?
Yes — header rows delete the same way as any other row. If you want to keep the row but stop it repeating on each page, untick Repeat Header Rows on the Table Layout tab instead.
Conclusion
Once you know how to delete a row in a table in Word, the choice of method comes down to where your hands are at the time — right-click for the discoverable path, the Table Layout tab when you’re already on the ribbon, and Backspace when speed matters.
Mastering small actions like this turns table editing from a chore into a fluid part of your workflow. The natural next step is building cleaner table structures from the start — start with our guide on how to merge tables in Word to combine and tidy data alongside the deletion methods above.
New to Word? This tutorial goes with Chapter 9 of the free Microsoft Word Beginners Hub: Tables. It covers the basics step by step, with screenshots, short videos and practice files.
Related Tutorials
- How to Merge Tables in Word
- How to Hide Table Lines in Word
- How to Create a Table of Contents in Word
Word Tutorials
Recently Added on Word Made Easy
Browse the complete collection for help with formatting, layout, pages, tables, images, and document setup.
For Microsoft support documentation, visit the official Microsoft guidance.
Leave a Reply