Using your own document? The steps use the practice newsletter, but they work the same on any document. Wherever a step names part of the newsletter, such as the title or the date, use the matching text in your own document.
Insert a table
A table puts information into neat rows and columns. It is ideal for a list of events, prices or phone numbers.
Click in your document where you want the table to go.The cursor flashes there.
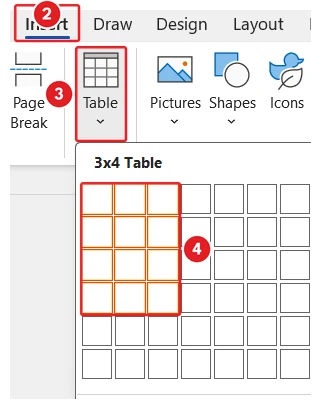
Click the Insert tab.Open the Insert tab (2), click Table (3), then click the 3 by 4 square in the grid (4).
In the Tables group, click Table.A grid of small squares opens.
Move the pointer across the grid until 3 squares across and 4 down are highlighted. The top of the grid says 3×4 Table. Then click.An empty table appears in your document.You should see: A new table with 3 columns and 4 rows.
While the cursor is in a table, two new tabs appear on the ribbon: Table Design and Table Layout.
Type in a table and move around
Each box in a table is called a cell. The Tab key moves you from one cell to the next, so your hands can stay on the keyboard.
Click in the top-left cell.
Type Event.
Press Tab.The cursor moves to the next cell on the right.
Type When, press Tab, then type Where.
Press Tab again.The cursor jumps to the first cell of the next row.
Fill in the other rows the same way, using the three events listed below the table in the start file.Your table is full of text.You should see: The table filled in with three events.
Press Shift + Tab to go back one cell. In the very last cell, pressing Tab adds a new row.
Add a row or column
Plans change, so you will often need an extra row or column. Word adds them for you.
Click in a cell in the row above where you want the new row. For example, click in the Litter pick row.
Click the Table Layout tab.Open the Table Layout tab (2), then click Insert Row Below (3).
In the Rows & Columns group, click Insert Row Below.A new empty row appears under the cell you clicked.
The same group has Insert Row Above, Insert Column Left and Insert Column Right. For a faster way, right-click a cell. A small toolbar appears with Insert and Delete buttons on it.
Delete a row or column
Remove a row or column you no longer need, such as an event that was cancelled.
Click in any cell of the row or column you want to remove.
On the Table Layout tab, in the Rows & Columns group, click Delete.Click Delete (2), then Delete Rows (3).A menu opens.
Click Delete Rows or Delete Columns.The row or column disappears, with its text.
Watch it happen: Choose Delete, then Delete Columns, and the column disappears.
Resize a column
Word makes every column the same width at first. Make a column wider when its text needs more room.
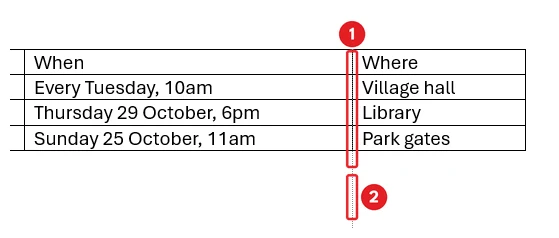
Point to the line between two columns.Point to the line between columns (1), then drag it to its new place (2).The pointer changes to two short lines with arrows pointing left and right.
Drag the line to the left or right.One column gets wider and the one next to it gets narrower.
Watch it happen: Drag the line between two columns to make one wider and the other narrower.
Merge cells
Merging joins several cells into one big cell. It is useful for a note that runs across the whole table. To follow along, first add an empty row at the bottom of your table, as in Add a row or column.
Drag across the cells you want to join. For example, drag across all three cells of the empty bottom row.The cells are shaded grey.
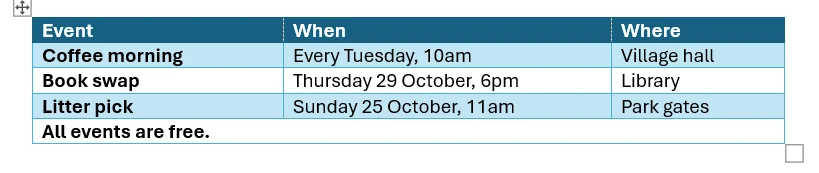
On the Table Layout tab, in the Merge group, click Merge Cells.Click Merge Cells in the Merge group (2).The cells become one wide cell. Type All events are free. in it.You should see: The bottom row is now one cell across the whole table.
Watch it happen: Select the cells, click Merge Cells, and they become one cell.
Give a table a style
A table style adds colours, shading and lines in one click. It makes a table easier to read.
Click in any cell of the table.
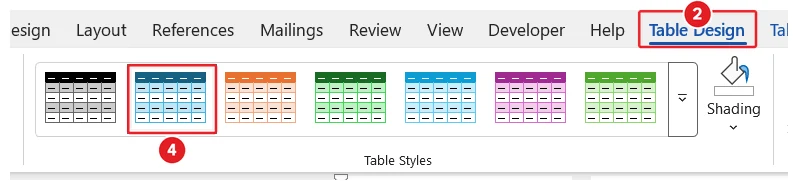
Click the Table Design tab.Open the Table Design tab (2), then click a style (4).
In the Table Styles group, point to a style.Your table shows a preview of that style.
Click the style you like.The table changes to that style. The top row looks different, because Header Row is ticked.You should see: The events table with a table style.
Add borders to a table
Borders are the lines around the cells. You choose which lines show.
Point to the table. Click the small square with four arrows that appears at its top-left corner.The whole table is selected.
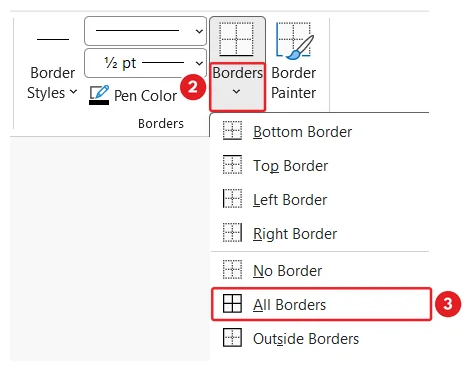
On the Table Design tab, in the Borders group, click the arrow under Borders.Click the Borders arrow (2), then All Borders (3).A list of border choices opens.
Click All Borders.Every cell now has a line round it.
If every cell already had lines, you won’t see a change. To hide every line, choose No Border from the same list.
Mac and Word for the web: The steps are much the same, with Table Design and Table Layout tabs. Word for the web has fewer table styles and border tools.
See it done in Word: Three Ways to Insert a Table in Word.
Your privacy choices
We use cookies and similar technologies to make this site work, understand how it is used, and show relevant content and advertising. You can accept all cookies, deny non-essential cookies, or manage your preferences. You can change your choice at any time.
Functional
Always active
The technical storage or access is strictly necessary for the legitimate purpose of enabling the use of a specific service explicitly requested by the subscriber or user, or for the sole purpose of carrying out the transmission of a communication over an electronic communications network.
Preferences
The technical storage or access is necessary for the legitimate purpose of storing preferences that are not requested by the subscriber or user.
Statistics
The technical storage or access that is used exclusively for statistical purposes.The technical storage or access that is used exclusively for anonymous statistical purposes. Without a subpoena, voluntary compliance on the part of your Internet Service Provider, or additional records from a third party, information stored or retrieved for this purpose alone cannot usually be used to identify you.
Marketing
The technical storage or access is required to create user profiles to send advertising, or to track the user on a website or across several websites for similar marketing purposes.







 3:51
3:51