Skip to content
Word Made Easy
Home Word Tutorials Word Templates Google Docs PowerPoint Tutorials YouTube Videos

How to Make a Table in Word: 3 Easy Methods

Microsoft Word, Tables, Images & Media

Updated 13 November 2026 · By Patrick Elliott

You can make a table in Word three ways — the grid selector, the Insert Table dialog, and Draw Table — and pick the one that fits the job. Tables turn cluttered text into clean, readable structure for schedules, reports, invoices, and academic work. This works in Word 2016, 2019, 2021, and Microsoft 365.

In this guide, you’ll learn three easy methods to insert a table in Word, plus how to resize, distribute rows and columns evenly, and add rows or columns after the table exists.


Contents hide
1 Why Use Tables in Word?
2 How to Make a Table in Word: Step-by-Step
3 Method 1: How to Insert a Table in Word Using the Grid Selector
4 Method 2: How to Insert a Table in Word Using the Insert Table Dialog
5 Method 3: How to Insert a Table in Word by Drawing It Manually
6 Which Method Should You Use?
7 How to Distribute Rows and Columns Evenly
8 How to Add Rows and Columns After Creating a Table
9 Editing a Table with the Draw Tool
10 Common Problems When Inserting a Table in Word
11 Pro Tips for Cleaner Tables
12 FAQs
13 Conclusion
14 Related Tutorials
15 Word Tutorials

Why Use Tables in Word?

Tables organise information into rows and columns so readers scan it fast. They’re ideal for:

  • Schedules and timetables
  • Comparisons and pricing
  • Reports and invoices
  • Academic and form layouts

Watch the Video Tutorial

If you prefer to see this in action, the full video walkthrough is below, showing each method step by step.


How to Make a Table in Word: Step-by-Step

Three methods cover every situation — grid for speed, dialog for control, Draw Table for custom shapes.


Method 1: How to Insert a Table in Word Using the Grid Selector

The fastest, most beginner-friendly method.

Steps

  1. Go to the Insert tab.
  2. Click Table.
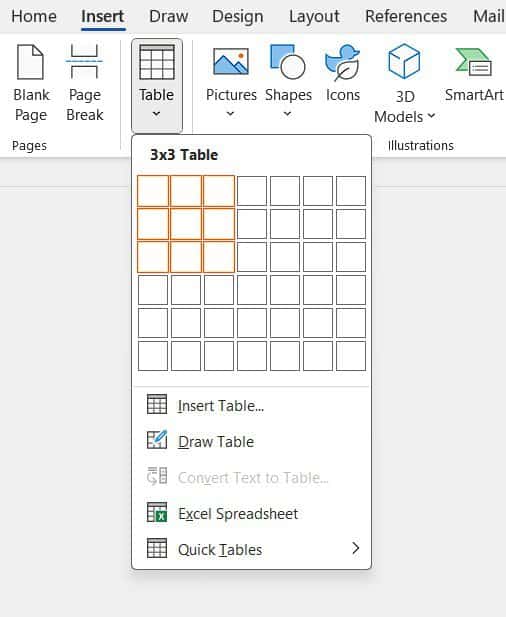
  3. Hover over the grid and highlight the rows and columns you want (for example, 3×3).
  4. Click once to insert the table.
Microsoft Word grid selector highlighting rows and columns to insert a table in Word
Select the number of rows and columns using the grid selector when inserting a table in Microsoft Word.

👉 The table drops straight in. Best for small tables where speed beats precision.


Method 2: How to Insert a Table in Word Using the Insert Table Dialog

This gives precise control over size and column behaviour.

Steps

  1. Click Insert → Table → Insert Table.
Microsoft Word Insert menu showing the Insert Table option to insert a table in Word
Use the Insert tab in Microsoft Word to add a table using the built-in table tools.
  1. Enter the number of columns and rows.
  2. Choose an AutoFit behaviour: AutoFit to Contents (fits the text), AutoFit to Window (fills page width), or Fixed Column Width (precise sizing).
  3. Click OK.
Microsoft Word Insert Table dialog showing columns, rows, and AutoFit options to insert a table in Word
Use the Insert Table dialog in Microsoft Word to set the number of columns, rows, and AutoFit behaviour.

👉 AutoFit keeps layout consistent, which matters for reports and forms — and if you need people to type into set fields, take it further and create a fillable form in Word.


Method 3: How to Insert a Table in Word by Drawing It Manually

The most flexible method — ideal for uneven or custom layouts.

Steps

  1. Select Insert → Table → Draw Table.
  2. Hold the left mouse button and draw the outer border.
  3. Draw rows and columns freely inside it.
  4. Add or remove lines as needed.
Microsoft Word Insert Table menu with Draw Table selected to insert a table in Word manually
Choose Draw Table from the Insert menu to manually create a custom table in Microsoft Word.

👉 It may look uneven at first — the next section evens it out in two clicks.


Which Method Should You Use?

MethodBest forControl
Grid selectorQuick, small tablesLow
Insert Table dialogReports and formsHigh
Draw TableCustom, irregular layoutsHighest

How to Distribute Rows and Columns Evenly

  1. Click the table handle (the move icon) at the top-left.
  2. Go to the Layout tab under Table Tools.
  3. Click Distribute Rows, then Distribute Columns.
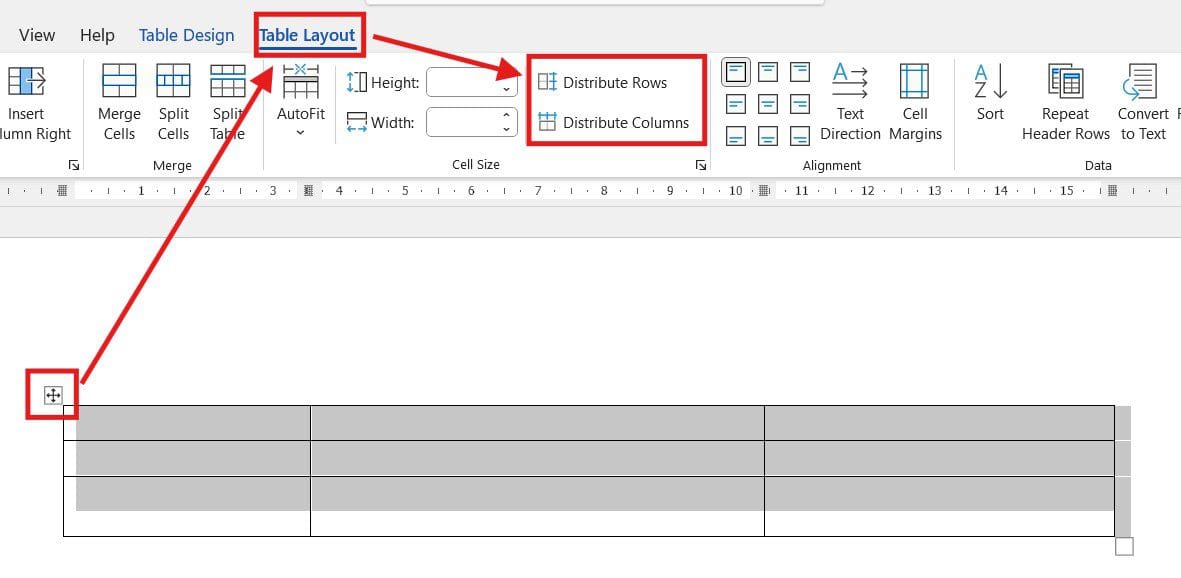
Microsoft Word Layout tab showing Distribute Rows and Distribute Columns to even out a table in Word
Use Distribute Rows and Distribute Columns in the Table Layout tab to evenly space a Word table.

👉 The table snaps to even spacing instantly.


How to Add Rows and Columns After Creating a Table

Right-click menu

Right-click inside the table to insert columns left or right, or rows above or below.
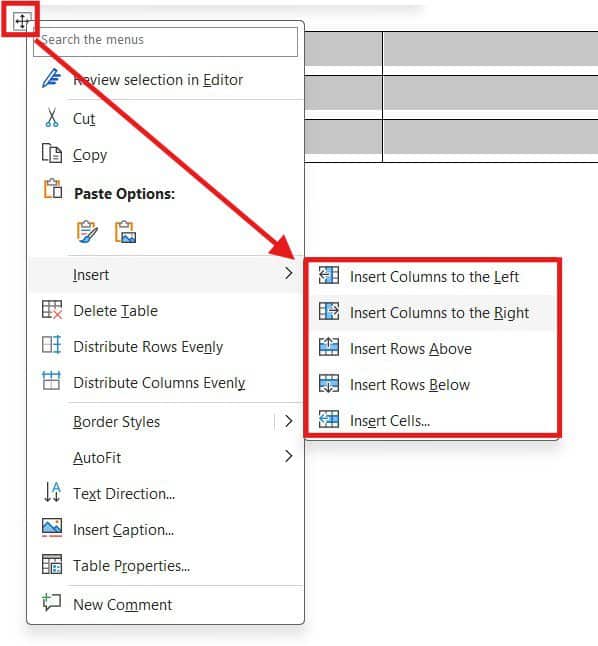
Microsoft Word right-click menu showing insert column and insert row options for a table in Word
Right-click inside a Word table to insert columns to the left or right, or add rows above and below.

Layout ribbon

  1. Select the table.
  2. Go to the Layout tab.
  3. Use the Rows & Columns group to insert above, below, left, or right.
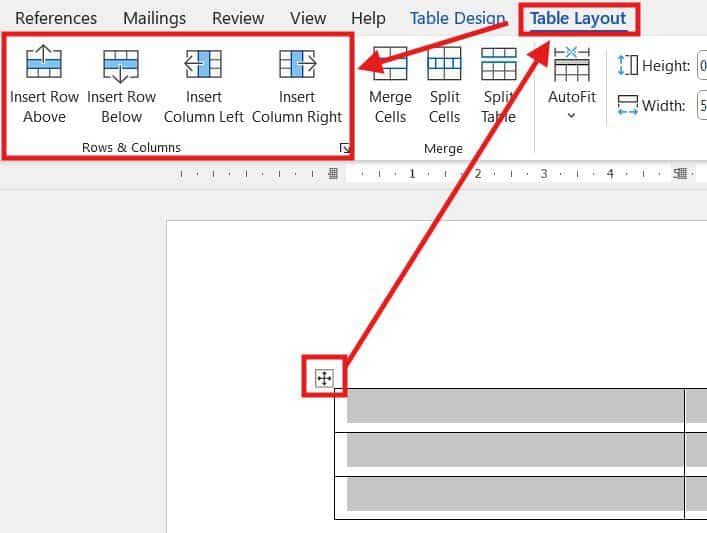
Microsoft Word Layout tab Rows and Columns group to add rows and columns to a table in Word
Use the Table Layout tab in Microsoft Word to insert rows above, below, or add columns to a table.

You can also hover between two rows or columns and click the plus (+) icon.

Microsoft Word plus icon between columns to quickly insert a column in a table in Word
Click the plus (+) icon in a Word table to quickly insert a new column.

Editing a Table with the Draw Tool

Return to Draw Table any time to add rows or columns, adjust cell boundaries, or redesign the structure.
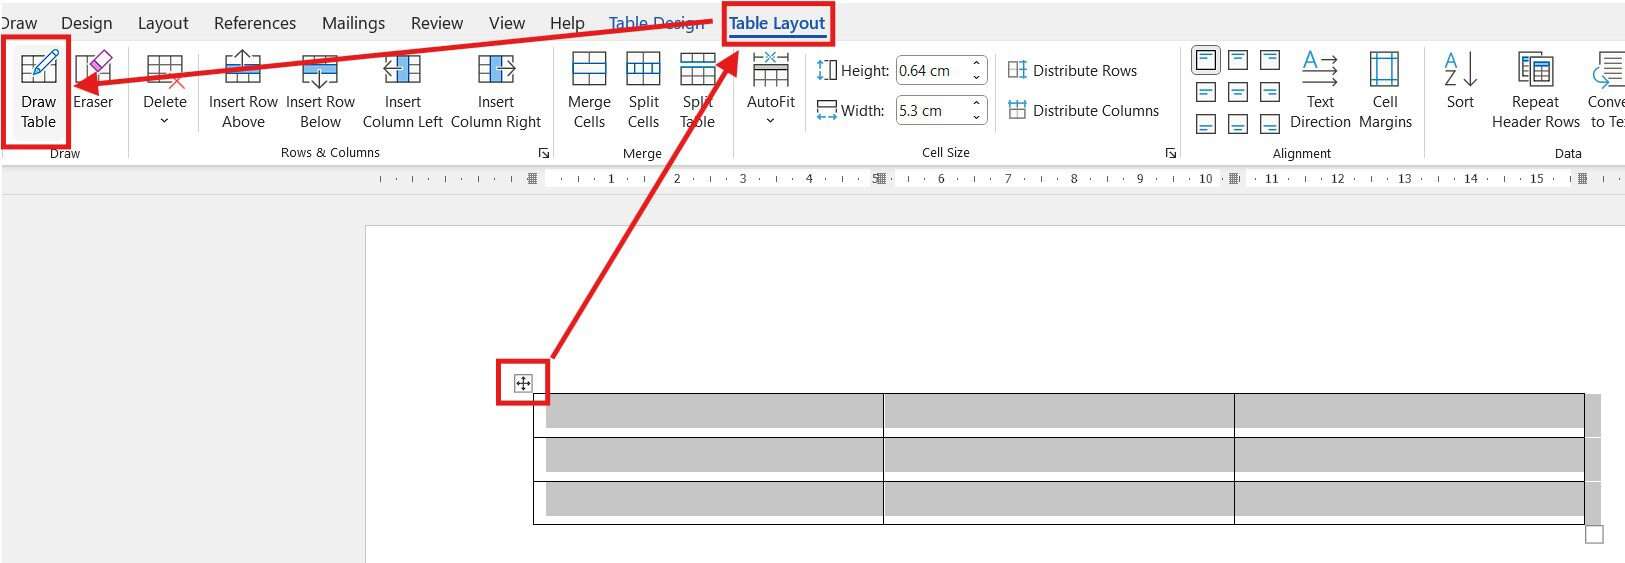
Microsoft Word Draw Table tool and Layout tab used to adjust a table in Word
Use the Draw Table tool and Table Layout options in Microsoft Word to create and adjust custom tables.

👉 After redrawing, run Distribute Rows and Columns again for balance.


Common Problems When Inserting a Table in Word

The table runs off the page

Too many columns for the width. Use AutoFit to Window, or adjust the margins in Word to give the layout more room.

Columns are uneven

Select the table, open the Layout tab, and click Distribute Columns to make them equal.

The table won’t resize the way you want

AutoFit is overriding manual widths. Set it to Fixed Column Width first, then drag the borders.

Text looks cramped in the cells

Add cell padding via Layout → Cell Margins, and make sure the text is set correctly — see how to align text in Word inside the cells.


Pro Tips for Cleaner Tables

  • Keep tables simple — fewer columns read better than a wall of data.
  • Use consistent column widths and even spacing for a professional look.
  • Press Tab to move to the next cell, and Tab in the last cell to add a new row instantly.
  • Applying a header row? Combine it with a matching Microsoft Word keyboard shortcuts cheat sheet to speed up the whole document.
  • To turn table data into a chart, see How to Make a Bar Graph in Microsoft Word.
  • To remove the padding inside cells, see How to Remove Margins Inside Table Cells in Word.
  • To paste table text as plain lines, see How to Paste Text from a Table in Word.

FAQs

How do I insert a table in Word?

To insert a table in Word, go to Insert → Table, then drag across the grid, or use Insert Table to type exact rows and columns.

What is the easiest way to insert a table in Word?

The grid selector is the fastest — hover over the squares and click your chosen size.

Can I resize a table after inserting it?

Yes. Drag the borders, or use an AutoFit option under the Layout tab.

How do I space table rows evenly?

Select the table and click Layout → Distribute Rows (and Distribute Columns).

Can I add rows or columns later?

Yes. Right-click inside the table, use the Layout ribbon, or click the plus (+) icon between rows or columns.

What is AutoFit in Word tables?

AutoFit adjusts column widths automatically to the content or the page width, depending on the option you pick.

Is drawing a table better than inserting one?

Only when you need an irregular or custom layout. For standard tables, the grid or dialog is quicker.


Conclusion

You can now insert a table in Word three ways — the grid selector for speed, the Insert Table dialog for control, and Draw Table for custom layouts — then distribute, resize, and expand it with ease.

With the structure in place, finish the layout properly by learning how to merge cells in a Word table for headers and grouped data.


New to Word? This tutorial goes with Chapter 9 of the free Microsoft Word for beginners guide: Tables. It covers the basics step by step, with screenshots, short videos and practice files, and you can download the whole guide as a free PDF.

Related Tutorials

  • How to Merge Cells in Word
  • How to Align Text in Word
  • How to Create a Fillable Form in Word

Word Tutorials

Recently Added on Word Made Easy

  • How to Mail Merge Certificates in Word: 7 Easy Steps

    November 12, 2026
  • How to Split a Cell in Word: 2 Easy Methods

    November 11, 2026
  • How to Add Mendeley Citations in Word: 9 Easy Steps

    November 11, 2026

Browse the complete collection for help with formatting, layout, pages, tables, images, and document setup.

View all Word tutorials
Watch on YouTube

For Microsoft support documentation, visit the official Microsoft guidance.

← PreviousMicrosoft Word Keyboard Shortcuts Cheat Sheet (Free PDF)
Next →How to Merge Documents in Word (Combine Files): 3 Easy Methods

Leave a comment Cancel reply

Stuck on a step, or know a quicker way? Ask or share it below.

Meet the Author

Patrick Elliott standing outdoors holding his dog.

I’m Patrick Elliott, the creator of Word Made Easy. I’ve worked in schools for over 10 years and I’m now an Inclusion Lead in the UAE. I use Microsoft Word and PowerPoint every day for planning, documentation and classroom resources.

Every guide is tested step by step before publishing (usually in Microsoft 365), and every free template is one I made myself in Word. You’ll also find practical walkthroughs on my YouTube channel.

Browse

  • Word TutorialsStep-by-step guides for every feature
  • Word Beginners HubFree 12-chapter Word course
  • Word TemplatesFree, editable downloads
  • Word Shortcut Cheat SheetsFree printable PDFs
  • Google Docs TutorialsStep-by-step Docs guides
  • PowerPoint TutorialsClear, simple slide guides
  • YouTube VideosWatch the video walkthroughs

Watch on YouTube

Prefer to watch? Most guides have a short video walkthrough on the Word Made Easy channel.

  • 147videos
  • 1.88Mviews
  • 8,000+subscribers
Subscribe on YouTube

Recently Added

  • Printable Logic Puzzles: 12 Free Number Puzzles with AnswersNovember 13, 2026
  • Directed Drawing Worksheets: 4 Free Grid Drawing Printables with AnswersNovember 13, 2026
  • Abacus Worksheets: 3 Free Place Value Printables to 9,999November 13, 2026
  • Find the Letter Worksheets: 2 Free A to Z Letter Hunt BookletsNovember 13, 2026
  • Color Code Worksheets: 4 Free Color by Code Puzzles for KidsNovember 13, 2026

Most Downloaded

  • Free Microsoft Word Keyboard Shortcuts Bundle: 14 Cheat Sheets (PDF)65 downloads in the last 30 days
  • Microsoft Word for Beginners: Free Guide and PDF62 downloads in the last 30 days
  • Free Fillable Form Templates for Word: 4 Easy Forms53 downloads in the last 30 days
  • Free Printable Alphabet Charts for Word: 5 Easy Designs50 downloads in the last 30 days
  • Free ILAW Lesson Plan Templates for Word: English and Filipino (DO 16, s. 2026)35 downloads in the last 30 days
Word Made Easy

Free, step-by-step Microsoft Word tutorials, written and tested by teacher Patrick Elliott.

Subscribe on YouTube Follow on Facebook Follow on Pinterest

Explore

  • Home
  • Word Tutorials
  • Word Templates
  • Google Docs Tutorials
  • PowerPoint Tutorials
  • YouTube Videos

Microsoft Word

  • Page Layout & Sections
  • Tables, Images & Media
  • Formatting Basics
  • Productivity & Automation
  • Beginners Hub
  • Templates
  • Shortcut Cheat Sheets

Google Docs

  • All Google Docs Tutorials

About

  • About Me
  • Contact
Privacy Policy Cookie Policy Terms of Use
© 2012–2026 Word Made Easy. All rights reserved.
Manage your privacy

To provide the best experiences, we and our partners use technologies like cookies to store and/or access device information. Consenting to these technologies will allow us and our partners to process personal data such as browsing behavior or unique IDs on this site and show (non-) personalized ads. Not consenting or withdrawing consent, may adversely affect certain features and functions.

Click below to consent to the above or make granular choices. Your choices will be applied to this site only. You can change your settings at any time, including withdrawing your consent, by using the toggles on the Cookie Policy, or by clicking on the manage consent button at the bottom of the screen.

Functional Always active
The technical storage or access is strictly necessary for the legitimate purpose of enabling the use of a specific service explicitly requested by the subscriber or user, or for the sole purpose of carrying out the transmission of a communication over an electronic communications network.
Preferences
The technical storage or access is necessary for the legitimate purpose of storing preferences that are not requested by the subscriber or user.
Statistics
The technical storage or access that is used exclusively for statistical purposes. The technical storage or access that is used exclusively for anonymous statistical purposes. Without a subpoena, voluntary compliance on the part of your Internet Service Provider, or additional records from a third party, information stored or retrieved for this purpose alone cannot usually be used to identify you.
Marketing
The technical storage or access is required to create user profiles to send advertising, or to track the user on a website or across several websites for similar marketing purposes.
Statistics

Marketing

Features
Always active

Special features

Special purposes
Always active

  • Manage options
  • Manage services
  • Manage {vendor_count} vendors
  • Read more about these purposes
Manage options
  • {title}
  • {title}
  • {title}
Manage your privacy
To provide the best experiences, we use technologies like cookies to store and/or access device information. Consenting to these technologies will allow us to process data such as browsing behavior or unique IDs on this site. Not consenting or withdrawing consent, may adversely affect certain features and functions.
Functional Always active
The technical storage or access is strictly necessary for the legitimate purpose of enabling the use of a specific service explicitly requested by the subscriber or user, or for the sole purpose of carrying out the transmission of a communication over an electronic communications network.
Preferences
The technical storage or access is necessary for the legitimate purpose of storing preferences that are not requested by the subscriber or user.
Statistics
The technical storage or access that is used exclusively for statistical purposes. The technical storage or access that is used exclusively for anonymous statistical purposes. Without a subpoena, voluntary compliance on the part of your Internet Service Provider, or additional records from a third party, information stored or retrieved for this purpose alone cannot usually be used to identify you.
Marketing
The technical storage or access is required to create user profiles to send advertising, or to track the user on a website or across several websites for similar marketing purposes.
Statistics

Marketing

Features
Always active

Special features

Special purposes
Always active

  • Manage options
  • Manage services
  • Manage {vendor_count} vendors
  • Read more about these purposes
Manage options
  • {title}
  • {title}
  • {title}