Skip to content
Word Made Easy
Home Word Tutorials Word Templates Google Docs PowerPoint Tutorials YouTube Videos

How to Add Mendeley Citations in Word: 9 Easy Steps

Microsoft Word, Word Productivity & Automation

Published 11 November 2026 · By Patrick Elliott

To add Mendeley citations in Word, select References > Mendeley Cite, sign in, and select Insert citation under any reference in your library. When you have finished writing, place the cursor where the reference list should go, select the three dots (…) at the top of the sidebar and choose Insert Bibliography.

In this guide, you’ll follow the nine steps from the video: load your library, add references at mendeley.com, set the citation style and language, insert single and multiple citations, add a page number, then insert and update a bibliography. The steps are for Mendeley Cite in Word for Microsoft 365 on Windows.


Contents hide
1 Before You Start: Check Mendeley Cite Is Installed
2 Step 1: Open Mendeley Cite and Sign In
3 Step 2: Add References to Your Mendeley Library
4 Step 3: Sync Your Library in Word
5 Step 4: Set the Citation Style and Language
6 Step 5: Insert a Citation
7 Step 6: Insert Several Citations at Once
8 Step 7: Edit a Citation and Add a Page Number
9 Step 8: Insert a Bibliography
10 Step 9: Update the Bibliography
11 Live or Manual Updates?
12 Quick Tips
13 FAQs
14 Conclusion
15 Related Tutorials
16 Word Tutorials

Before You Start: Check Mendeley Cite Is Installed

Select References on the ribbon and look for Mendeley Cite at the far right. If it is not there, follow how to add Mendeley Cite in Word first, then come back to this guide.


Watch the Video Tutorial

If you prefer to see this in action, the full video walkthrough is below, showing each method step by step.


Step 1: Open Mendeley Cite and Sign In

  1. Select References > Mendeley Cite.
Mendeley Cite button on the Word References tab
  1. In the sidebar that opens, select Get started.
  2. Sign in with your Mendeley (Elsevier) account and select Sign in.

👉 The sign-in window closes and the references already in your library load in the sidebar.
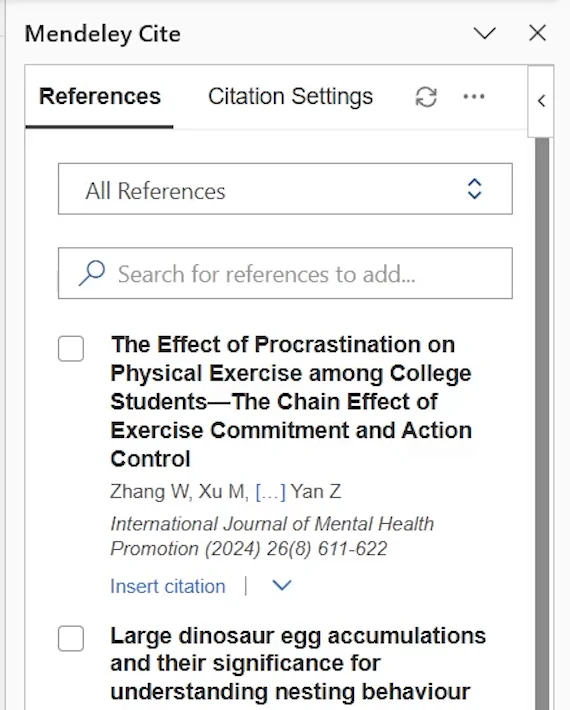
Mendeley Cite sidebar in Word showing the references in a Mendeley library

If the sidebar is empty, your library has no references yet. Step 2 shows you how to add them.


Step 2: Add References to Your Mendeley Library

References are added outside Word, in your Mendeley library.

  1. Go to mendeley.com. Either select Download for Windows to use the desktop app, or select Get started on Mendeley Web. Both work the same way for this guide.
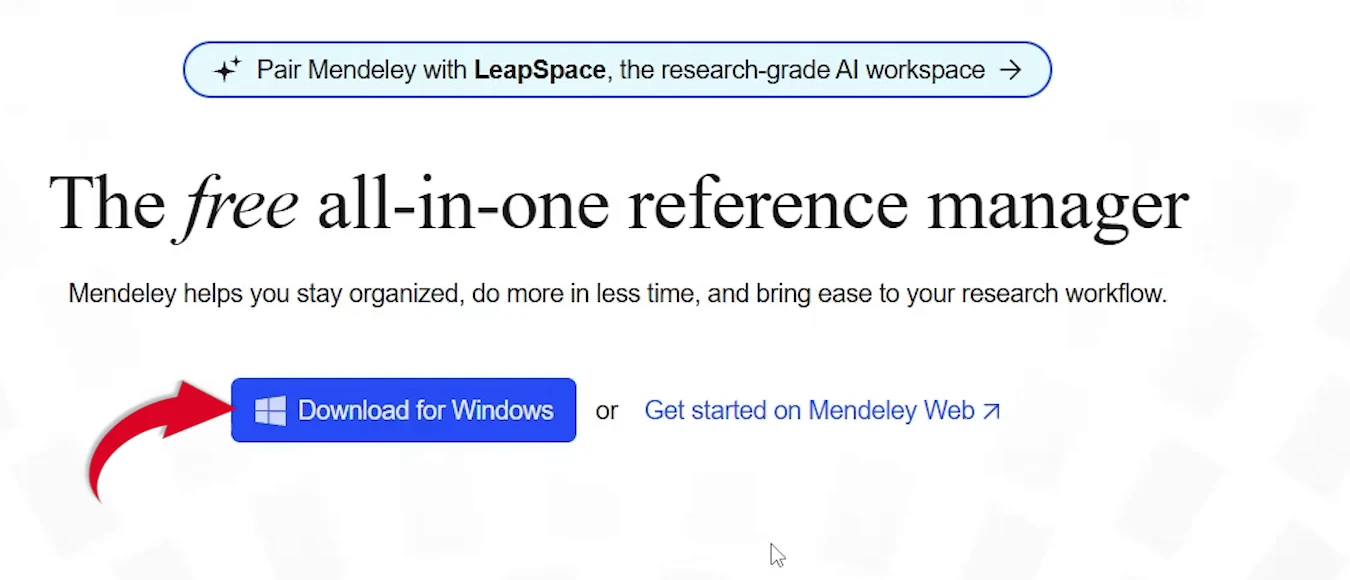
Mendeley website with Download for Windows and Get started on Mendeley Web
  1. Sign in with the same account you used in Word.
  2. Select Add references, then choose how to add them: Import file(s), Import folder(s), Import library (from another reference manager, as a BibTeX, EndNote XML or RIS file) or Add reference manually, where you type the details yourself.
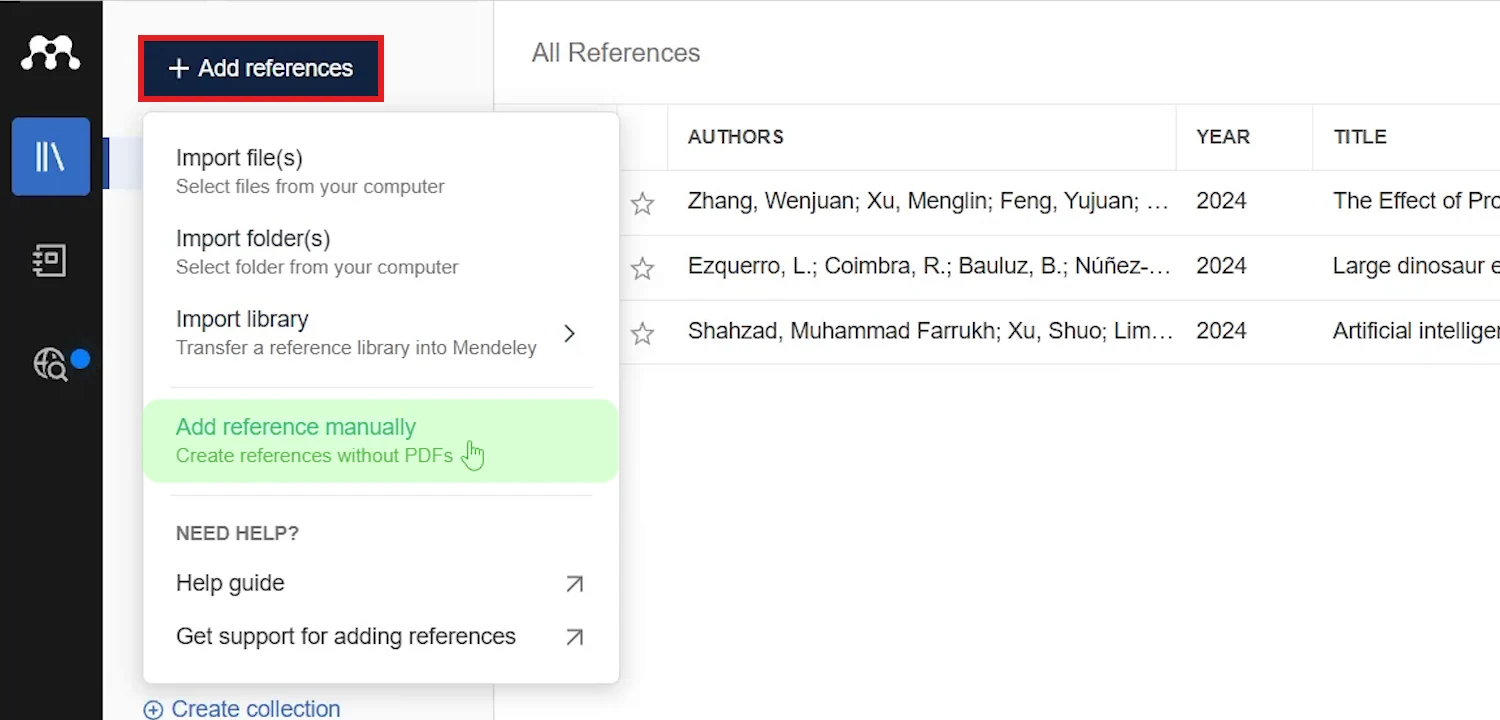
Mendeley web library Add references menu with import and manual options

Step 3: Sync Your Library in Word

  1. Go back to Word and open References > Mendeley Cite.
  2. If your new references do not appear, select the sync button (the two circling arrows) at the top of the sidebar.
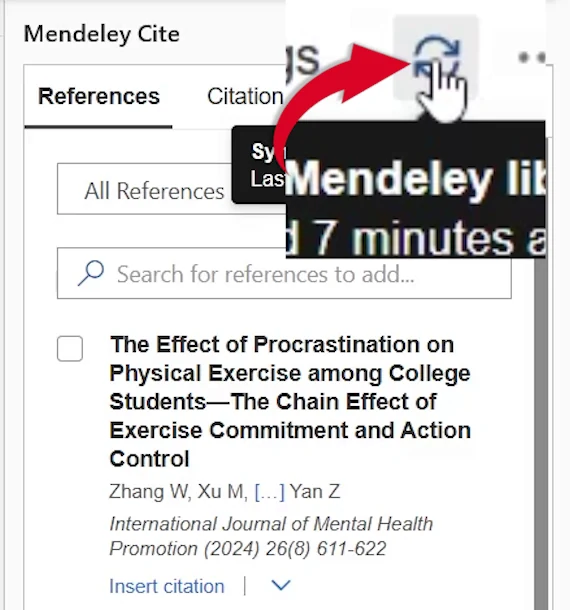
Sync button at the top of the Mendeley Cite sidebar in Word

👉 The sidebar refreshes and shows every reference in your library.


Step 4: Set the Citation Style and Language

Choose the style before you insert anything, so every citation matches.

  1. Select the Citation Settings tab at the top of the sidebar.
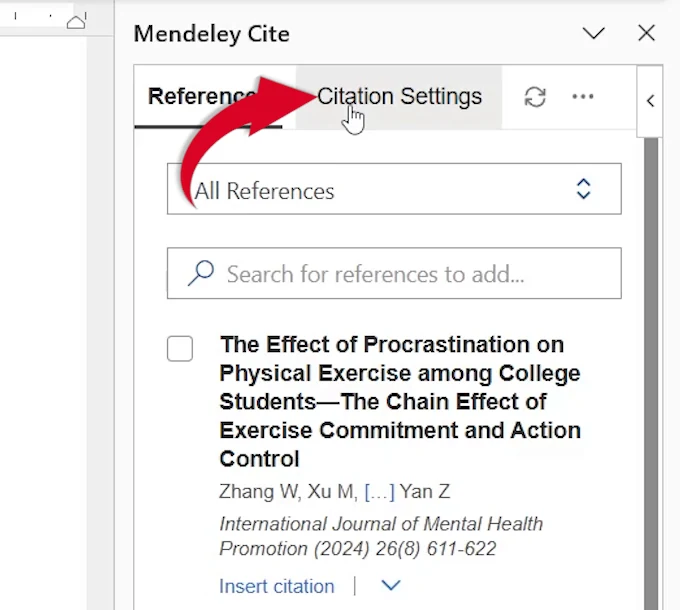
Citation Settings tab in the Mendeley Cite sidebar
  1. Select Change citation style and choose your style from the list, for example APA Style 7th edition.
Change citation style button in Mendeley Cite with APA Style 7th edition
  1. Select Change citation language, choose your language, such as English (UK), and select Update citation language.
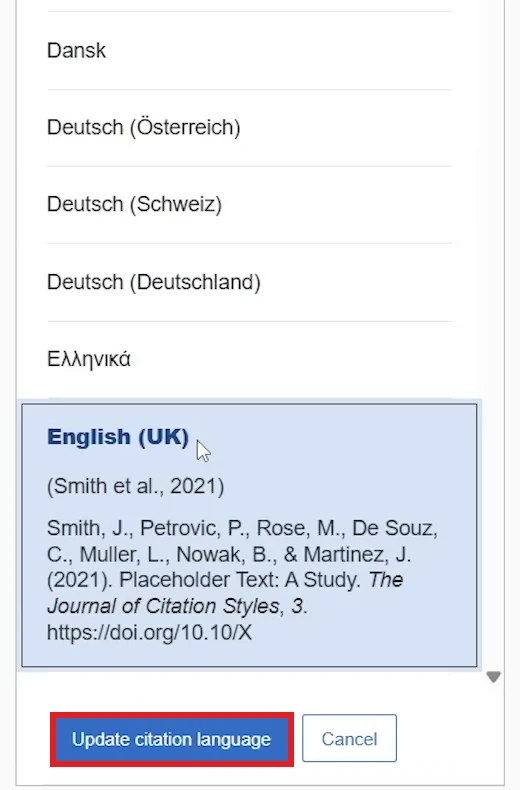
Mendeley Cite citation language list with English (UK) and Update citation language
  1. Check that both settings are correct, then select the References tab to go back to your library.
Mendeley Cite set to APA Style 7th edition and English (UK)

👉 If the changes do not show straight away, select the sync button again to refresh the sidebar.


Step 5: Insert a Citation

  1. Click in your document where the citation should go.
  2. In the sidebar, select Insert citation under the reference you want.
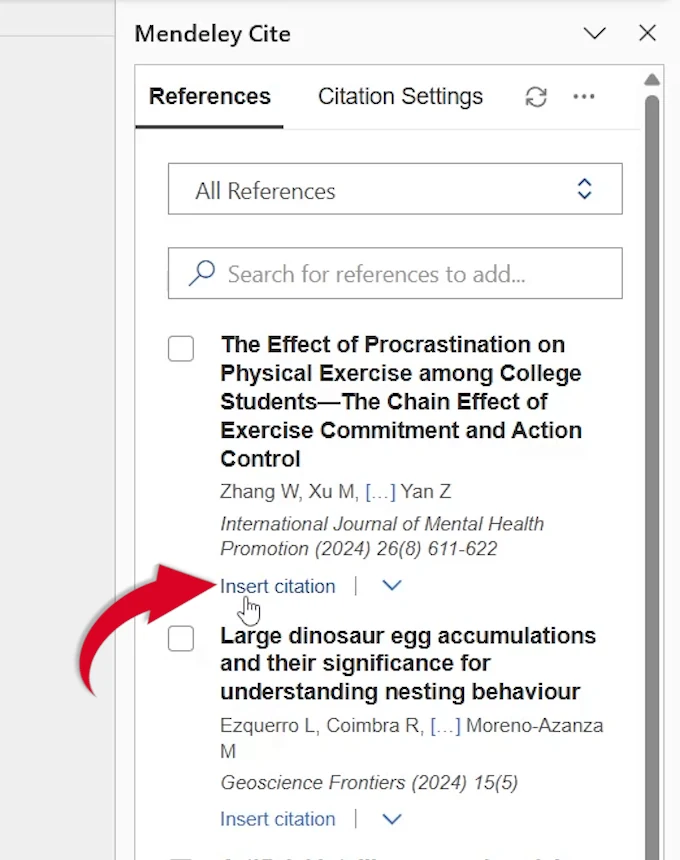
Mendeley citations in Word: Insert citation under a reference in the Mendeley Cite sidebar

👉 Word adds the citation at the cursor in your chosen style, for example (Zhang et al., 2024).

Mendeley citation inserted in a Word document reading Zhang et al., 2024

Step 6: Insert Several Citations at Once

Use this when one sentence draws on more than one source.

  1. Tick the box next to each reference you want to cite.
  2. Select Insert 3 citations at the bottom of the sidebar. The number matches how many references you ticked.
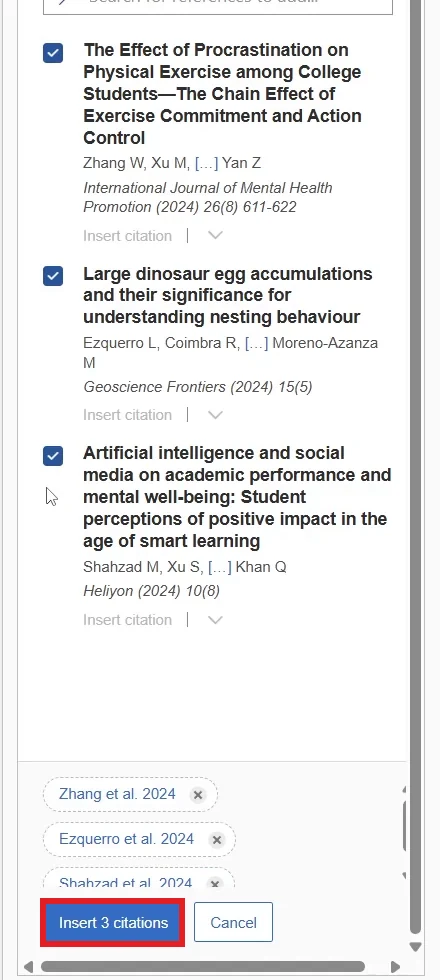
Three references ticked in Mendeley Cite with the Insert 3 citations button

👉 The citations appear together in one set of brackets, in the order your style requires.

Three Mendeley citations inserted together in one set of brackets in Word

Step 7: Edit a Citation and Add a Page Number

Use this to change how a citation is displayed or to cite a specific page.

  1. Tick the reference, then select its name at the bottom of the sidebar, above Insert 1 citation.
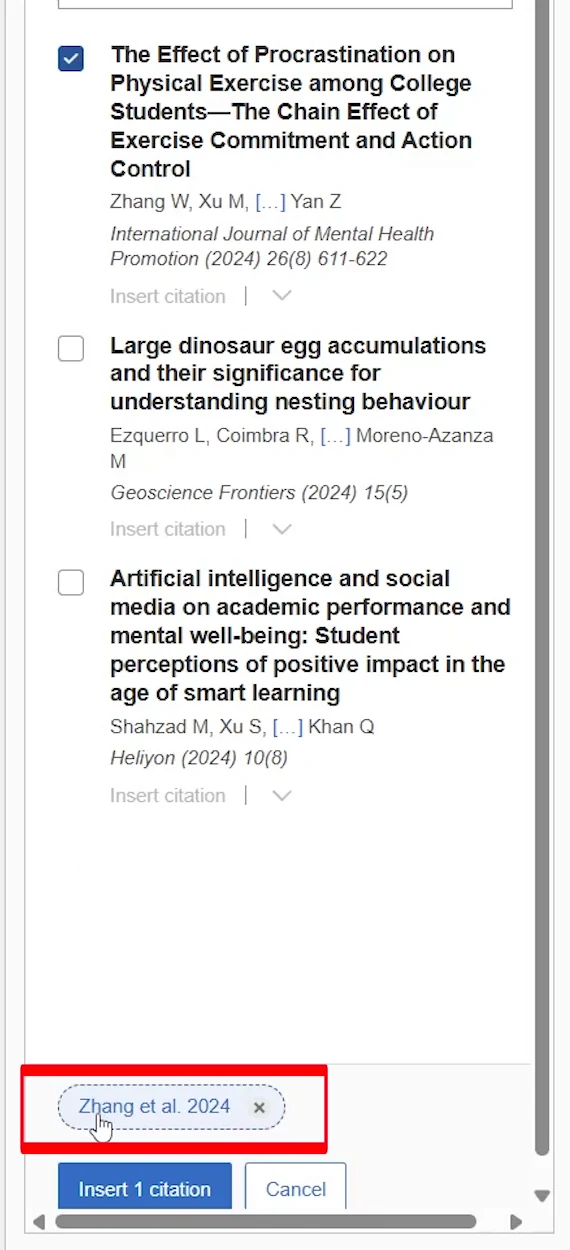
Selected citation name above Insert 1 citation in the Mendeley Cite sidebar
  1. The editing panel opens with a Preview of the citation. Open Display as to switch between styles such as (Author, Year) and Author (Year).
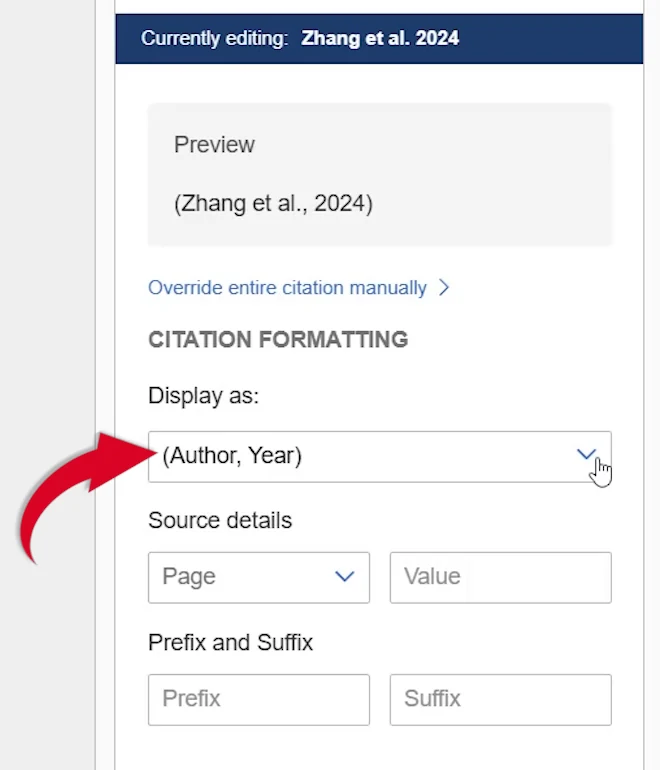
Mendeley Cite citation editor with the Display as menu
  1. Under Source details, leave Page selected (or choose another locator, such as Chapter), then type the page number in the Value box.
Mendeley Cite Source details Page menu for adding a page number
  1. Check the Preview, which now includes the page number.
  1. Select Save changes, then Insert 1 citation.

👉 Always read the preview before saving. If the citation does not look right, try another Display as option before you insert it.


Step 8: Insert a Bibliography

  1. Click in your document where the bibliography should go, usually on a new page at the end.
  2. Select the three dots (…) at the top of the sidebar, then Insert Bibliography.
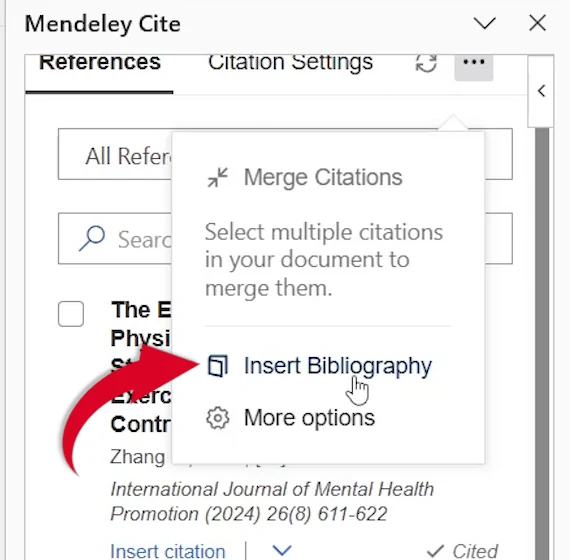
Insert Bibliography in the Mendeley Cite three-dot menu
  1. Choose Switch to manual updates or Keep live updates. Live updates change the bibliography every time you add a citation; manual updates are faster in long documents.
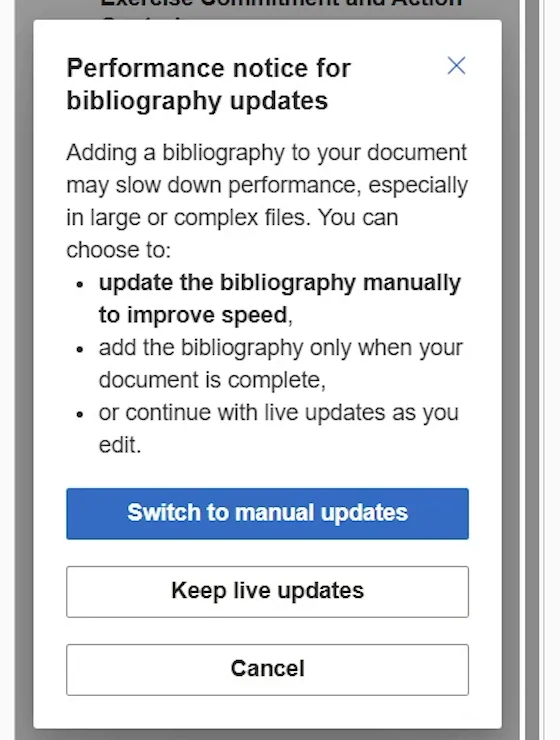
Mendeley Cite choice between manual and live bibliography updates
  1. Select Continue.

👉 Mendeley Cite inserts the bibliography at your cursor, with every reference you have cited.

APA bibliography inserted in Word by Mendeley Cite

Step 9: Update the Bibliography

With manual updates, the bibliography does not change on its own when you add or remove a citation.

  1. Delete the citation you no longer need from your document.
  2. Select the three dots (…) at the top of the sidebar, then Update Bibliography.
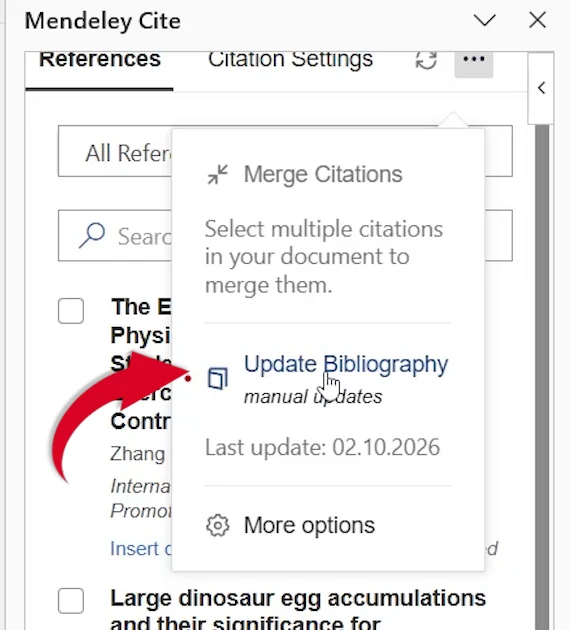
Update Bibliography in the Mendeley Cite three-dot menu

👉 The reference you removed disappears from the bibliography.

Updated bibliography in Word after removing a citation

Live or Manual Updates?

Keep Live Updates

The bibliography updates every time you insert a citation. Best for short essays.

Switch to Manual Updates

Recommended by Mendeley for long or complex documents. Select Update Bibliography when you need it.


Quick Tips

Choose the Style First

Set the citation style before you start citing, so you do not have to check every citation later.

Use One Account

Sign in to Word and mendeley.com with the same Mendeley account, or your references will not appear.

Hanging Indents

APA and MLA reference lists use a hanging indent. See how to do a hanging indent in Word.

Reference Shortcuts

Work faster on the References tab with the reference shortcuts in Word.


FAQs

How do I add Mendeley citations in Word?

Select References > Mendeley Cite, sign in, click in your document and select Insert citation under the reference you want.

Why are my Mendeley references not showing in Word?

Select the sync button at the top of the Mendeley Cite sidebar, and check that you are signed in with the same account as your library.

How do I change the citation style in Mendeley Cite?

Select the Citation Settings tab, then Change citation style, and choose a style such as APA Style 7th edition.

How do I add a page number to a Mendeley citation?

Tick the reference, select its name at the bottom of the sidebar, type the page number under Source details, then save and insert it.

How do I insert a bibliography with Mendeley Cite?

Click where the bibliography should go, select the three dots at the top of the sidebar, then Insert Bibliography and Continue.

Why has my bibliography not updated?

Manual updates are switched on. Select the three dots, then Update Bibliography, to refresh it.


Conclusion

To add Mendeley citations in Word, sync your library, set the citation style, insert your citations from the Mendeley Cite sidebar, then insert a bibliography and update it as your work changes. Elsevier explains more in how to insert citations using Mendeley and how to insert a bibliography with Mendeley Cite.

Writing an APA paper? Start from the free APA format templates for Word.


Related Tutorials

  • How to Add Mendeley Cite in Word
  • How to Format APA in Word: Easy Step-by-Step Guide
  • How to Do a Hanging Indent in Word: 3 Easy Methods

Word Tutorials

Recently Added on Word Made Easy

  • How to Mail Merge Certificates in Word: 7 Easy Steps

    November 12, 2026
  • How to Split a Cell in Word: 2 Easy Methods

    November 11, 2026
  • How to Add Mendeley Citations in Word: 9 Easy Steps

    November 11, 2026

Browse the complete collection for help with formatting, layout, pages, tables, images, and document setup.

View all Word tutorials
Watch on YouTube

For Microsoft support documentation, visit the official Microsoft guidance.
← PreviousHow to Make a Table Smaller in Word: 3 Easy Methods
Next →Free Printable Mazes for Kids: 30 Mazes with Answer Keys

Leave a comment Cancel reply

Stuck on a step, or know a quicker way? Ask or share it below.

Meet the Author

Patrick Elliott standing outdoors holding his dog.

I’m Patrick Elliott, the creator of Word Made Easy. I’ve worked in schools for over 10 years and I’m now an Inclusion Lead in the UAE. I use Microsoft Word and PowerPoint every day for planning, documentation and classroom resources.

Every guide is tested step by step before publishing (usually in Microsoft 365), and every free template is one I made myself in Word. You’ll also find practical walkthroughs on my YouTube channel.

Browse

  • Word TutorialsStep-by-step guides for every feature
  • Word Beginners HubFree 12-chapter Word course
  • Word TemplatesFree, editable downloads
  • Word Shortcut Cheat SheetsFree printable PDFs
  • Google Docs TutorialsStep-by-step Docs guides
  • PowerPoint TutorialsClear, simple slide guides
  • YouTube VideosWatch the video walkthroughs

Watch on YouTube

Prefer to watch? Most guides have a short video walkthrough on the Word Made Easy channel.

  • 147videos
  • 1.88Mviews
  • 8,000+subscribers
Subscribe on YouTube

Recently Added

  • Christmas Directed Drawing: 4 Free Grid Drawing Worksheets with AnswersNovember 13, 2026
  • Free Class Record Template for Word (DO 15, s. 2026): 5 PrintablesNovember 12, 2026
  • Free Learner’s Profile Templates for Word: 5 PrintablesNovember 12, 2026
  • Free LAC Templates for Word (DO 35, s. 2016): 5 PrintablesNovember 12, 2026
  • Free Classroom Structuring Templates for Word: 7 Charts and PostersNovember 12, 2026

Most Downloaded

  • Free Microsoft Word Keyboard Shortcuts Bundle: 14 Cheat Sheets (PDF)64 downloads in the last 30 days
  • Microsoft Word for Beginners: Free Guide and PDF62 downloads in the last 30 days
  • Free Printable Alphabet Charts for Word: 5 Easy Designs50 downloads in the last 30 days
  • Free Fillable Form Templates for Word: 4 Easy Forms45 downloads in the last 30 days
  • Free ILAW Lesson Plan Templates for Word: English and Filipino (DO 16, s. 2026)33 downloads in the last 30 days
Word Made Easy

Free, step-by-step Microsoft Word tutorials, written and tested by teacher Patrick Elliott.

Subscribe on YouTube Follow on Facebook Follow on Pinterest

Explore

  • Home
  • Word Tutorials
  • Word Templates
  • Google Docs Tutorials
  • PowerPoint Tutorials
  • YouTube Videos

Microsoft Word

  • Page Layout & Sections
  • Tables, Images & Media
  • Formatting Basics
  • Productivity & Automation
  • Beginners Hub
  • Templates
  • Shortcut Cheat Sheets

Google Docs

  • All Google Docs Tutorials

About

  • About Me
  • Contact
Privacy Policy Cookie Policy Terms of Use
© 2012–2026 Word Made Easy. All rights reserved.
Manage your privacy

To provide the best experiences, we and our partners use technologies like cookies to store and/or access device information. Consenting to these technologies will allow us and our partners to process personal data such as browsing behavior or unique IDs on this site and show (non-) personalized ads. Not consenting or withdrawing consent, may adversely affect certain features and functions.

Click below to consent to the above or make granular choices. Your choices will be applied to this site only. You can change your settings at any time, including withdrawing your consent, by using the toggles on the Cookie Policy, or by clicking on the manage consent button at the bottom of the screen.

Functional Always active
The technical storage or access is strictly necessary for the legitimate purpose of enabling the use of a specific service explicitly requested by the subscriber or user, or for the sole purpose of carrying out the transmission of a communication over an electronic communications network.
Preferences
The technical storage or access is necessary for the legitimate purpose of storing preferences that are not requested by the subscriber or user.
Statistics
The technical storage or access that is used exclusively for statistical purposes. The technical storage or access that is used exclusively for anonymous statistical purposes. Without a subpoena, voluntary compliance on the part of your Internet Service Provider, or additional records from a third party, information stored or retrieved for this purpose alone cannot usually be used to identify you.
Marketing
The technical storage or access is required to create user profiles to send advertising, or to track the user on a website or across several websites for similar marketing purposes.
Statistics

Marketing

Features
Always active

Special features

Special purposes
Always active

  • Manage options
  • Manage services
  • Manage {vendor_count} vendors
  • Read more about these purposes
Manage options
  • {title}
  • {title}
  • {title}
Manage your privacy
To provide the best experiences, we use technologies like cookies to store and/or access device information. Consenting to these technologies will allow us to process data such as browsing behavior or unique IDs on this site. Not consenting or withdrawing consent, may adversely affect certain features and functions.
Functional Always active
The technical storage or access is strictly necessary for the legitimate purpose of enabling the use of a specific service explicitly requested by the subscriber or user, or for the sole purpose of carrying out the transmission of a communication over an electronic communications network.
Preferences
The technical storage or access is necessary for the legitimate purpose of storing preferences that are not requested by the subscriber or user.
Statistics
The technical storage or access that is used exclusively for statistical purposes. The technical storage or access that is used exclusively for anonymous statistical purposes. Without a subpoena, voluntary compliance on the part of your Internet Service Provider, or additional records from a third party, information stored or retrieved for this purpose alone cannot usually be used to identify you.
Marketing
The technical storage or access is required to create user profiles to send advertising, or to track the user on a website or across several websites for similar marketing purposes.
Statistics

Marketing

Features
Always active

Special features

Special purposes
Always active

  • Manage options
  • Manage services
  • Manage {vendor_count} vendors
  • Read more about these purposes
Manage options
  • {title}
  • {title}
  • {title}