
To mail merge certificates in Word, put your class list in Excel with one row per learner, open your certificate, then choose Mailings > Start Mail Merge > Letters. Connect the list, replace the sample name with a Name merge field, preview, and select Finish & Merge to get one certificate per learner.
It is the quickest way to make a whole class set of recognition, completion or moving-up certificates without typing each name. The steps use one of our free certificate of recognition templates for Word, but they work with any certificate, including the general certificate templates. Already know the basics from letters? This guide adds what certificates need: awards, name formatting, landscape and long bond pages, and PDFs.
What Mail Merge Does for Certificates
Mail merge joins one certificate design to a list of people. Word fills each copy with one row of the list, so a class of 40 gives you 40 certificates, each with its own name, award and section. Edit the design once and every certificate changes with it.
It suits:
- recognition certificates with honours, such as With Honors or With High Honors;
- completion and moving-up certificates for Kindergarten, Grade 6 and Grade 10;
- participation and appreciation certificates for seminars, contests and volunteers;
- any award where the wording is the same and only the details change.
Before You Start
- Word for Microsoft 365, 2024, 2021, 2019 or 2016 on Windows. Word for Mac has the same Mailings tab, with the differences listed below.
- A certificate in Word. Our moving-up and perfect attendance certificates and participation and appreciation certificates are ready to use.
- Your class list in Excel, saved on your computer.
Step 1: Prepare the Class List in Excel
The list decides what Word can put on each certificate, so spend a minute getting it right.
- Type the headings in row 1: for example Name, Grade, Section and Award. Short headings without symbols are easiest to find later.
- Type one learner per row underneath, with no blank rows between them.
- Write each name exactly as it should be printed, including the middle initial and suffix, such as Jr.
- Save the workbook and close it before you connect it to Word.
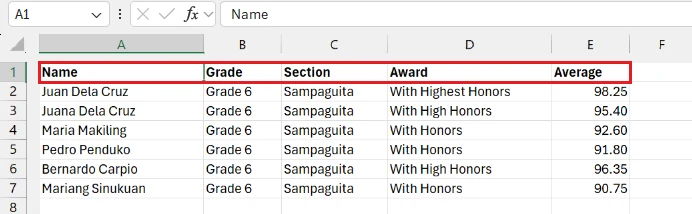
👉 Keep any title, such as the school name or “Grade 6 Honor Roll”, out of row 1. Word reads the first row as the headings.
Step 2: Open the Certificate and Choose Letters
Word has no separate certificate merge type. A certificate is a one-page letter, so you use the Letters option.
- Open your certificate in Word and save a copy with a clear name, such as Honors Certificate Merge.
- Select Mailings > Start Mail Merge > Letters.
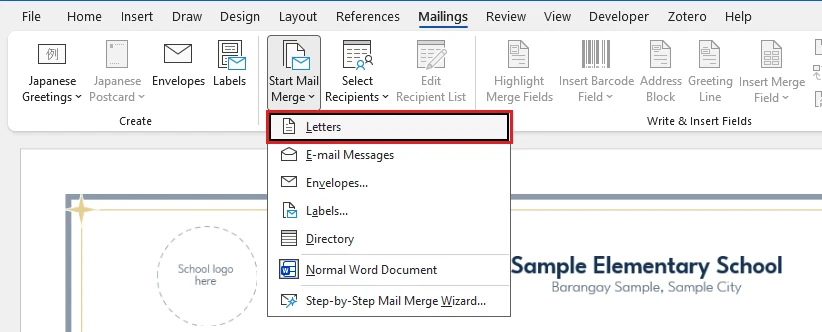
👉 If your certificate is a template with content controls (placeholders that show a small title tab when you click them), right-click the name placeholder and choose Remove Content Control before Step 4. Merge fields belong in ordinary text, and a drop-down list cannot hold one.
Step 3: Connect Your Excel List
- Select Select Recipients > Use an Existing List.
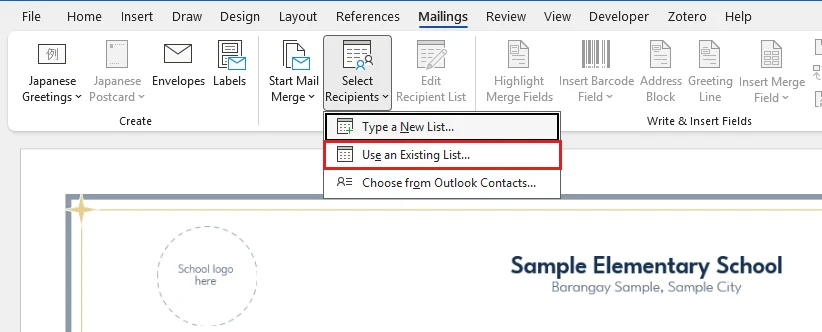
- Find your class list workbook, select it and select Open.
- Select the sheet, keep First row of data contains column headers ticked and select OK.
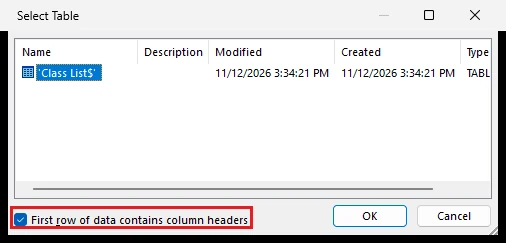
- Select Edit Recipient List to check that every learner came through. Untick anyone who should not get a certificate, then select OK.
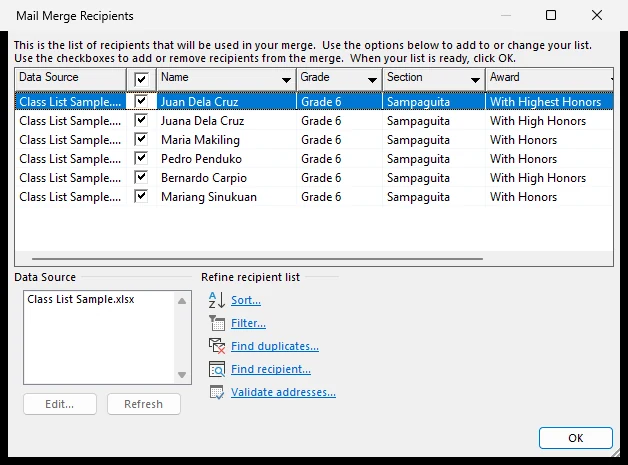
👉 Changed the Excel list later? Open Edit Recipient List, select the file name under Data Source and select Refresh.
Step 4: Insert the Merge Fields
A merge field is a placeholder, such as «Name», that Word swaps for each learner’s details. Put the fields where the sample text is, so they keep the certificate’s fonts and colours.
- Select the sample name on the certificate, for example Name of Learner.
- Select the arrow on Insert Merge Field and choose Name.
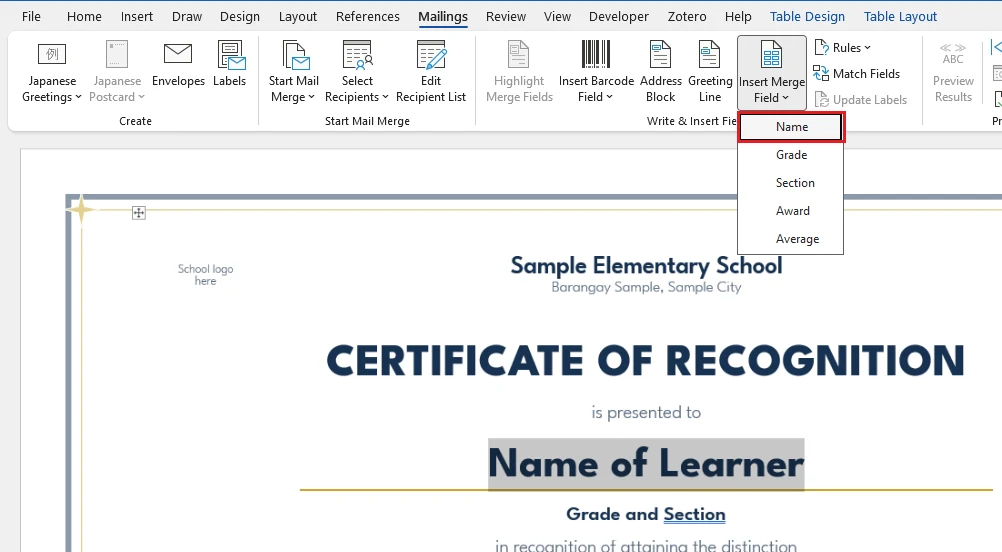
- Repeat for the other details: replace Grade and Section with Grade, type a dash, then insert Section. Replace the award line with Award.

👉 Selecting the sample text first means the field takes on its size, colour and centring. Type spaces and punctuation, such as the dash, between fields yourself.
Step 5: Format the Names
Format a merge field like ordinary text: whatever you apply to «Name» is applied to every learner’s name.
Change the Font Size
- Select the whole «Name» field, including the « » marks.
- Choose a size in Home > Font Size. Leave room for your longest name, then check it in Step 6.
Print the Names in Capitals
Many schools print learners’ names in capital letters. Do this with formatting, so your Excel list can stay in normal case.
- Select the «Name» field.
- Press Ctrl + Shift + A, or select the small arrow at the bottom-right of the Font group on the Home tab and tick All caps.
👉 The field now shows as «NAME», and every merged name prints in capitals. For other case changes, see how to change case in Word.
Step 6: Preview the Certificates
- Select Preview Results. The fields change to the first learner’s details.
- Use the arrows next to the record number to check each learner.
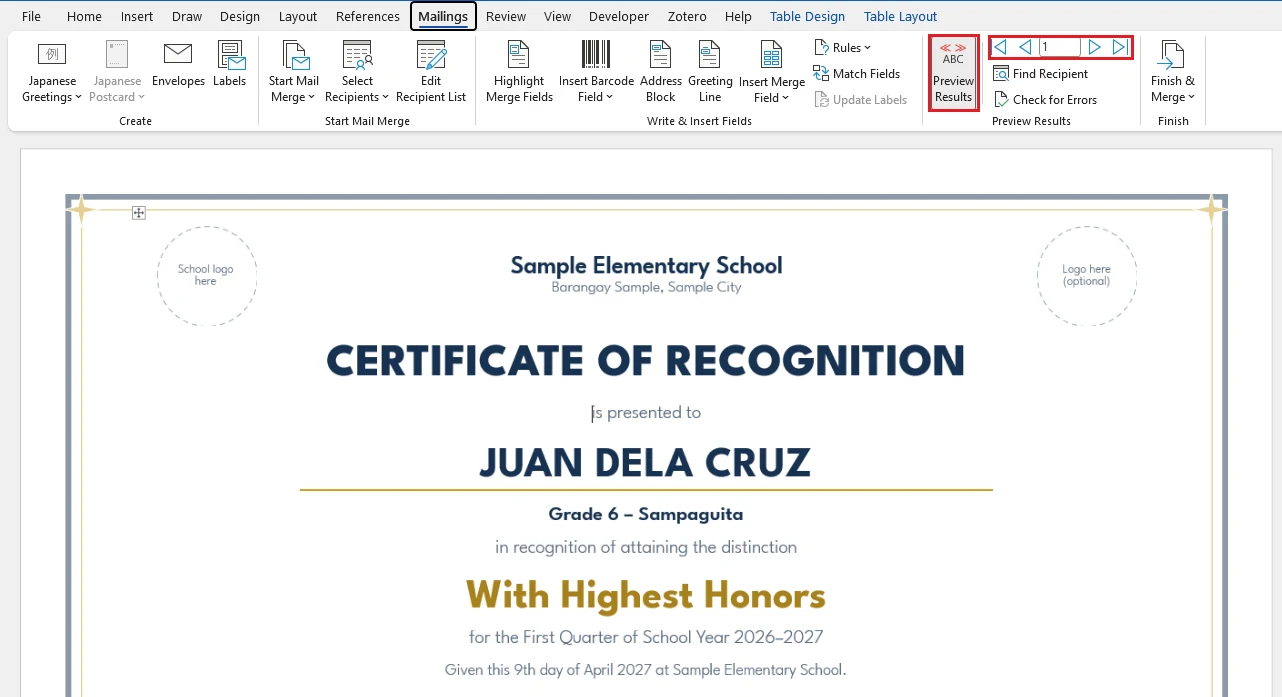
👉 Look for the longest name in the list (use Find Recipient to jump to it). If it wraps onto two lines or pushes the certificate onto a second page, make the name smaller.
Step 7: Finish and Merge
Merge to a New Document
This is the safest choice: you can check and fix any certificate before printing.
- Select Finish & Merge > Edit Individual Documents.
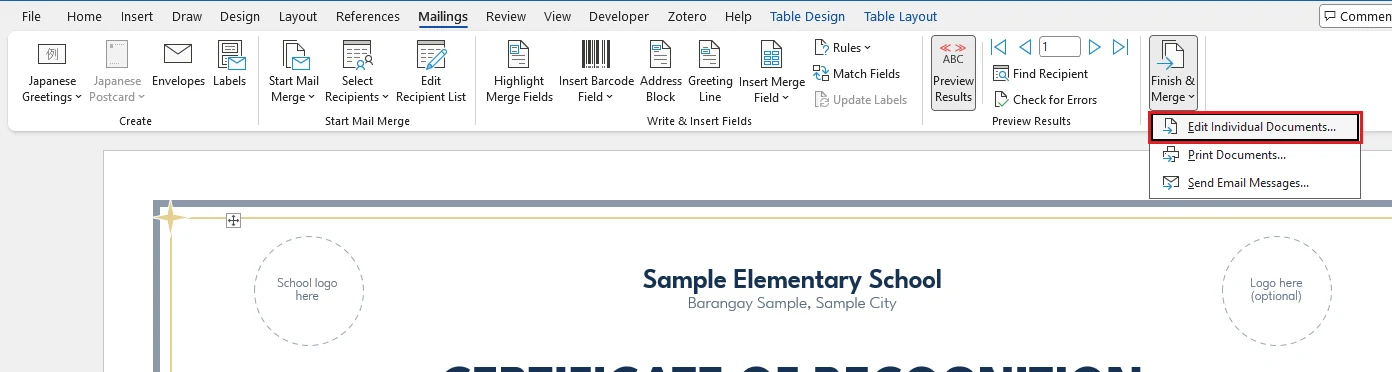
- Choose All and select OK.
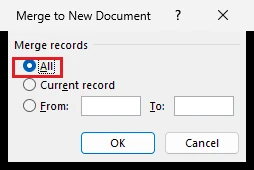
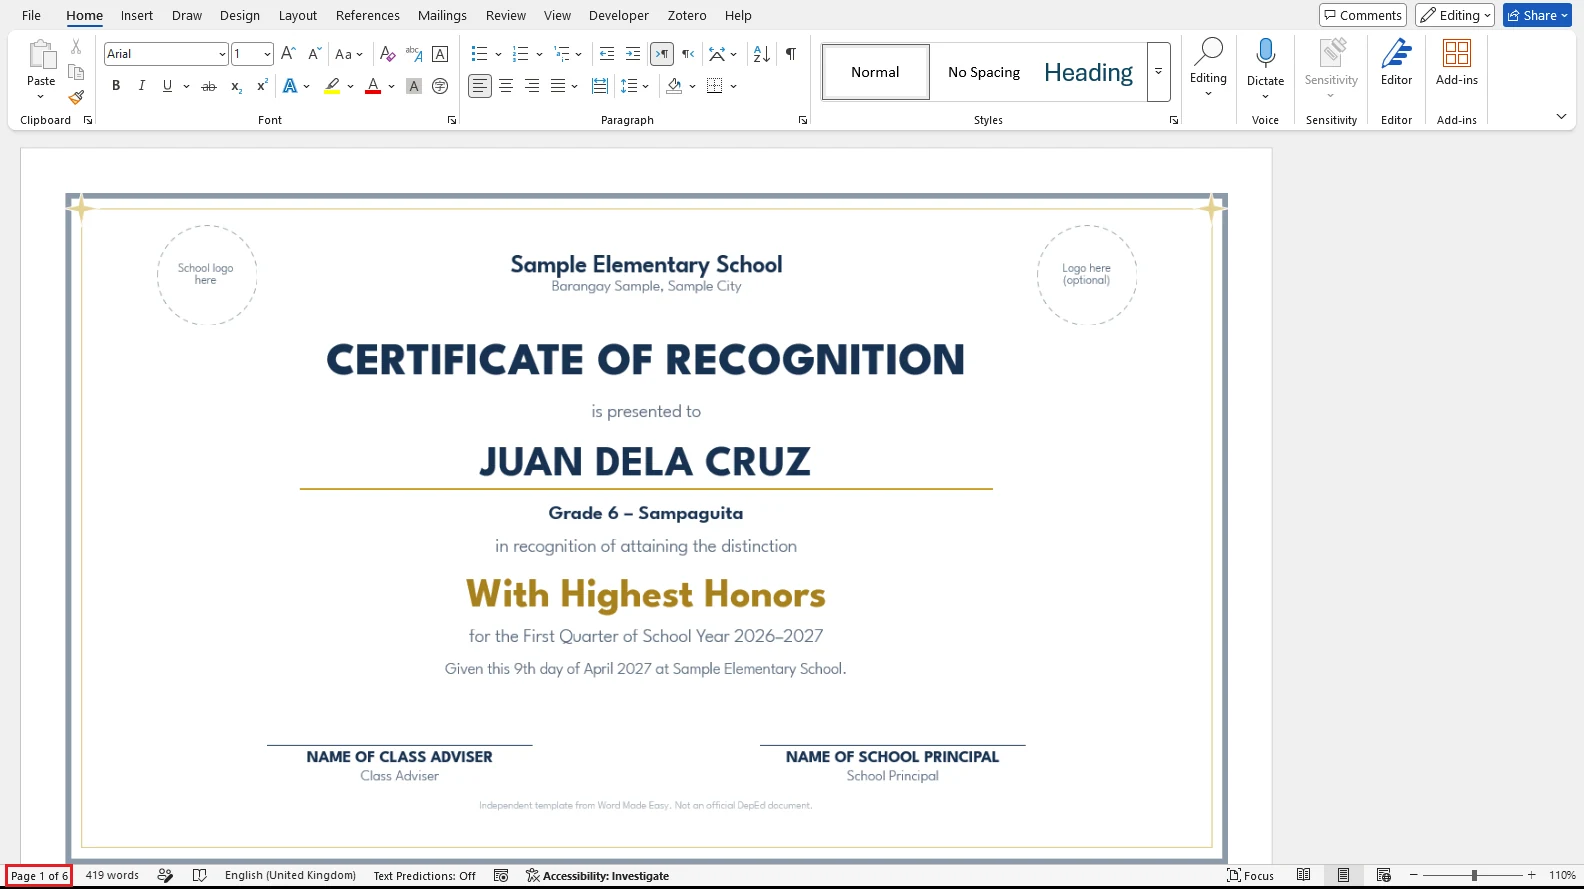
👉 Word opens a new document with one certificate per page. Six learners give six pages.
Print the Certificates Directly
Select Finish & Merge > Print Documents, choose All and select OK. Print one test copy on plain paper before you load the certificate paper.
Save the main certificate file. Next time you open it, Word asks whether to reconnect to the Excel list: choose Yes and you are ready for the next quarter or school year.
Save Each Certificate as a Separate PDF
Word for Windows has no built-in option that saves each merged certificate as its own PDF. Finish & Merge offers only Edit Individual Documents, Print Documents and Send Email Messages. These are the options that work:
One PDF for the Whole Class
In the merged document, select File > Save As, choose PDF as the file type and save. This is ideal for sending the set to a print shop. For more ways, see how to save a Word document as a PDF.
One PDF per Learner
- In the merged document, click anywhere on the certificate you want.
- Select File > Save As, choose PDF as the file type and type the learner’s name as the file name.
- Select Options, choose Current page and select OK, then Save.
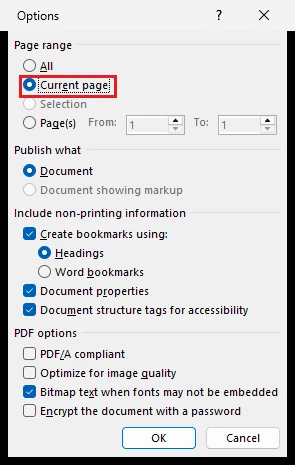
👉 Repeat for each certificate. This is practical for a small group. For a large class, a macro or a PDF add-in (such as the Acrobat add-in, if your school has Adobe Acrobat) can save one file per record.
Mail Merge Certificates on a Mac
Word for Mac uses the same Mailings tab and the same order of steps. The main differences:
- Choose the Excel file with Select Recipients > Use an Existing List, then pick the sheet when Word asks.
- For capitals, select the field and choose Format > Font > All caps.
- Finish & Merge lists Print Documents and Merge to E-mail; use Edit Individual Documents if your version shows it.
- To make a PDF, select File > Print, open the PDF menu at the bottom and choose Save as PDF. Type a page number in Pages to save one certificate at a time.
Common Problems and Fixes
Blank Certificates in the Merge
Blank rows in Excel become blank certificates. Delete empty rows in the list, or untick them in Edit Recipient List. You can also select Filter there and keep only rows where Name Is not blank.
The First Learner Is Missing, or Fields Are Called F1 and F2
Word is using the wrong row as headings. Make sure the headings are in row 1 with nothing above them, then connect the list again with First row of data contains column headers ticked.
Numbers and Dates Look Wrong
A general average of 95.4 can merge as 95.400000000000006, and dates can switch to month-first order. Fix the field rather than the list:
- Press Alt + F9 to show the field codes.
- Add a format switch inside the braces, for example
{ MERGEFIELD Average \# "0.00" }for two decimal places, or{ MERGEFIELD Date \@ "d MMMM yyyy" }for 9 April 2027. - Press Alt + F9 again and preview to check.
The Certificate Prints Portrait Instead of Landscape
Set the orientation in the main certificate before merging: Layout > Orientation > Landscape. The merged document copies the main file’s page setup. In the print dialog, also check that the printer is set to landscape.
Certificates Do Not Fit Long Bond Paper
Long bond paper is 8.5 × 13 inches. Select Layout > Size > More Paper Sizes and enter the size; for a landscape certificate, the width is 13 inches and the height 8.5 inches. Then choose the same paper size in the printer settings, or the printer may shrink the page. Full steps: long bond paper size in Word.
Quick Tips
Test on Plain Paper
Print one merged certificate on plain paper first to check margins and alignment before using certificate paper.
Match the Headings
Use the same column headings every year, such as Name and Award, so the saved certificate reconnects without changes.
Sort the List
Sort in Edit Recipient List by section or surname so the printed certificates come out in calling order.
Reuse the List
The same Excel list can make name tags or envelope labels: see how to make labels in Word.
FAQs
How do I mail merge certificates in Word from Excel?
Put one learner per row in Excel with headings in row 1. In Word, select Mailings > Start Mail Merge > Letters, connect the list with Use an Existing List, insert the merge fields, preview, then select Finish & Merge.
Can I merge different awards on the same certificate?
Yes. Add an Award column to the Excel list, such as With Honors or Best in Reading, and insert the Award field where the award name goes.
How do I make the names all capitals?
Select the «Name» field and press Ctrl + Shift + A, or tick All caps in the Font dialog. Every merged name prints in capitals.
Can Word save each certificate as a separate PDF?
Not on its own. Save the merged document as one PDF, or save one certificate at a time with Save As > PDF > Options > Current page. A macro or PDF add-in can automate it for a large class.
Why do I get blank certificates?
Your Excel list has empty rows. Delete them, or untick or filter them out in Edit Recipient List.
Why does the average show many decimal places?
Word merges the full stored number. Add a switch such as \# “0.00” to the field code to show two decimal places.
Does this work with long bond paper?
Yes. Set the certificate to 8.5 × 13 inches before merging, and choose the same paper size in the printer settings. See long bond paper size in Word.
Can I mail merge certificates on a Mac?
Yes. Word for Mac has the same Mailings tab. Use File > Print > PDF > Save as PDF to make PDFs.
Conclusion
To mail merge certificates in Word, you need a tidy Excel list, a certificate set to Letters and a few merge fields. Format the name once, preview the longest names, and merge to a new document so you can check every certificate before printing.
Getting ready for recognition day? Start from the free moving-up certificate templates for Word, and for printable shortcuts, keep the mail merge shortcuts in Word sheet beside you. Microsoft’s guide to mail merge with an Excel spreadsheet covers the data source settings in more detail.
Related Tutorials
- How to Mail Merge Letters in Word: Easy Step-by-Step Guide
- How to Use Mail Merge in Word: Send Personalised Emails
- Long Bond Paper Size in Word: 8.5 x 13 in (2 Easy Steps)
Word Tutorials
Recently Added on Word Made Easy
Browse the complete collection for help with formatting, layout, pages, tables, images, and document setup.
For Microsoft support documentation, visit the official Microsoft guidance.
Leave a comment
Stuck on a step, or know a quicker way? Ask or share it below.