
To paste text from a table in Word, copy the table, right-click where you want the text and choose Keep Text Only. Word keeps every word from the cells but drops the rows, columns and borders. It is a variation on ordinary copy and paste in Word, with one extra choice at the end.
In this guide, you’ll learn two ways to paste text from a table in Word: pasting a copy as plain text, and converting the original table to text in place. The steps are for Word for Windows.
What Happens to a Table Pasted as Text?
When you paste text from a table in Word, Word does not lose the table’s contents. It changes their shape. Each row of the table becomes a separate paragraph, and the cells in that row are separated by tab characters. Borders, shading and cell formatting disappear, and the text takes on the formatting of the paragraph you paste it into.
This is useful when you want to:
- Reuse table content in an email, a paragraph or a list
- Move data into a document that should not contain tables
- Strip messy formatting from a table copied from a website
- Start again with clean text before you insert a new table in Word
Watch the Video Tutorial
If you prefer to see this in action, the full video walkthrough is below, showing each method step by step.
Method 1: Paste Text from a Table in Word with Keep Text Only
Use this when you want a plain-text copy and need to keep the original table where it is.
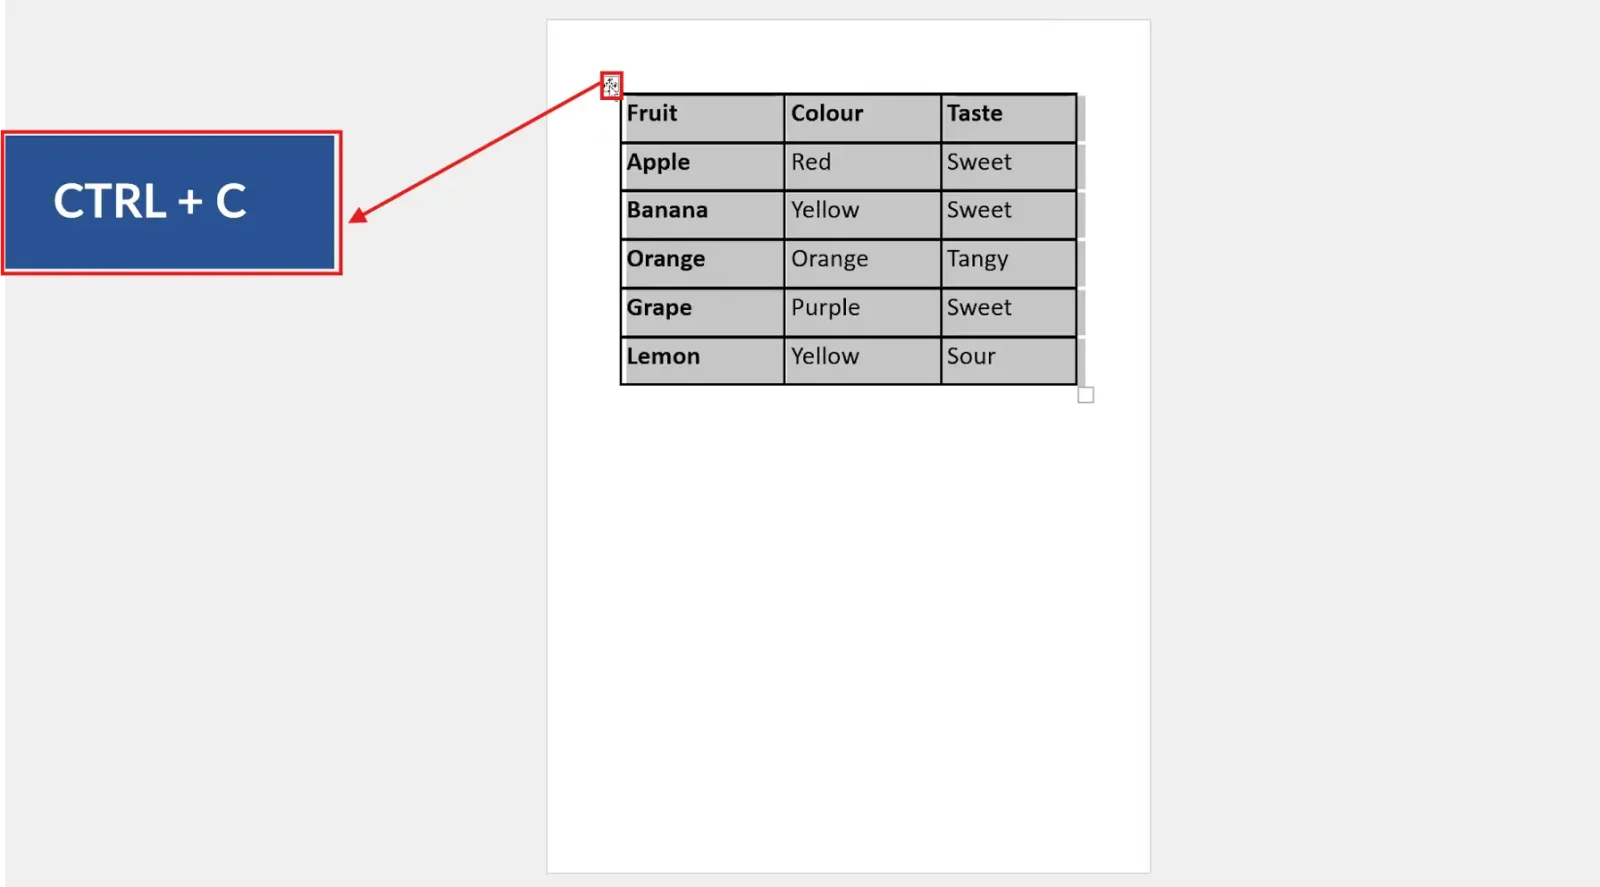
Copy the Table
- Hover over the table until the table move handle (the small four-way arrow) appears at its top-left corner.
- Click the handle to select the whole table.
- Press Ctrl + C to copy it.
Paste as Text Only
- Click where you want the text to go.
- Right-click to open the shortcut menu.
- Under Paste Options, select Keep Text Only (the clipboard icon with the letter A).
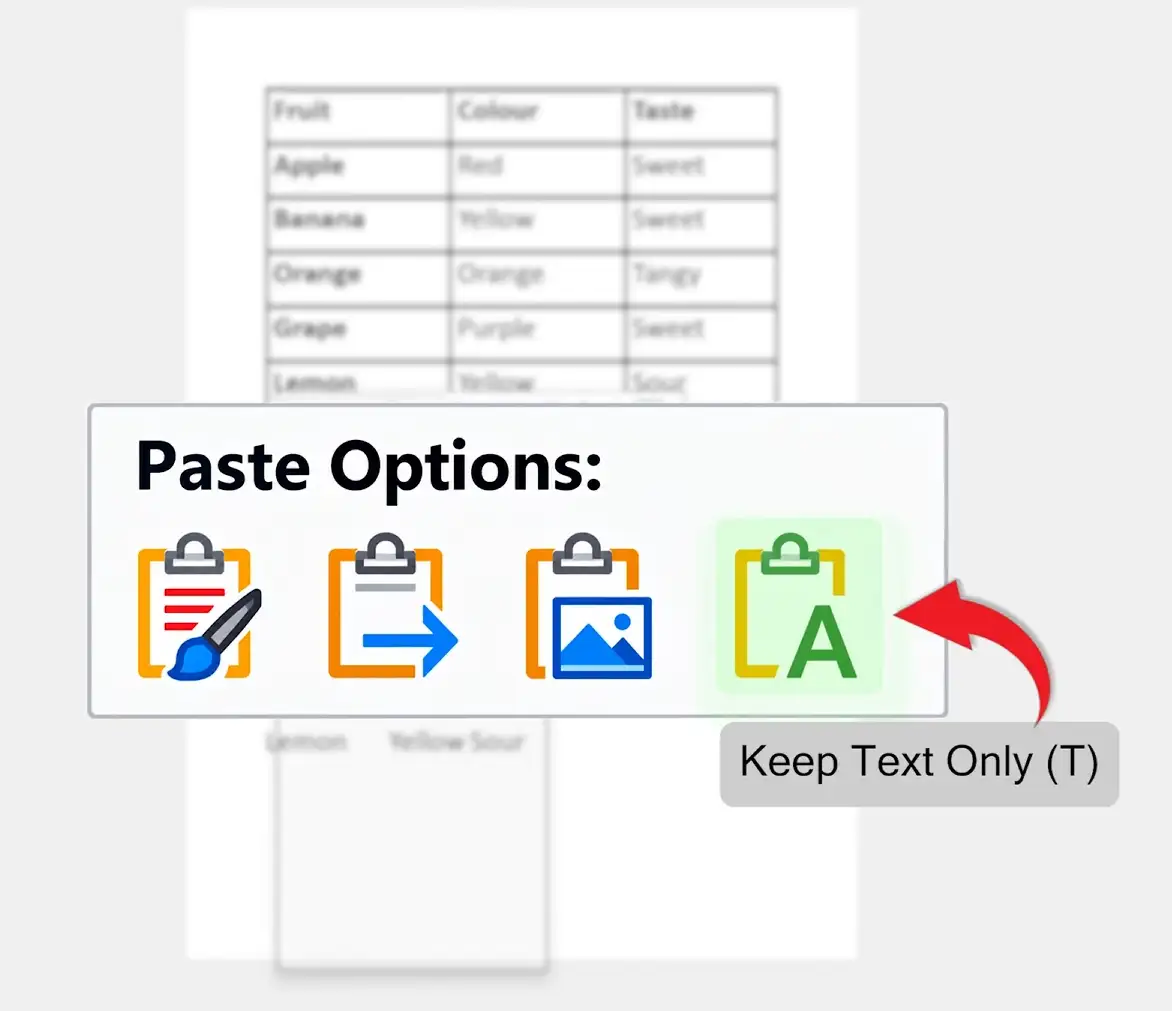
👉 The table’s contents appear as plain text: one row per line, with tabs between the cells.
Prefer the keyboard? Press Ctrl + V, then Ctrl to open Paste Options, then T. Microsoft lists every paste option in its guide to controlling formatting when you paste text.
Method 2: Convert the Table to Text in Place
Use this when you want to paste text from a table in Word without keeping the table at all. It removes the table itself and leaves its text exactly where it was, with no copying.
Steps
- Click anywhere inside the table.
- Open the table Layout tab. It appears next to Table Design while the cursor is in the table.
- In the Data group, select Convert to Text.
- Under Separate text with, choose Tabs (or Commas if you want a comma-separated list).
- Select OK.
👉 The table is gone, and its text stays in the same place. Microsoft documents the same command in its guide to converting a table to text.
Which Method Should You Use?
- Need the table and a plain-text copy? Use Keep Text Only.
- Want the table gone for good? Use Convert to Text.
- Want commas between the values? Use Convert to Text and choose Commas.
Common Problems When Pasting Table Text
Most problems when you paste text from a table in Word come from choosing the wrong paste option or copying only part of the table.
The Table Is Still There
A different paste option was chosen. Press Ctrl + Z and paste again with Keep Text Only.
The Table Pasted as a Picture
Picture was selected under Paste Options. Undo and choose Keep Text Only so the text stays editable.
Some Cells Are Missing
Only part of the table was selected. Use the table move handle to select the whole table before you copy.
The Columns Do Not Line Up
The tabs between cells follow the default tab stops, so long entries push the next column along. Set your own tab stops on the ruler, or turn on formatting marks to see where each tab falls.
Pro Tips for Pasting Table Text
- Only need to hide the grid, not remove the table? See how to hide table lines in Word instead.
- Need the rows as one continuous sentence? Replace the paragraph marks and tabs with spaces afterwards.
- Learn the table shortcuts that speed this up — the Word table shortcuts guide covers selecting rows, columns and whole tables.
FAQs
How do I paste text from a table in Word?
Copy the table, right-click where you want the text and choose Keep Text Only under Paste Options. Word pastes the cell contents as ordinary text and drops the table.
How do I remove a table but keep the text in Word?
Click inside the table, open the table Layout tab and select Convert to Text. Choose Tabs as the separator and select OK. The table is replaced by its text in the same place.
What happens to the columns when I paste a table as text?
Each row becomes its own paragraph, and the cells in that row are separated by tab characters. Turn on formatting marks to see the tabs.
Is there a keyboard shortcut for Keep Text Only?
Yes. Press Ctrl + V to paste, press Ctrl to open Paste Options, then press T for Keep Text Only.
Why did my table paste as a picture?
The Picture paste option was chosen. Press Ctrl + Z to undo, paste again and choose Keep Text Only instead.
Can I join the pasted rows into one paragraph?
Yes. Replace the paragraph marks and tabs with spaces using Find and Replace. The guide to converting lines into one paragraph in Word shows the codes to use.
Does Keep Text Only keep bold and colours?
No. Keep Text Only removes the original formatting, so the text takes on the formatting of the paragraph you paste it into.
Conclusion
To paste text from a table in Word, copy the table and choose Keep Text Only when you paste. If you would rather remove the table where it stands, use Convert to Text on the Layout tab.
Try Keep Text Only the next time you copy a table from a website or an old document. You will get clean text that is ready to format. To keep a table but make it look lighter, read how to delete table borders in Word.
Related Tutorials
- How to Insert a Table in Word: 3 Easy Methods
- How to Hide Table Lines in Microsoft Word
- Convert Lines into One Paragraph in Word: 3 Easy Steps
Word Tutorials
Recent Microsoft Word Tutorials
Browse the complete collection for help with formatting, layout, pages, tables, images, and document setup.
For Microsoft support documentation, visit the official Microsoft guidance.
Leave a Reply