
To convert lines into one paragraph in Word, select the text, press Ctrl + H, type ^p in Find what and a single space in Replace with, then select Replace All. It uses the same tool you would use to replace text in Word, but it searches for line-ending symbols instead of words.
In this guide, you’ll learn how to convert lines into one paragraph in Word: spot which kind of break is splitting your text, join the lines without touching the rest of the document, and tidy up the spacing afterwards. The steps are for Word for Windows.
Why Text Breaks into Separate Lines
Text copied from a PDF, an email or a website often arrives with a break at the end of every line. Word treats each of those lines as its own paragraph, so it cannot reflow the text when you change the margins or font size. Before you can convert lines into one paragraph in Word, you need to know which of two hidden symbols is causing the break.
- Paragraph mark (¶): created by pressing Enter. Find it with
^p. - Manual line break (↵): created by pressing Shift + Enter. Find it with
^l(a lowercase L). - No symbol: the text is simply wrapping at the edge of the page. There is nothing to remove.
Both symbols are hidden by default — the guide to showing and hiding formatting marks in Word covers every symbol in detail.
Watch the Video Tutorial
If you prefer to see this in action, the full video walkthrough is below, showing each method step by step.
Step 1: Show Formatting Marks to Find the Breaks
Always do this first. It tells you which replacement you need and stops you deleting breaks you want to keep.
Steps
- Open the Home tab.
- In the Paragraph group, select Show/Hide ¶. You can also press Ctrl + Shift + 8.
- Look at the end of each line. A ¶ is a paragraph mark. A bent arrow ↵ is a manual line break.
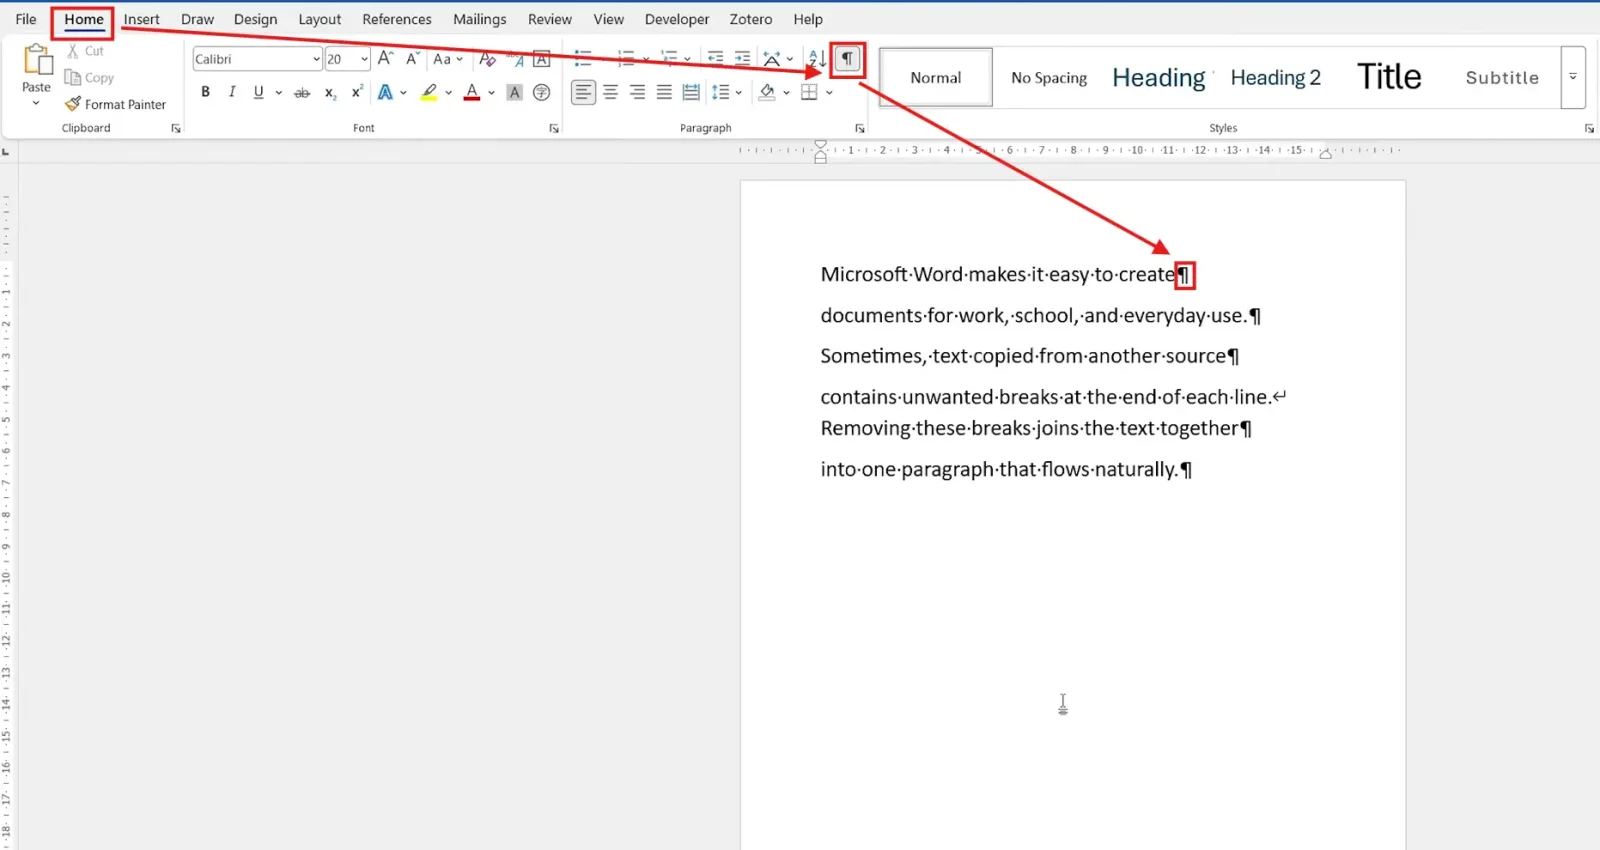
👉 In this example, most lines end with ¶ and one ends with ↵, so both replacements are needed.
Step 2: Convert Lines into One Paragraph in Word by Replacing ^p
This is the main way to convert lines into one paragraph in Word. It joins every line that ends with ¶, which is the usual problem with text pasted from a PDF.
Steps
- Select only the lines you want to join. If more text follows, stop the selection just before the last ¶, or the block will also join the next paragraph.
- Press Ctrl + H to open Find and Replace on the Replace tab.

- In Find what, type
^p. - Click in Replace with and press Space once.
- Select Replace All.
- When Word asks whether to search the rest of the document, select No.
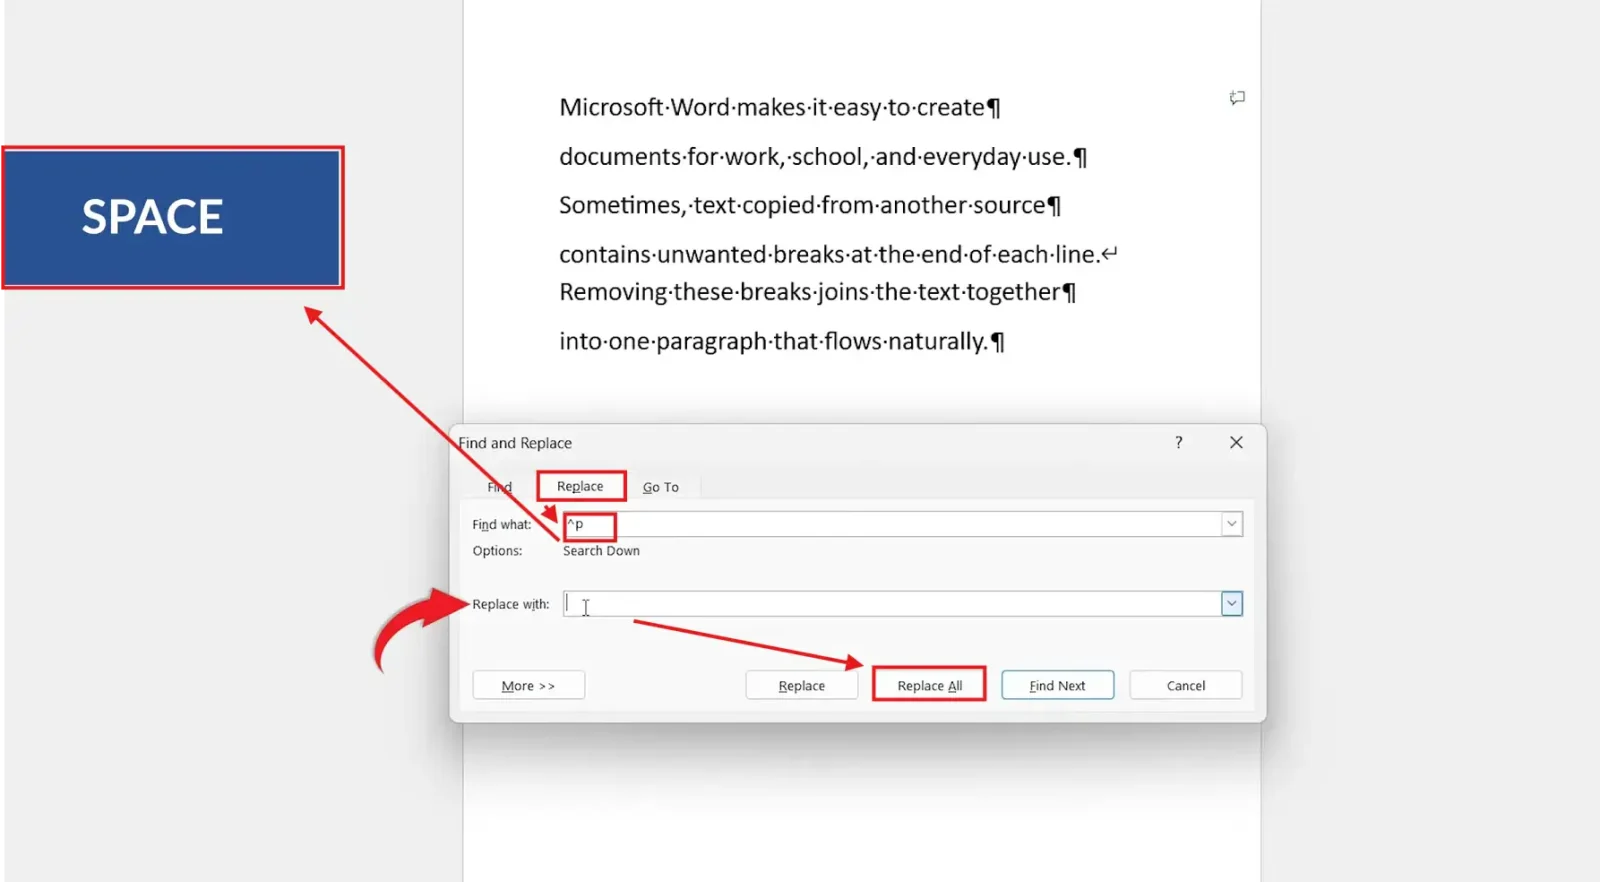
👉 Each ¶ inside your selection becomes a space, and the lines join into one paragraph.
Selecting No is important. Yes carries the replacement on through the whole document and merges every paragraph in the file. If that happens, press Ctrl + Z straight away.
Step 3: Remove Manual Line Breaks with ^l
If bent arrows ↵ are still visible after Step 2, those lines end with manual line breaks. Replace them in the same way.
Steps
- Keep the text selected and press Ctrl + H again if the dialog is closed.
- In Find what, replace the previous code with
^l. The second character is a lowercase L. - Make sure Replace with still contains one space.
- Select Replace All, then No when asked about the rest of the document.
- Select Close.

👉 The last ↵ disappears. You have converted the lines into one paragraph in Word, and the text now flows continuously.
Which Code Should You Use?
- See ¶ at the end of each line? Replace
^pwith a space. - See ↵ at the end of each line? Replace
^lwith a space. - See both? Run both replacements,
^pfirst. - See neither? The text is wrapping normally. Nothing needs replacing.
Keep Real Paragraph Breaks While Joining Lines
Pasted text often uses a blank line (¶¶) between real paragraphs and a single ¶ at the end of each line. If you convert lines into one paragraph in Word by replacing every ^p, the real paragraphs merge into one block too. Protect the real breaks first:
- Replace
^p^pwith a marker that does not appear in your text, such as###. - Replace
^pwith one space. - Replace
###with^p.
👉 The line endings are joined, and each real paragraph stays separate.
Tidy Up After Joining Lines
After you convert lines into one paragraph in Word, give the text a quick check:
- Remove double spaces. Replace two spaces with one, and repeat until Word reports zero replacements — for finer control, see how to adjust space between words in Word.
- Fix hyphenated words. PDF text can split words such as “docu- ment” across lines. Search for a hyphen followed by a space and correct each one by hand.
- Hide the marks. Select Show/Hide ¶ again when you are finished.
- Align the paragraph. If you want straight edges on both sides, justify the text.
Common Problems When Joining Lines
Word Found No Matches
Check the code. ^l uses a lowercase L, not a capital I or the number 1. If the code is correct, the break may be the other type, so try ^p.
The Whole Document Was Merged
You either had nothing selected or selected Yes when Word offered to search the rest of the document. Press Ctrl + Z to undo, select only the lines you want, and select No this time.
Words Are Stuck Together
Replace with was left empty, so the breaks were deleted with no space in their place. Undo, add one space to Replace with, and run the replacement again.
Find and Replace Shows an Error for the Code
Use wildcards is probably on. Select More >>, clear Use wildcards, and try again.
Pro Tips for Joining Lines in Word
- For just two or three lines, the quickest way to convert lines into one paragraph in Word is by hand: click at the end of a line, press Delete to remove the break, then type a space.
- You don’t have to remember the codes. Select More >> → Special in the Find and Replace dialog, and Word inserts the code for you. Microsoft explains the options in its guide to replacing text in Word.
- If you regularly clean up PDF text, converting the PDF to a Word document first often produces fewer broken lines than copying and pasting.
- Learn Ctrl + H and Ctrl + Shift + 8 along with the rest of the Microsoft Word keyboard shortcuts cheat sheet.
FAQs
How do I convert lines into one paragraph in Word?
Select the lines, press Ctrl + H, type ^p in Find what and a single space in Replace with, then select Replace All. If bent-arrow line breaks remain, repeat with ^l.
How do I remove line breaks from text copied from a PDF?
PDF text usually ends each line with a paragraph mark. Paste it into Word, then replace ^p with a space. Remove any leftover manual line breaks with ^l.
What is the difference between ^p and ^l in Word?
^p finds paragraph marks, created by pressing Enter. ^l finds manual line breaks, created by pressing Shift + Enter. The l is a lowercase L, not a capital I or the number 1.
Why does Word ask whether to search the rest of the document?
When you run Replace All on a selection, Word finishes the selection first and then offers to continue. Select No to keep the change inside your selection.
Why are there double spaces after joining the lines?
Some lines already ended with a space before the break. Replace two spaces with one space and repeat until Word reports zero replacements.
Will replacing ^p also remove page breaks?
No. Manual page breaks use a different code, ^m. To remove those, see how to remove a page break in Word.
Why does Word say ^p is not a valid special character?
Use wildcards is probably turned on. Select More, clear Use wildcards, and run the replacement again.
Conclusion
To convert lines into one paragraph in Word, show the formatting marks, then replace ^p and, if needed, ^l with a single space. Select No when Word offers to search the rest of the document, and only your selection changes.
Next time you paste text from a PDF, run this fix first and then give the result a final check — Word’s built-in tools help you check spelling and grammar in Word before you share it.
Related Tutorials
- How to Replace Text in Word: 2 Easy Methods (Quick Guide)
- How to Remove Formatting Marks in Word: 5 Easy Methods (Quick Guide)
- How to Convert a PDF to Word Document: 6 Steps
Word Tutorials
Recent Microsoft Word Tutorials
Browse the complete collection for help with formatting, layout, pages, tables, images, and document setup.
For Microsoft support documentation, visit the official Microsoft guidance.
Leave a Reply