
To turn an image into a letterhead in Word, place the image in the page header, set its wrapping to Behind Text and stretch it to the edges of the page. Word then repeats the design on every page while you type your letter over it. If you have not added pictures to Word before, start with how to insert a picture in Word.
In this guide, you’ll learn how to turn an image into a letterhead in Word in seven steps, from opening the header to checking the print preview. The steps are for Word for Windows.
Why Use the Header for a Letterhead?
A letterhead image placed in the body of a document moves every time you add or delete text. Placed in the header, it stays fixed. Word repeats it on every page, protects it from accidental edits while you type, and lets you control exactly where the letter text begins.
Before you start, you need:
- A finished letterhead image (PNG or JPG). A full-page design with your logo at the top and contact details at the bottom works best.
- The image sized for your paper, for example A4 or US Letter, so it fills the page without stretching.
- An open Word document, ideally with your letter already typed.
Watch the Video Tutorial
If you prefer to see this in action, the full video walkthrough is below, showing each method step by step.
How to Turn an Image into a Letterhead in Word
Follow these steps in order. Each one builds on the last, and the screenshots show the exact menus.
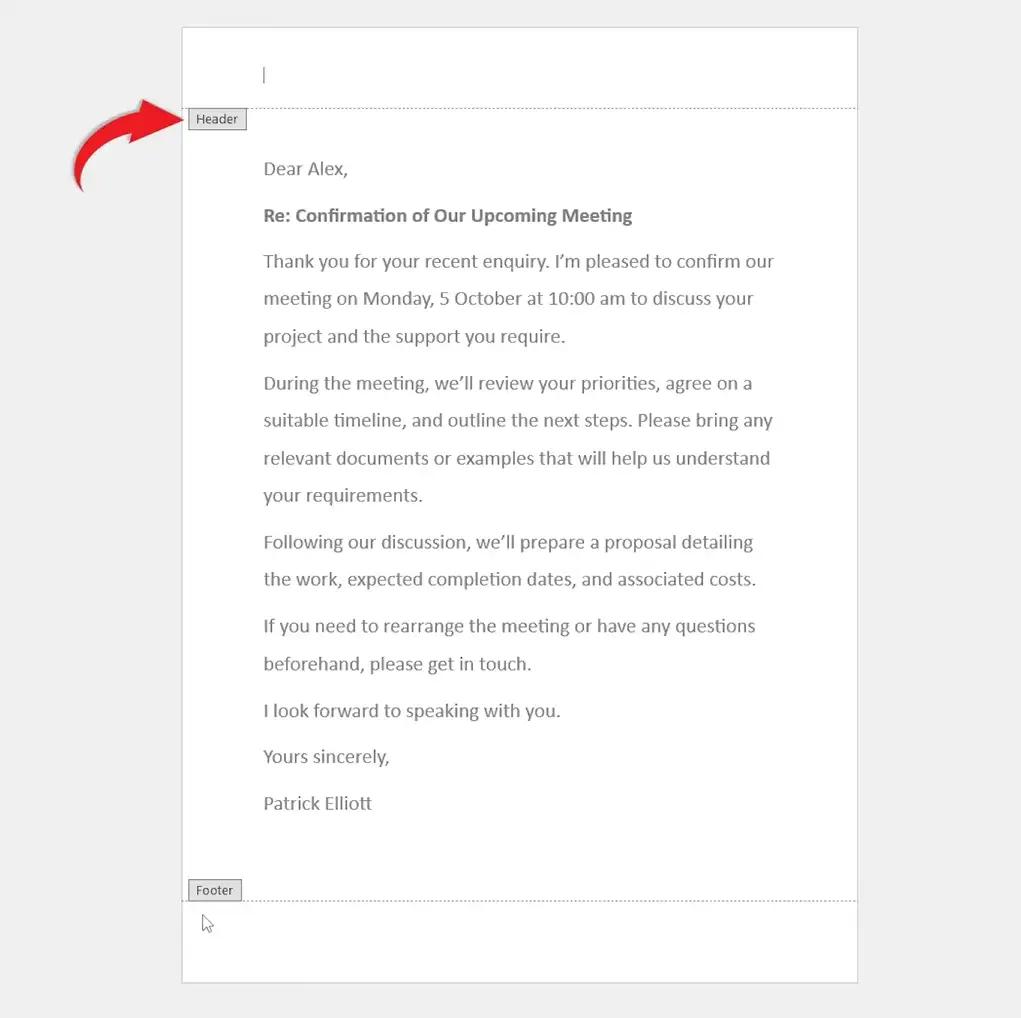
Step 1: Open the Header
Every time you turn an image into a letterhead in Word, you start in the header. Double-click the top margin of the page. The dotted Header line appears and the Header & Footer tab opens on the ribbon.
Step 2: Insert the Letterhead Image
- On the Header & Footer tab, select Pictures.
- Browse to your letterhead image and select it.
- Select Insert.
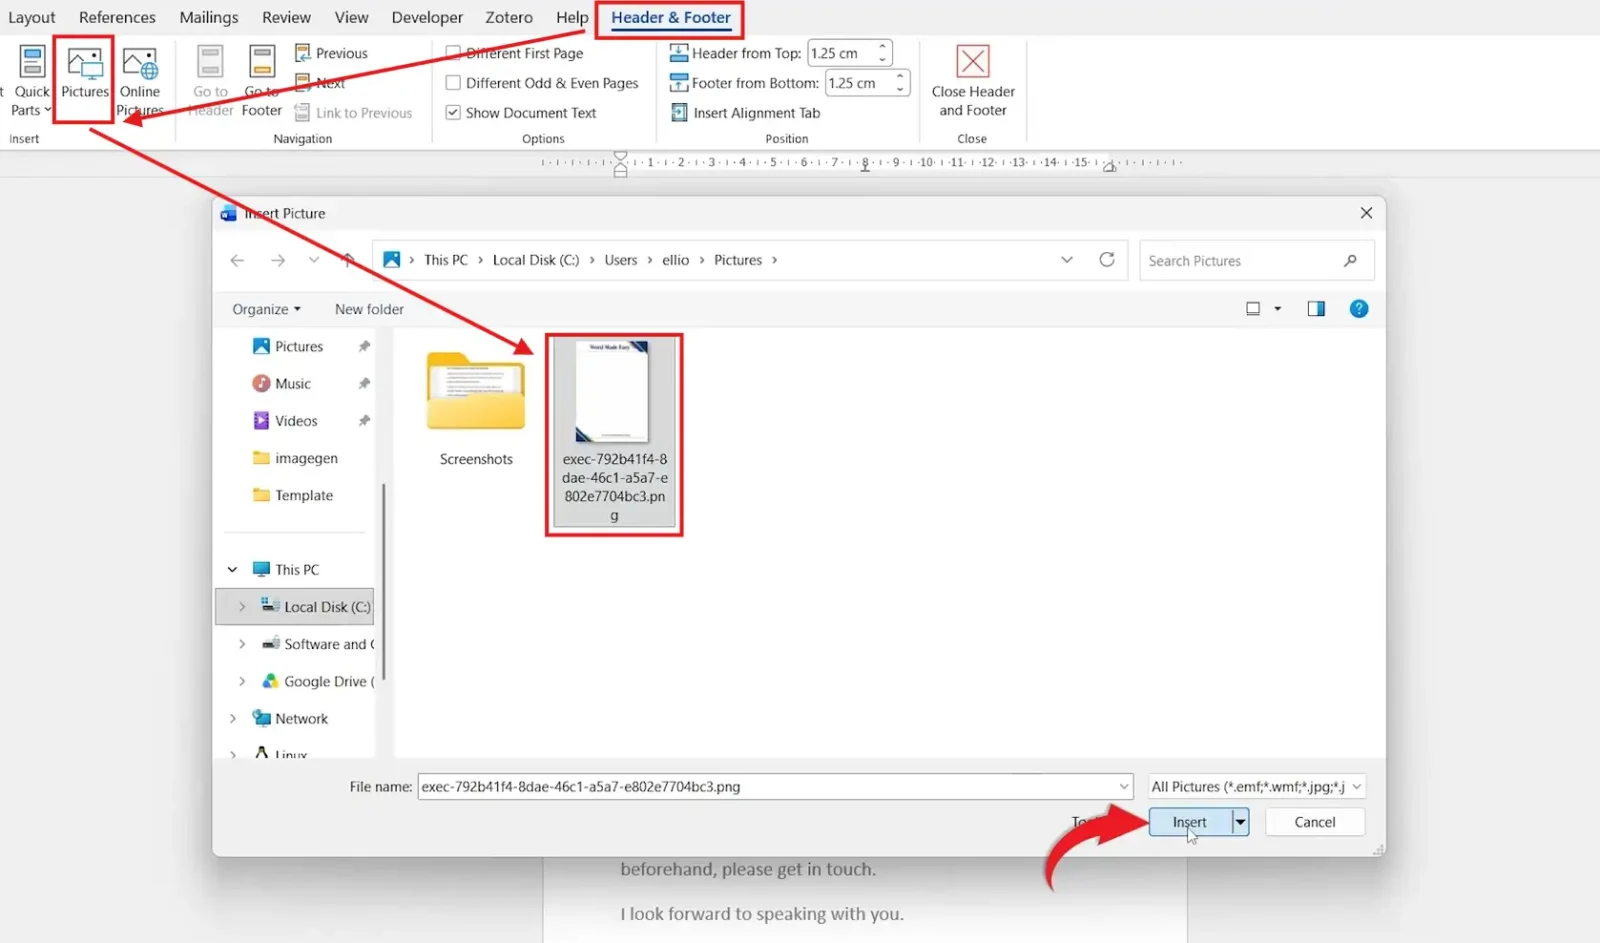
👉 The image appears in the header. It may push your text around at first. The next two steps fix that.
Step 3: Centre the Image on the Page
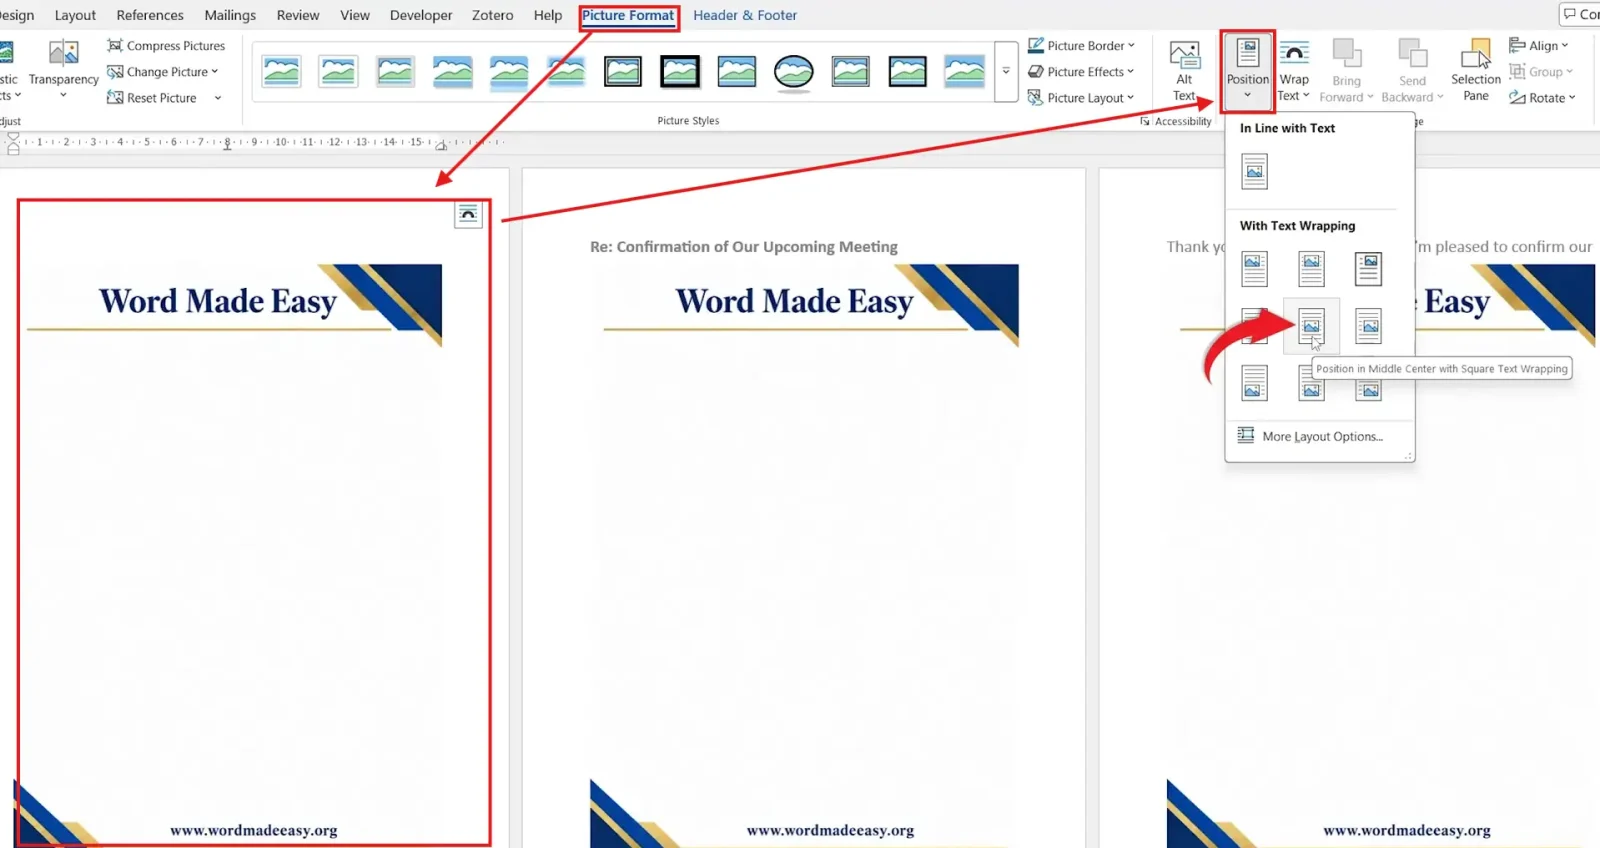
- With the image selected, open the Picture Format tab.
- Select Position.
- Choose Position in Middle Center with Square Text Wrapping.
Step 4: Set Wrap Text to Behind Text
- Keep the image selected on the Picture Format tab.
- Select Wrap Text.
- Choose Behind Text.
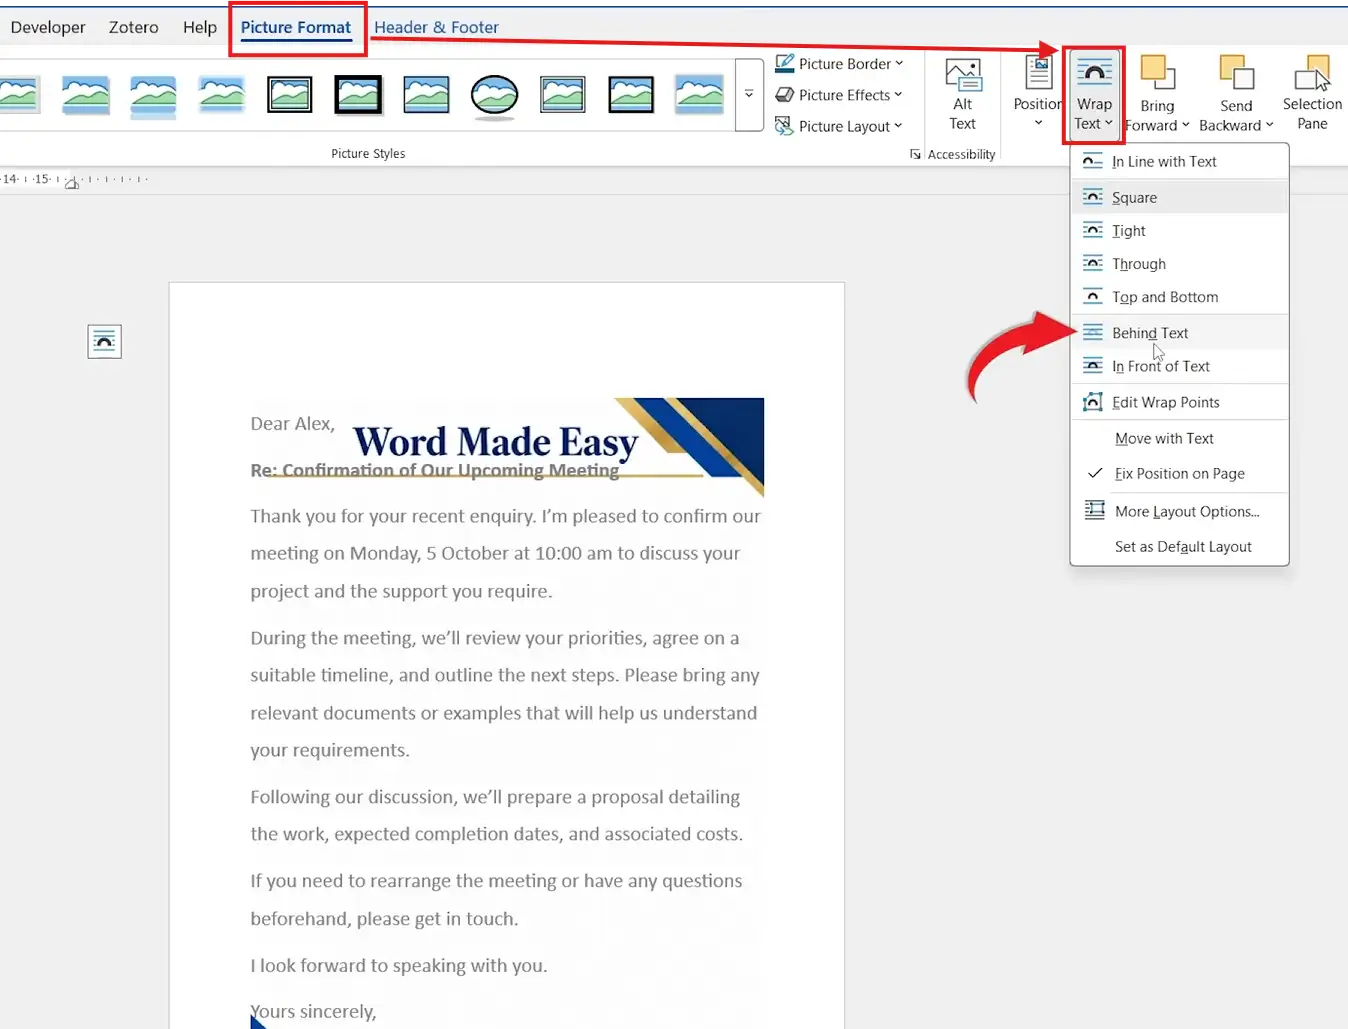
👉 The image moves behind the letter and stops pushing the text onto other pages. The same setting lets you put text over any image in Word.
Step 5: Stretch the Image to the Page Edges
- Drag the image towards the top-left corner of the page until the green alignment guides appear along the top and left edges.
- Drag the bottom-right sizing handle to the bottom-right corner of the page.
- Stop when the guides show the image meets the page edges on all sides.
👉 The letterhead now fills the page. For more ways to size a full-page image, see how to make a picture fill a page in Word.
Step 6: Move the Text Below the Design
- On the Header & Footer tab, find Header from Top in the Position group.
- Increase the value until the dotted header line sits just below the bottom of your logo area.
- If the design has contact details at the bottom, increase Footer from Bottom in the same way.
Step 7: Close the Header and Check the Print Preview
- Select Close Header and Footer, or press Esc.
- Press Ctrl + P to open the print preview.
- Check that the letterhead reaches the page edges and that no text overlaps the design.
- Press Esc to return to the document.
👉 Your letter now sits on a fixed letterhead that repeats on every page. Microsoft covers the header part of this process in its guide to adding images to a header or footer.
Before You Print
- White strip at the edges? Most printers cannot print to the very edge, so leave important details at least 5 mm from it.
- Letterhead on page 1 only? Use Different First Page in the header settings.
- Logo looks blurry? Use a higher-resolution image, ideally 300 dpi at the full page size.
Common Problems with Image Letterheads
Most problems when you turn an image into a letterhead in Word come from the wrapping setting or the header position.
The Image Pushes Text onto Another Page
The image is still set to a wrapping style that takes up space. Select it and choose Picture Format > Wrap Text > Behind Text.
The Image Will Not Move or Select
The header is closed, so Word treats the image as background. Double-click the top margin to reopen the header, then select the image.
The Text Overlaps the Logo
Increase Header from Top until the dotted header line is below the logo area.
The Letterhead Appears on Every Page
That is how headers work. Tick Different First Page and leave the other pages’ header empty if you only want it on page one.
Pro Tips for Word Letterheads
- You only need to turn an image into a letterhead in Word once: save the finished document as a Word template (.dotx) so every new letter starts with the letterhead in place.
- Keep contact details in a separate footer image if you want to update them without redesigning the whole page — see how to add an image to the footer in Word.
- Need the letterhead removed from a copy of the document? Use remove headers and footers in Word.
FAQs
How do I turn an image into a letterhead in Word?
Open the header, insert the letterhead image with Header & Footer > Pictures, set Wrap Text to Behind Text and stretch the image to the page edges. Then raise Header from Top so your typing starts below the design.
Why put the letterhead in the header instead of the page?
Anything in the header repeats on every page and cannot be moved by accident while you type. The letterhead stays fixed while the letter itself flows underneath.
Can I use a PNG, JPG or PDF letterhead?
PNG and JPG work directly with Pictures. Save a PDF letterhead as a PNG or JPG first, using a high resolution so it prints sharply.
How do I show the letterhead on the first page only?
Open the header and tick Different First Page, then insert the image in the First Page Header. The guide to adding a header on the first page only in Word shows each step.
Why does my text overlap the letterhead?
The body text starts above the bottom of the design. Open the header and increase Header from Top (and Footer from Bottom for a footer design) until the text clears it.
How do I reuse the letterhead for every new letter?
Save the finished document as a Word template with File > Save As and the Word Template (*.dotx) file type. Open the template whenever you start a new letter.
Why does the letterhead look faded while I type?
Word dims header content while you edit the body of the document. It prints at full strength, which you can confirm in Print Preview.
Conclusion
To turn an image into a letterhead in Word, put the image in the header, set it to Behind Text, stretch it to the page edges and raise Header from Top so your letter starts below the design.
Set it up once and save it as a template. Every letter after that takes seconds. For a simpler letterhead built from text and a rule instead of an image, read how to add a line under a header in Word.
Related Tutorials
- Make a Picture Fill a Page in Word: 2 Easy Methods (Quick Guide)
- How to Add a Header on the First Page Only in Word: 2 Easy Methods
- Add an Image to the Footer in Word: 2 Easy Methods (Quick Guide)
Word Tutorials
Recent Microsoft Word Tutorials
Browse the complete collection for help with formatting, layout, pages, tables, images, and document setup.
For Microsoft support documentation, visit the official Microsoft guidance.
Leave a Reply