
To remove margins inside table cells in Word, open Table Layout > Cell Margins and set the Top, Bottom, Left and Right margins to 0. Word then removes the padding between the text and the cell borders, so the table becomes tighter and more compact.
In this guide, you’ll learn how to remove margins inside table cells in Word with three methods: the Cell Margins setting, paragraph spacing and AutoFit. Each one targets a different kind of extra space, so you can fix exactly the gap you see. The steps are for Word for Windows.
Cell Margins, Cell Spacing and Paragraph Spacing
Three different settings can make a table look padded. It helps to know which one you are dealing with:
- Cell margins: the space between the text and the borders of each cell.
- Cell spacing: the gap between neighbouring cells, which makes them look separated.
- Paragraph spacing: extra space before or after the text inside each cell.
Need a table to practise on? See how to insert a table in Word.
Watch the Video Tutorial
If you prefer to see this in action, the full video walkthrough is below, showing each method step by step.
Method 1: Set the Cell Margins to Zero
This is the main way to remove margins inside table cells in Word, and it fixes most padded tables on its own.
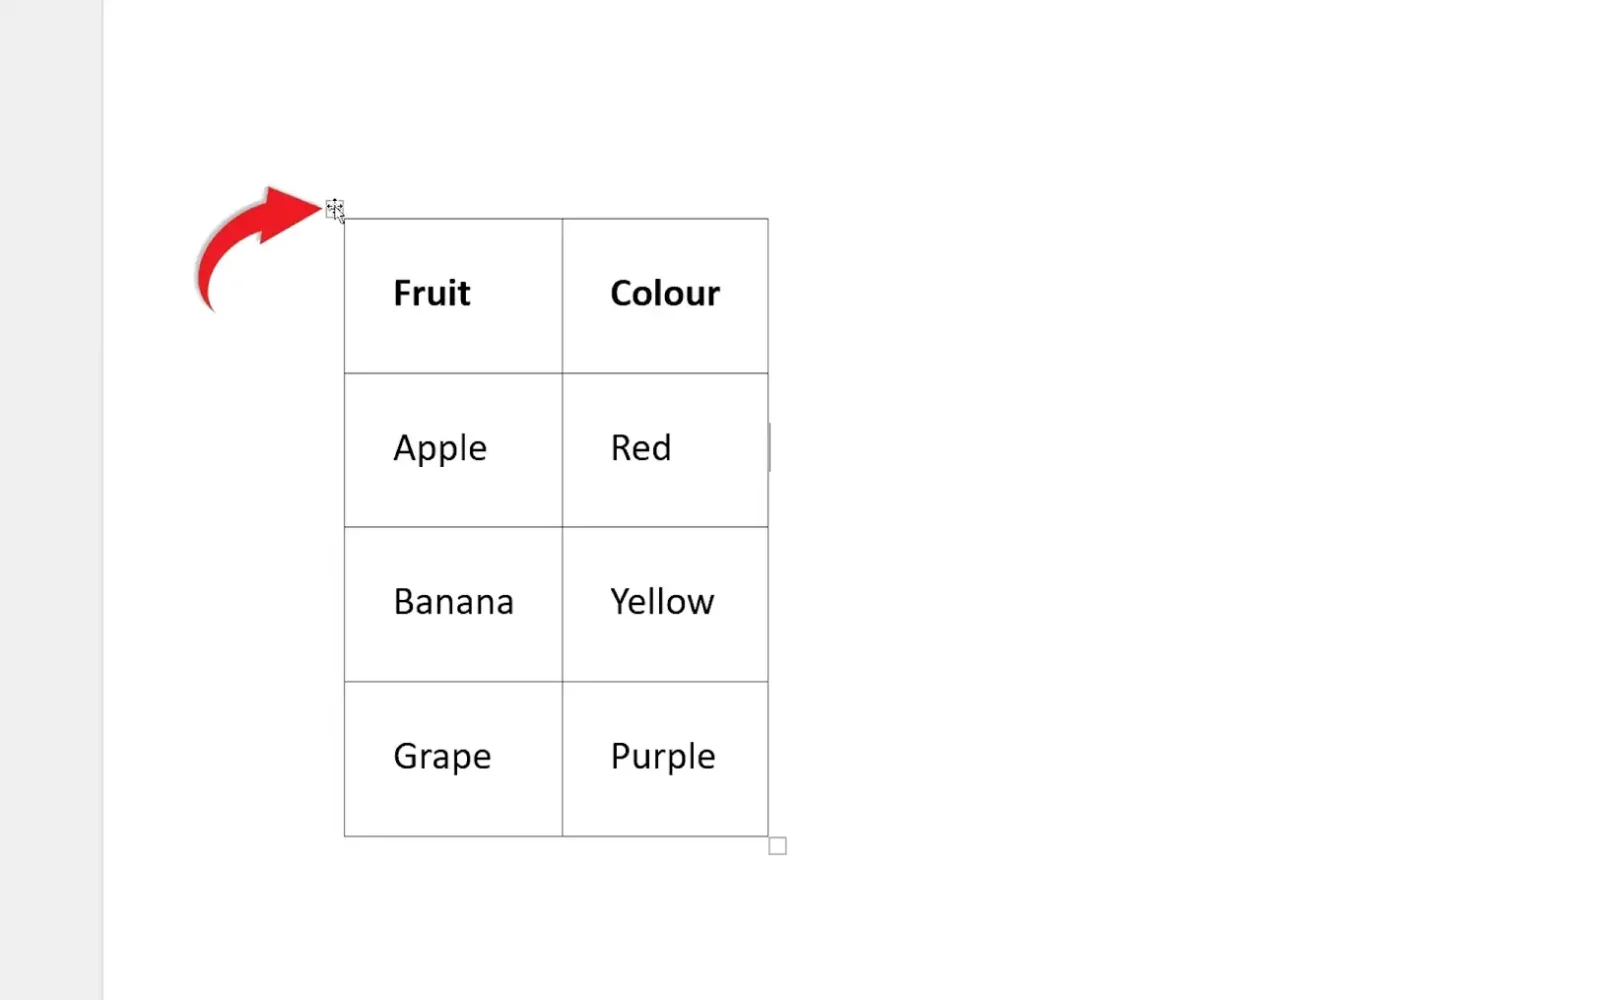
Step 1: Select the Table
Hover over the table and click the table handle (the small four-way arrow) at its top-left corner. The whole table is selected.
Step 2: Open Cell Margins
- Open the Table Layout tab. It only appears while the table is selected.
- Select Cell Margins in the Alignment group. The Table Options window opens.
Step 3: Set Every Margin to 0
- Under Default cell margins, set Top, Bottom, Left and Right to 0.
- Under Default cell spacing, make sure Allow spacing between cells is cleared.
- Leave Automatically resize to fit contents ticked if you want the columns to shrink as well.
- Select OK.
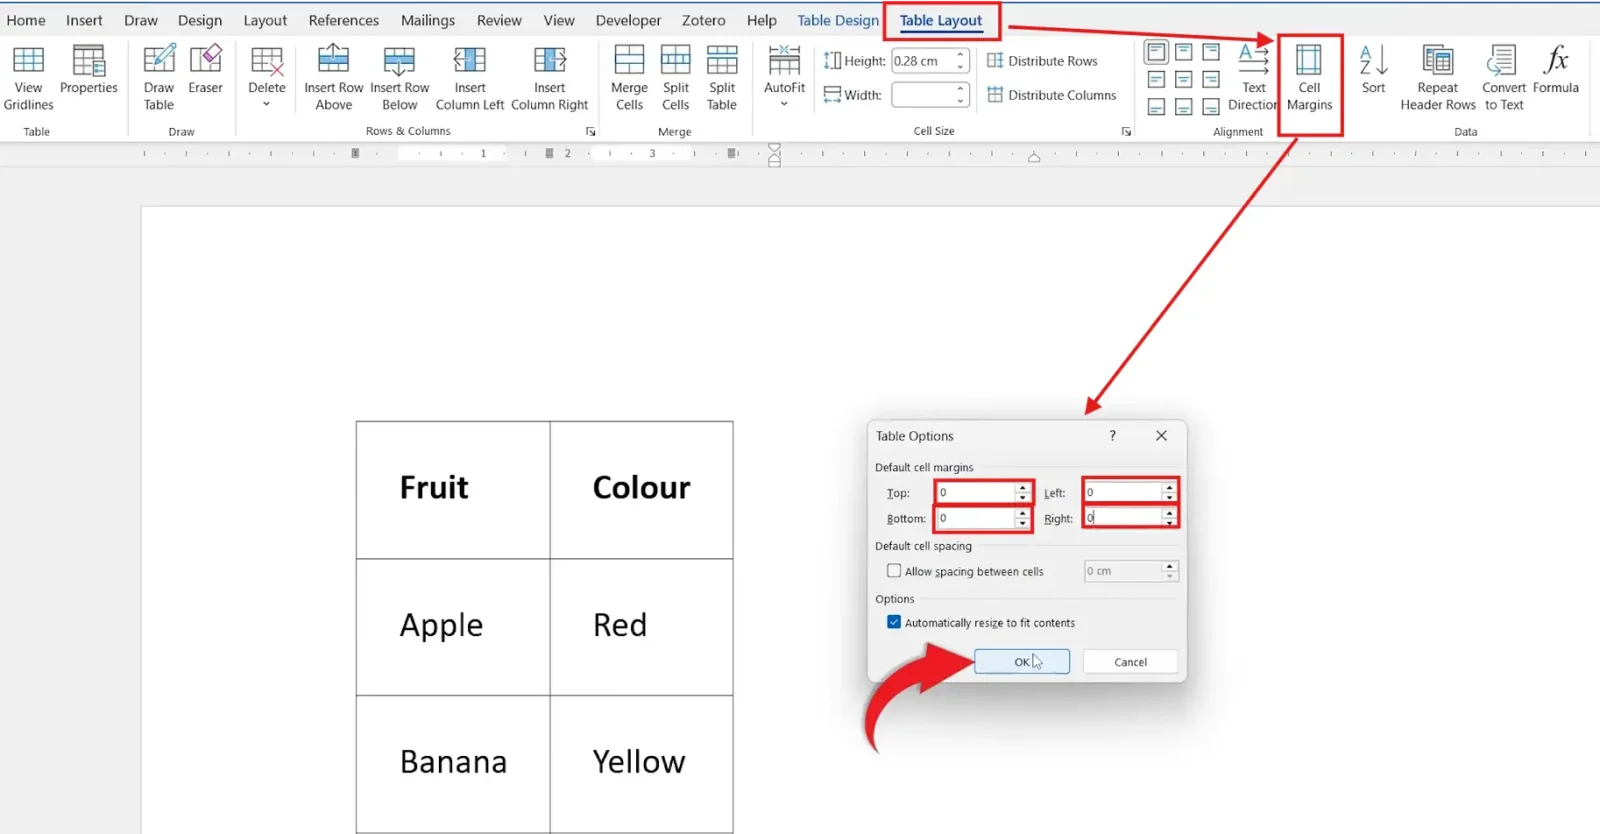
👉 The text now sits right against the cell borders. Microsoft explains these settings in its guide to resizing a table, column or row.
Method 2: Remove Paragraph Spacing in the Cells
If the rows still look tall after Method 1, the space is coming from paragraph spacing rather than the cell margins. Removing it is the second step when you remove margins inside table cells in Word.
- Select the whole table.
- Open the Home tab and select Line and Paragraph Spacing in the Paragraph group.
- Choose Remove Space Before Paragraph and, if it appears, Remove Space After Paragraph.
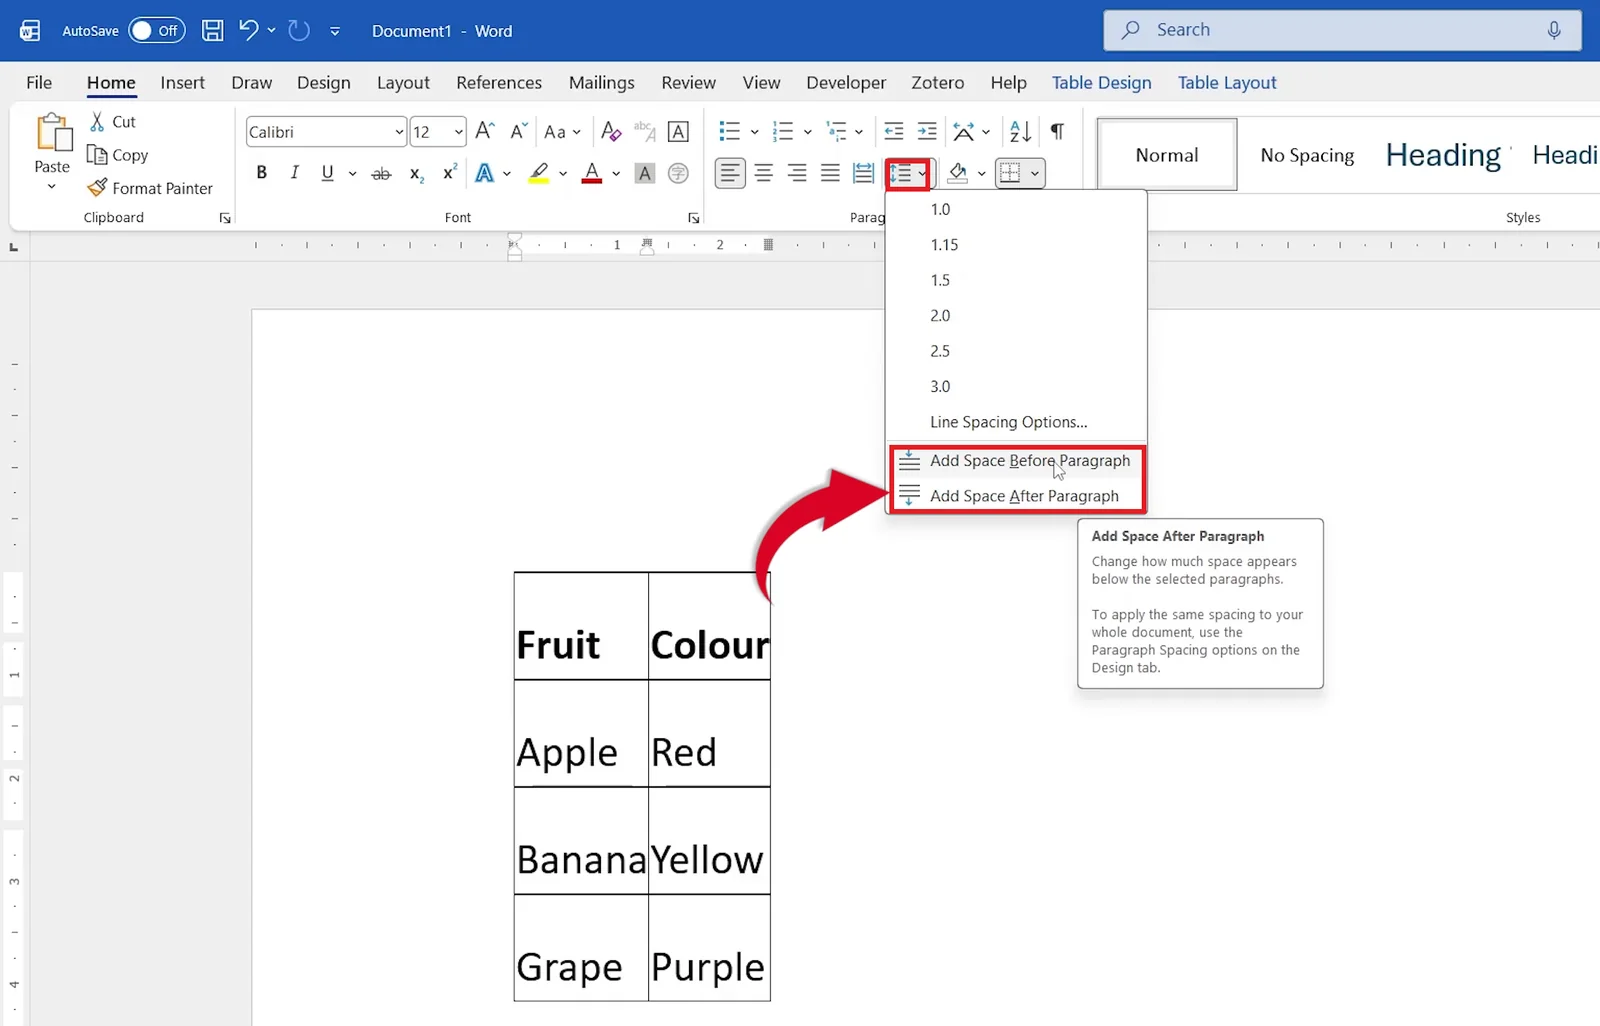
👉 Word shows Remove only when there is spacing to remove. If the menu says Add Space Before Paragraph and Add Space After Paragraph, as in the screenshot, the cells have no extra paragraph spacing and you can move on. For more on spacing, see how to set 1.5 line spacing in Word.
Method 3: AutoFit the Table to Its Contents
Once the padding is gone, the columns may still be wider than they need to be.
- Click anywhere in the table.
- Open Table Layout and select AutoFit.
- Choose AutoFit Contents.
👉 Each column shrinks to fit its longest entry, so the table takes up only the space it needs.
Best Way to Remove Margins Inside Table Cells in Word
| What you see | Fix |
|---|---|
| Space between the text and the cell borders | Method 1: set the cell margins to 0 |
| Gaps between neighbouring cells | Clear Allow spacing between cells |
| Rows taller than the text | Method 2: remove paragraph spacing |
| Columns wider than the text | Method 3: AutoFit Contents |
Most tables need only Method 1. When you remove margins inside table cells in Word and some space remains, work down the list.
Quick Tips
- One cell only: use Table Layout > Properties > Cell > Options and clear Same as the whole table.
- Keep it readable: a margin of 0.1 cm stops text touching the borders while keeping the table compact.
- Borders too heavy? After tightening the cells, you can delete the table borders or hide the table lines.
Common Problems
The Margins Are Zero but Rows Are Still Tall
Paragraph spacing or a fixed row height is adding the space. Use Method 2, then lower the row Height in the Cell Size group on the Table Layout tab.
There Are Gaps Between the Cells
Allow spacing between cells is switched on. Open Cell Margins again and clear it.
Only Some Cells Changed
Those cells have their own margins. Select them, open Properties > Cell > Options and tick Same as the whole table.
The Table Is Still Too Wide
Use AutoFit Contents from Method 3, or drag the right edge of the table inwards.
FAQs
How do I remove margins inside table cells in Word?
Click in the table, open Table Layout > Cell Margins, set Top, Bottom, Left and Right to 0 and select OK. Word removes the padding between the text and the cell borders.
What is the difference between cell margins and cell spacing?
Cell margins are the space inside a cell, between the text and its borders. Cell spacing is the gap between neighbouring cells. Both are set in the same Table Options window.
Why is there still space after setting the cell margins to zero?
The extra space usually comes from paragraph spacing. Select the table, open Home > Line and Paragraph Spacing and choose Remove Space Before Paragraph or Remove Space After Paragraph.
Can I change the margins of just one cell?
Yes. Click in the cell, open Table Layout > Properties, go to the Cell tab and select Options. Clear Same as the whole table and enter the margins for that cell.
How do I make a Word table fit its text?
Select the table, then choose Table Layout > AutoFit > AutoFit Contents. Each column shrinks to fit its longest entry.
Should I always set cell margins to zero?
Not always. Text that touches the borders can be hard to read. A small value such as 0.1 cm keeps the table compact while leaving a little breathing room.
Conclusion
To remove margins inside table cells in Word, open Table Layout > Cell Margins, set all four margins to 0 and clear Allow spacing between cells. If the rows still look padded, remove the paragraph spacing, then use AutoFit to tighten the columns.
For more ways to tidy up tables, learn how to merge cells in Word or browse these Word table shortcuts.
Related Tutorials
- How to Delete Table Borders in Word: 2 Easy Methods (Quick Guide)
- How to Remove a Column from a Table in Word: 3 Easy Methods
- How to Hide Table Lines in Microsoft Word
Word Tutorials
Recent Microsoft Word Tutorials
Browse the complete collection for help with formatting, layout, pages, tables, images, and document setup.
For Microsoft support documentation, visit the official Microsoft guidance.
Leave a Reply