
To delete table borders in Word, select the whole table, then choose Table Design → Borders → No Borders. Every line disappears at once. To keep some lines, clear them all first and add back only the set you want.
In this guide, you’ll learn 2 easy methods to delete table borders in Word, how to keep just the outside edge or just the internal lines, and why the faint dashed lines that appear afterwards are not borders at all. If you only want the lines hidden rather than removed, see how to hide table lines in Word.
What Happens When You Delete Table Borders?
Borders are the printed lines around and between your cells. Removing them changes what appears on paper — the table structure itself stays exactly where it was, and your text does not move.
One rule governs the whole Borders menu, and it is the opposite of what most people assume:
- Each option works like a switch. An option that is already applied shows highlighted, and choosing it again removes those lines — Inside Borders on a fully bordered table takes the internal lines away and leaves the outside edge untouched.
- No Borders is the only option that clears everything.
- The surest route to any partial arrangement is a two-step job: No Borders first, then apply the set you want back.
- Borders and Shading gives a preview for removing one line at a time.
Watch the Video Tutorial
If you prefer to see this in action, the full video walkthrough is below, showing each method step by step.
How to Remove Table Borders in Word: Step-by-Step
Method 1 handles the common arrangements — all borders gone, outside only, inside only — from a single menu. Method 2 opens the Borders and Shading dialog for one line at a time.
Method 1: How to Delete Table Borders in Word Using the Borders Menu
Use this for whole-table changes. On Word 2016 and 2019 the tab is called Design under Table Tools rather than Table Design — the Borders button is in the same place either way.
Select the Entire Table
- Click inside the table.
- Click the four-arrow handle at the top-left corner of the table.
👉 The whole table highlights. Skip this and Word applies your change to one cell only — the single most common reason this fails.
Remove All Table Borders
- Open the Table Design tab.
- Select the arrow beside Borders.
- Select No Borders.

👉 Every line vanishes. Use Borders, not Border Styles — Border Styles changes how lines look, not whether they exist.
Keep the Internal Lines Only
Clear everything first, then add the internal lines back. On a fully bordered table you can also select the highlighted Outside Borders option to switch the outer edge off in one step, but the two-step method works whatever borders the table starts with.
- Keep the whole table selected.
- Open Borders and select No Borders.
- Open Borders again and select Inside Borders.
👉 The cells stay divided and the outer edge is gone.
Keep Only the Outside Border
- Keep the whole table selected.
- Open Borders and select No Borders.
- Open Borders again and select Outside Borders.
👉 A clean box with no internal divisions. Same two-step pattern, opposite result — and it is the pattern for every partial arrangement.
Method 2: How to Delete Table Borders in Word Selectively
When you need one specific line gone — the top edge, a single divider between two rows — the Borders and Shading dialog has a preview you click directly.
Open Borders and Shading
- Select the table, or just the cells you want to change.
- Open Table Design.
- Select the arrow beside Borders.
- Select Borders and Shading at the bottom of the menu.
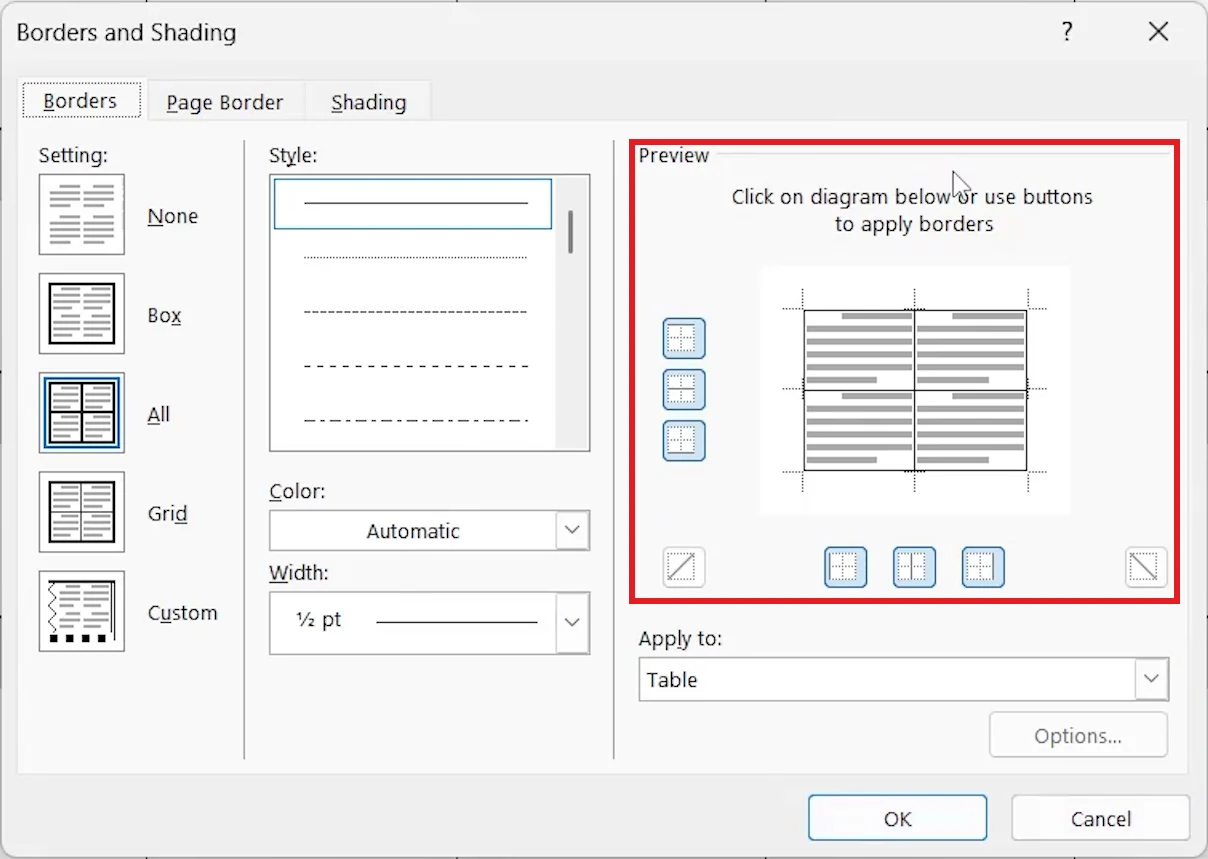
👉 The Preview panel on the right is the control. Each edge of that diagram is a button.
Remove Individual Lines
- In the Preview panel, click the line you want to remove.
- The line disappears from the diagram — click again to bring it back.
- Repeat for each line you want gone: top, bottom, left, right, or the internal dividers.
- Check Apply to reads Table or Cell as you intend.
- Select OK.
👉 The diagram is a live map of the result. If the preview looks right, the table will too.
Remove Borders from Specific Cells
- Drag to select the cells you want to change.
- Open Table Design → Borders.
- Select No Borders to clear those cells, then add back any lines you want.
👉 Only the selected cells change. This is how you knock out the gridlines behind a header row while keeping the rest of the table intact — useful alongside how to merge cells in Word when building a header block.
Which Method Should You Use?
| Approach | Best For | What You Do |
|---|---|---|
| Method 1 — Borders menu | All borders, outside only, inside only | Select table → Borders → No Borders, then add back |
| Method 2 — Borders and Shading | One line, or one group of cells | Click the individual edges in the Preview panel |
Best choice: Method 1 for whole-table work — it covers most cases in two clicks. Method 2 when a single line is the problem.
Common Problems When Removing Table Borders
Faint Dashed Lines Remain
Those are gridlines, not borders. Word shows them on screen so you can still see the table structure, and they never print. Turn them off with Table Layout → View Gridlines — or leave them, since they will not appear on paper. Full detail in how to remove gridlines in Word.
Only One Cell Loses Its Border
Your cursor was in a single cell rather than the whole table being selected. Click the four-arrow handle at the top-left of the table first, then reapply.
The Borders Came Back
Applying a table style after removing borders reinstates that style’s own border set. Remove the borders after choosing your table style, not before.
Nothing Happens When You Click
You are probably in Border Styles rather than Borders. Border Styles sets line weight, colour and pattern for borders you draw next — it does not add or remove anything on its own.
Pro Tips for Removing Table Borders
- Clear first, add back second. Trying to subtract from an existing arrangement is what causes the confusion.
- Borderless tables are the standard trick for invisible page layout — CVs, letterheads and forms are usually built on one.
- Leave View Gridlines on while you work. You cannot edit a table you cannot see.
- A single bottom border under the header row reads better than a fully ruled table in most documents.
- Table borders and page borders are separate features — for the page edge, see how to add a page border in Word.
FAQs
How do I delete table borders in Word?
To delete table borders in Word, click the four-arrow handle to select the whole table, then choose Table Design → Borders → No Borders.
How do I remove the outside border but keep the inside lines?
Select the table, apply No Borders to clear everything, then apply Inside Borders. On a fully bordered table you can instead select the highlighted Outside Borders option, which switches just the outer edge off.
How do I remove the inside borders but keep the outside border?
Apply No Borders first, then Outside Borders. On a fully bordered table you can instead select the highlighted Inside Borders option, which switches the inside lines off and keeps the outer edge.
Why can I still see lines after removing all borders?
Those are gridlines, not borders. They appear on screen only and never print. Turn them off with Table Layout → View Gridlines.
Can I remove just one border from a Word table?
Yes. Open Borders → Borders and Shading and click that line in the Preview panel to switch it off, then select OK.
Can I remove borders from only selected cells?
Yes. Drag to select those cells first, then apply No Borders. Only the selection changes.
What is the difference between Borders and Border Styles?
Borders controls which lines are applied. Border Styles sets the weight, colour and pattern those lines use.
Where is the Table Design tab in Word 2016?
It is called Design and sits under Table Tools, which appears only when your cursor is inside a table. The Borders button is in the same position.
Conclusion
To delete table borders in Word, select the whole table and choose Borders → No Borders. For anything partial, clear everything first and then apply the set you want — the menu adds borders, it does not take them away.
When one specific line is the problem, Borders and Shading is faster than fighting the menu. Click the edge in the Preview panel and it is gone.
Borderless tables are the foundation of most clean Word layouts. Once the lines are gone, how to merge cells in Word is the next step towards a table that does not look like a table.
Related Tutorials
- How to Hide Table Lines in Word
- How to Remove Gridlines in Word: 3 Easy Methods
- How to Merge Cells in Word: 3 Easy Methods
Word Tutorials
Recently Added on Word Made Easy
Browse the complete collection for help with formatting, layout, pages, tables, images, and document setup.
For Microsoft support documentation, visit the official Microsoft guidance.
Leave a comment
Stuck on a step, or know a quicker way? Ask or share it below.