
Knowing how to hide table lines in Word is the difference between a document that looks structured and one that looks cluttered — particularly when you’re using tables for layout rather than data. If you’re new to tables, start with our guide on how to merge tables in Word before hiding the lines.
In this guide, you’ll learn how to hide table lines in Word using two reliable methods, how to handle the faint gridlines that remain after removing borders, and when an invisible table is the right design choice.
Why Table Lines Appear in Word
Before you hide table lines in Word, it helps to understand that what looks like a single line is actually two separate things working together:
- Borders — visible on screen and printable
- Gridlines — faint, non-printing guides that only appear on screen for cleaner editing — covered in detail in our guide on how to remove gridlines in Microsoft Word
The distinction matters. Removing borders does not remove gridlines, which is why so many people think their table lines won’t go away.
Watch the Video Tutorial
If you prefer to see this in action, the full video walkthrough is below, showing each method step by step.
How to Hide Table Lines in Word: Step-by-Step
There are two reliable ways to hide table lines in Word, plus a separate control for gridlines. Use Method 1 when you want full control from the Table Design tab, and Method 2 when you want the fastest possible click path from the Home tab.
Method 1: How to Hide Table Lines in Word Using Table Design
This is the most common approach and the one I recommend if you build tables regularly — useful whether you’ve drawn the table yourself or used one of the three ways to insert a table in Word.
Steps:
- Select your entire table using the handle in the top-left corner
- Go to the Table Design tab on the ribbon
- Click the Borders dropdown arrow
- Select No Borders
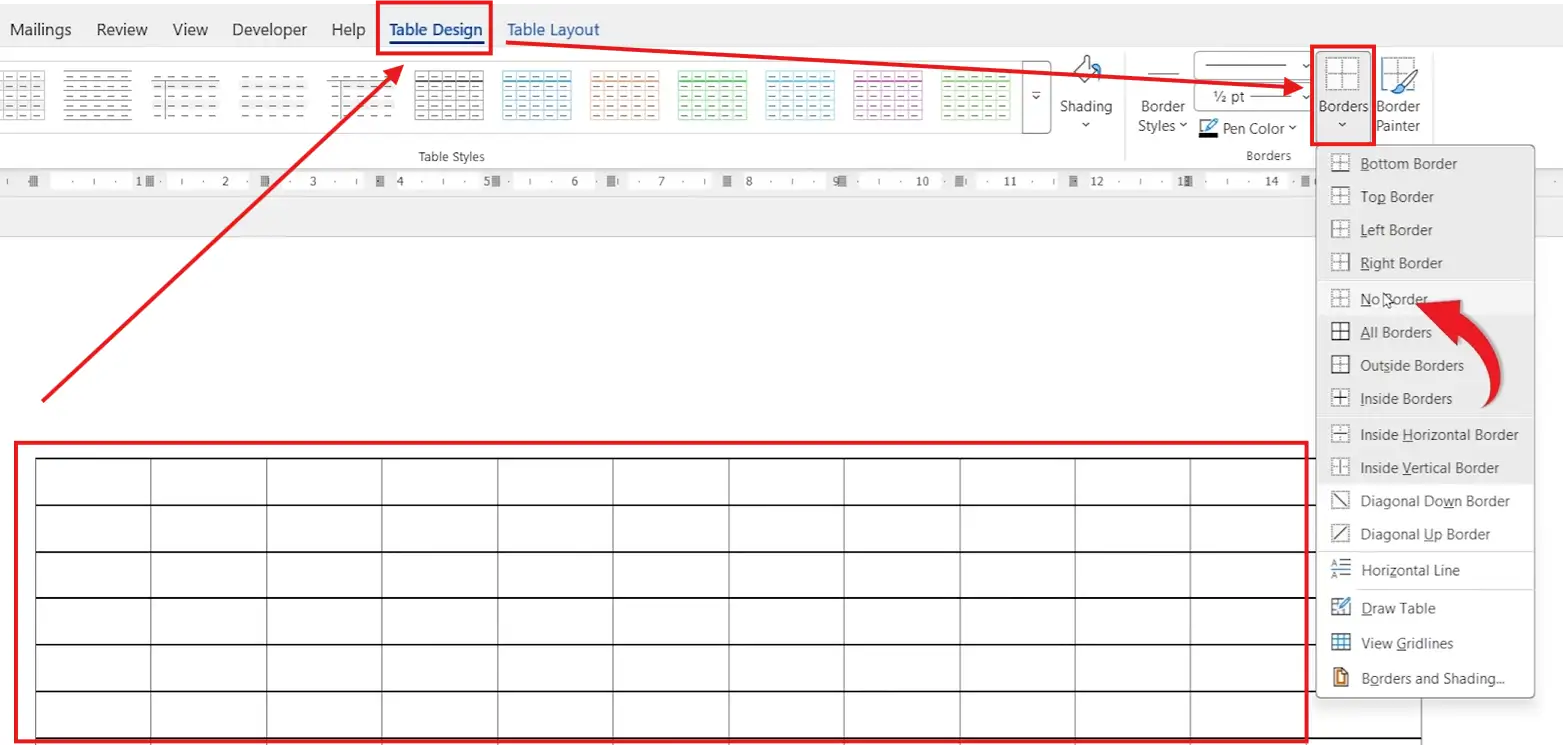
👉 All visible table lines disappear, but the table itself stays fully functional — you can still type, edit, and resize as normal.
Method 2: How to Hide Table Lines in Word From the Home Tab
If your Home tab is already open, you can hide table lines in Word without switching ribbons — fewer clicks, same result.
Steps:
- Select your table
- Stay on the Home tab
- Click the Borders icon in the Paragraph group
- Choose No Borders

👉 Same result, fewer clicks. This is the method I use when I’m already formatting paragraph text and don’t want to switch tabs.
Method 3: How to Hide Table Lines in Word by Turning Off Gridlines
After removing borders, you may still see faint lines on screen. Those are gridlines — non-printing guides that help you see cell boundaries while editing. To make a table truly invisible on screen, toggle them off.
Steps:
- Click anywhere inside your table
- Go to the Table Layout tab
- Click View Gridlines to toggle them off
- Click again to bring them back when you need to edit
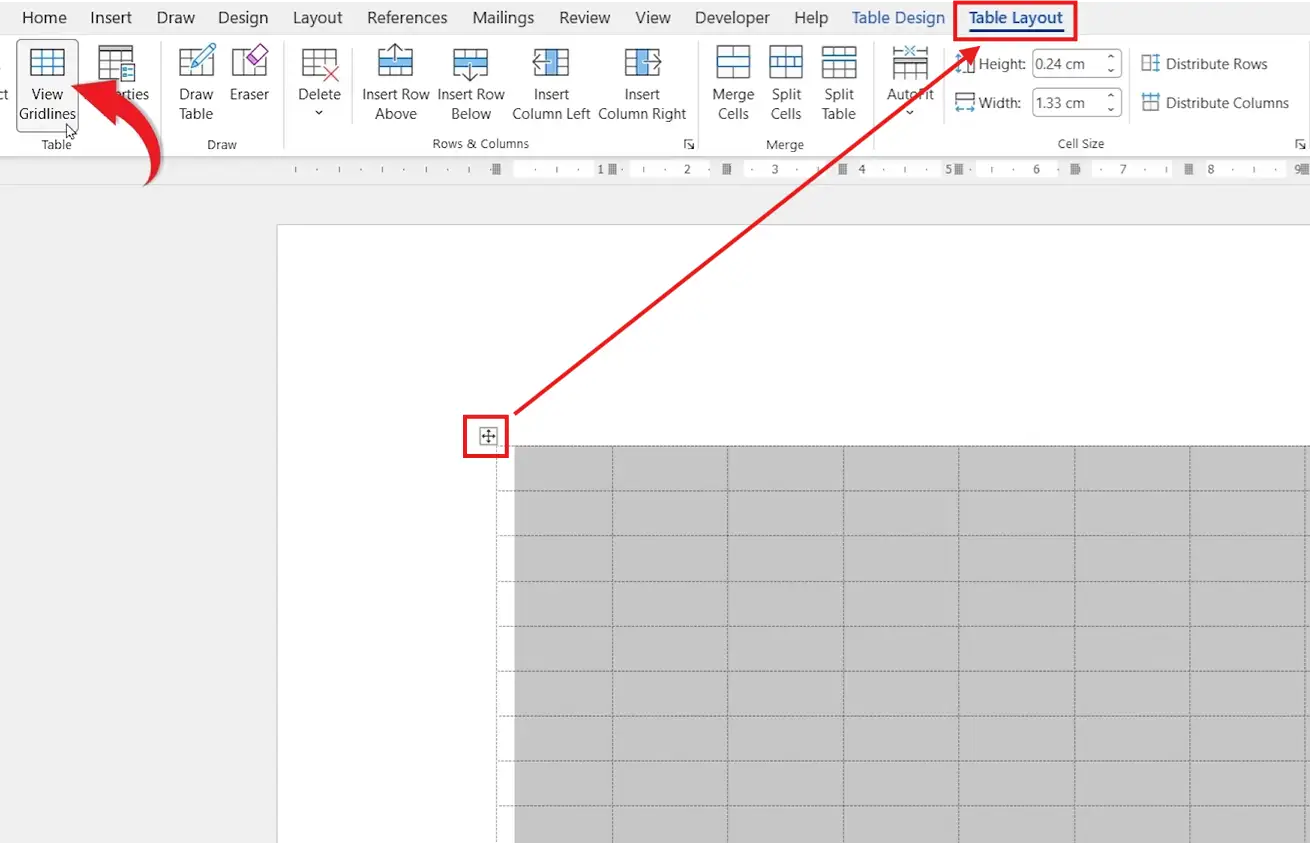
👉 Gridlines never print — they only affect what you see on screen — so this setting is purely about your editing view.
Which Method Should You Use?
| Method | Best For | Speed | What It Hides |
|---|---|---|---|
| Method 1 — Table Design | Full control, multiple border edits | Medium | Borders only |
| Method 2 — Home Tab | Quick hide while typing | Fastest | Borders only |
| Method 3 — View Gridlines | Truly invisible on-screen tables | Fast | Gridlines only |
For most documents, combine Method 1 or 2 with Method 3 — borders off, gridlines off, table invisible.
Common Problems When Hiding Table Lines in Word
Faint lines still appear after No Borders
Those are gridlines, not borders. Go to Table Layout → View Gridlines and click once to switch them off.
Only some borders disappear
You haven’t selected the full table. Hover over the table and click the four-arrow handle in the top-left corner to select everything, then apply No Borders again.
Borders come back when you print
If lines appear on the printed page, they’re still borders — gridlines never print. Re-select the table and apply No Borders from the Table Design tab.
The Table Design tab is missing
The Table Design tab only appears when your cursor is inside a table. Click any cell and it will reappear on the ribbon.
Pro Tips
- Use invisible tables for resumes, contact blocks, and form layouts — borderless tables are the cleanest way to align text and images side by side, particularly when paired with how to justify text in Word for tidy paragraph edges.
- Apply No Borders to just a few cells by selecting only those cells before opening the Borders dropdown — useful when you want a partial grid.
- Press Ctrl + Z immediately if you remove borders by accident — it reverses the change without disturbing your text.
- Leave gridlines on while you’re still editing — they make selecting cells far easier, and they vanish at print time anyway.
FAQs
How do I hide table lines in Word?
To hide table lines in Word, select the table, go to Table Design → Borders → No Borders, then optionally turn off gridlines via Table Layout → View Gridlines for a fully invisible table.
Why are my table lines still visible after removing borders?
You’re seeing gridlines, not borders. Gridlines are non-printing guides shown only on screen. Toggle them off from the Table Layout tab.
Do gridlines print in Word?
No. Gridlines are only visible on screen and never appear on the printed page.
Can I hide borders for only part of a table?
Yes. Select the specific cells, rows, or columns you want to change, then apply No Borders from the Table Design or Home tab. The rest of the table keeps its borders.
How do I make a Word table completely invisible?
Remove all borders with No Borders, then switch off View Gridlines. Both the printed and on-screen versions of the table will then appear invisible.
Should I keep gridlines on or off?
Keep gridlines on while editing — they make cell boundaries easy to see. Turn them off when you want a cleaner preview of how the final document will look.
Is there a keyboard shortcut to hide table lines in Word?
There’s no single shortcut for borders, but you can press Alt to surface ribbon key tips, then navigate to the Borders dropdown without using the mouse. Use Ctrl + Z to undo if you make a mistake.
When should I use a table without borders?
Invisible tables are ideal for resumes, contact details, form layouts, and any document where you need precise alignment without visible structure — the table organises the content while staying out of sight.
Conclusion
Learning how to hide table lines in Word is one of those small skills that instantly improves the look of any document. Remove the borders, toggle the gridlines, and your table works behind the scenes — keeping your layout organised without drawing attention to itself.
Once you’re comfortable with borderless tables, the next step is mastering the table itself — start with our guide on how to merge tables in Word to build cleaner, more flexible layouts.
Related Tutorials
- How to Remove Gridlines in Microsoft Word
- Three Ways to Insert a Table in Word
- How to Delete a Row in a Microsoft Word Table
Word Tutorials
Recent Microsoft Word Tutorials
Browse the complete collection for help with formatting, layout, pages, tables, images, and document setup.
For Microsoft support documentation, visit the official Microsoft guidance.
Leave a Reply