
You can add a page border in Word straight from the Design tab, framing your whole document or a single page in just a few clicks — no add-ins or extra software needed. For a fully polished layout, it also helps to adjust your page margins in Word first.
In this guide, you’ll learn how to add a basic page border, choose and customise the style, and control exactly where it appears in your document.
What Is a Page Border in Word?
A page border is a line or decorative design that surrounds the edges of your document pages. You can apply it to every page or restrict it to a single page or section.
It can be used to:
- Enhance presentations or reports
- Create certificates or formal documents
- Add structure to printed materials
- Make documents stand out visually
Watch the Video Tutorial
If you prefer to see this in action, the full video walkthrough is below, showing each method step by step.
How to Add a Page Border in Word: Step-by-Step
Method 1: How to Add a Page Border in Word Using the Design Tab
This is the standard route and applies a border to your whole document.
Open the Page Borders dialog
- Open your document in Microsoft Word.
- Click the Design tab on the ribbon.
- Select Page Borders.
- Make sure you are on the Page Border tab.
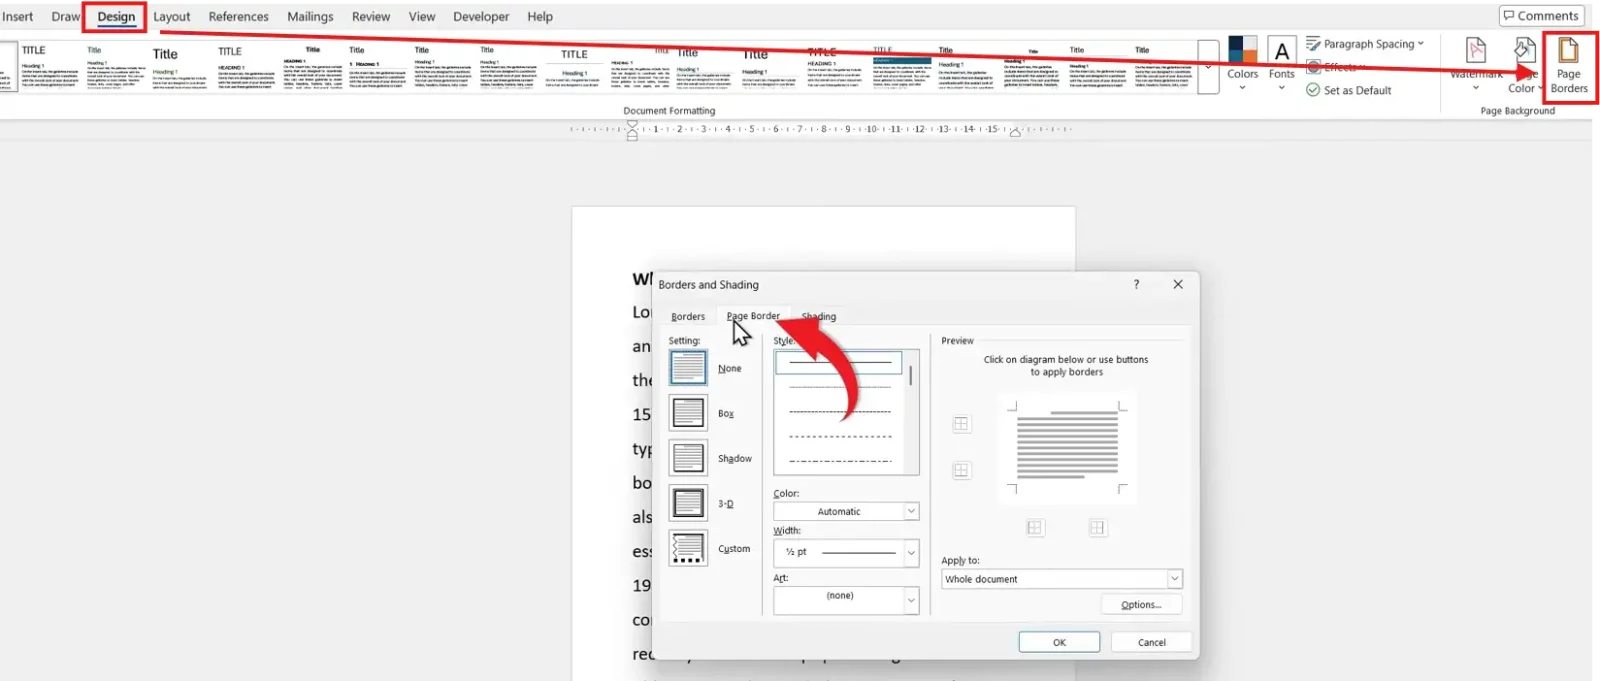
By default, the setting is None (no border).
Choose a border style
Word provides several built-in border options:
- Box — a simple border around the page
- Shadow — adds a shadow effect to the border
- 3-D — gives the border a raised appearance
- Custom — lets you apply borders to specific sides
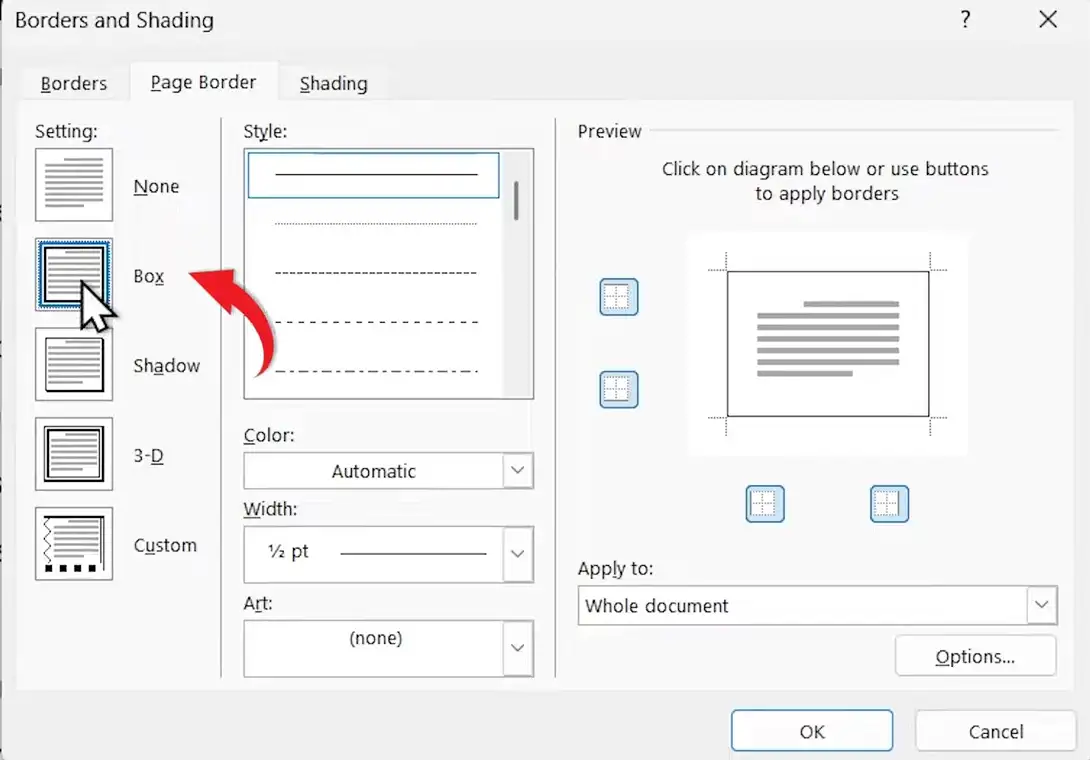
For most documents, Box is the cleanest option.
Customise the style, colour, and width
Once you’ve chosen a style, personalise the border using the dialog controls:
- Style — choose different line designs
- Color — pick a colour that matches your document
- Width — adjust the thickness of the border
- Art — add decorative borders such as patterns or graphics
👉 Click OK and the border appears instantly around every page.
Method 2: How to Add a Page Border in Word to One Page or Section Only
Use this method when you want a border on the first page, a single section, or every page except the first.
Set the Apply to scope
- Open Design → Page Borders and choose your style, colour, and width.
- Open the Apply to dropdown in the bottom-right of the dialog.
- Choose one of the scopes below.
- Whole document — every page gets the border
- This section only — just the current section
- This section — First page only — the first page of the section
- This section — All except first page — every page but the first

👉 Click OK and the border appears only where you selected.
Note: to border a single page in a longer document, insert a section break before and after that page first, then apply the border to This section only.
Which Method Should You Use?
Quick Recommendation
Want the border on every page? Use Method 1. Only need it on one page or section? Use Method 2 and set the Apply to scope.
| Method | Best For | What You Do |
|---|---|---|
| Method 1 | A border on every page | Design → Page Borders → choose a style → OK |
| Method 2 | One page or section | Set the Apply to dropdown before clicking OK |
Common Problems When Adding Page Borders in Word
The border sits too close to the page edge
In the Page Borders dialog, click Options and increase the margin values, or change Measure from to Text. This pulls the border away from the edge so printers don’t clip it.
The page border does not print
Most home printers can’t print to the very edge. Open Options and set Measure from to Text, then reduce the edge distance so the whole border falls inside the printable area.
The Art border overlaps the text
Art borders are thicker than line borders. Lower the Width value, or add more spacing in Options so the decorative border doesn’t sit over your content.
The border appears on every page
Reopen the dialog and change the Apply to dropdown to This section only or First page only instead of Whole document.
Pro Tips for Better Page Borders
- Keep borders simple for professional documents — thin lines read as cleaner than heavy ones.
- Use subtle colours so the border frames the page without competing with the content.
- Match the border to your text layout — for a balanced look, make sure your body copy is set up correctly, such as when you justify text in Word.
- Always print a test page when using Art borders to confirm nothing is clipped at the edge.
FAQs
How do I add a page border in Word?
To add a page border in Word, go to Design → Page Borders, choose a style on the Page Border tab, and click OK.
Can I add a page border to just one page in Word?
Yes. Open the Apply to dropdown and choose First page only, or use section breaks and apply the border to This section only.
How do I add a custom page border in Word?
Select the Custom setting, then click the sides in the preview to apply borders to specific edges only.
How do I add a decorative Art border in Word?
In the Page Borders dialog, open the Art dropdown and pick a design. Adjust the Width so it fits the page cleanly.
Why is my page border not showing in Word?
It’s usually too close to the page edge. Click Options and set Measure from to Text, then increase the spacing.
Do page borders print in Word?
Yes. Unlike gridlines, page borders are visible and will print, provided they sit inside your printer’s printable area.
How do I remove a page border in Word?
Open Design → Page Borders, select None on the Page Border tab, and click OK.
Conclusion
You can add a page border in Word in seconds from the Design tab, either around the whole document or a single page using the Apply to scope.
Choose Box for a clean frame, or Art for something decorative, and use Options to keep the border inside the printable area.
Once your border is in place, take the layout further with How to Change Page Size in Word.
Related Tutorials
Word Tutorials
Recently Added on Word Made Easy
Browse the complete collection for help with formatting, layout, pages, tables, images, and document setup.
For Microsoft support documentation, visit the official Microsoft guidance.
Leave a Reply