
To add definitions at the bottom of a page in Word, click after the word you want to explain and select References > Insert Footnote. Word adds a small number next to the word and moves you to the bottom of the page, where you type the definition.
In this guide, you’ll learn how to add definitions at the bottom of a page in Word with a footnote, using either the ribbon or a keyboard shortcut. You’ll also see how to return to your text, check a definition and choose between footnotes and endnotes. The steps are for Word for Windows.
Why Use a Footnote for a Definition?
A footnote keeps the explanation close to the word without interrupting your sentence. Word handles the numbering for you, and the note always stays on the same page as its word, even when the text moves.
- Explain a technical term or piece of jargon.
- Define a literary device, such as alliteration in a poem analysis.
- Add a short translation or a source note.
If a term needs a longer explanation that already exists online, you can insert a hyperlink in Word instead.
Watch the Video Tutorial
If you prefer to see this in action, the full video walkthrough is below, showing each method step by step.
Method 1: Insert a Footnote from the References Tab
Step 1: Click After the Word
Click immediately after the word you want to define, with no space in between. In the example, the cursor goes straight after alliteration.
Step 2: Select Insert Footnote
- Open the References tab.
- Select Insert Footnote in the Footnotes group.
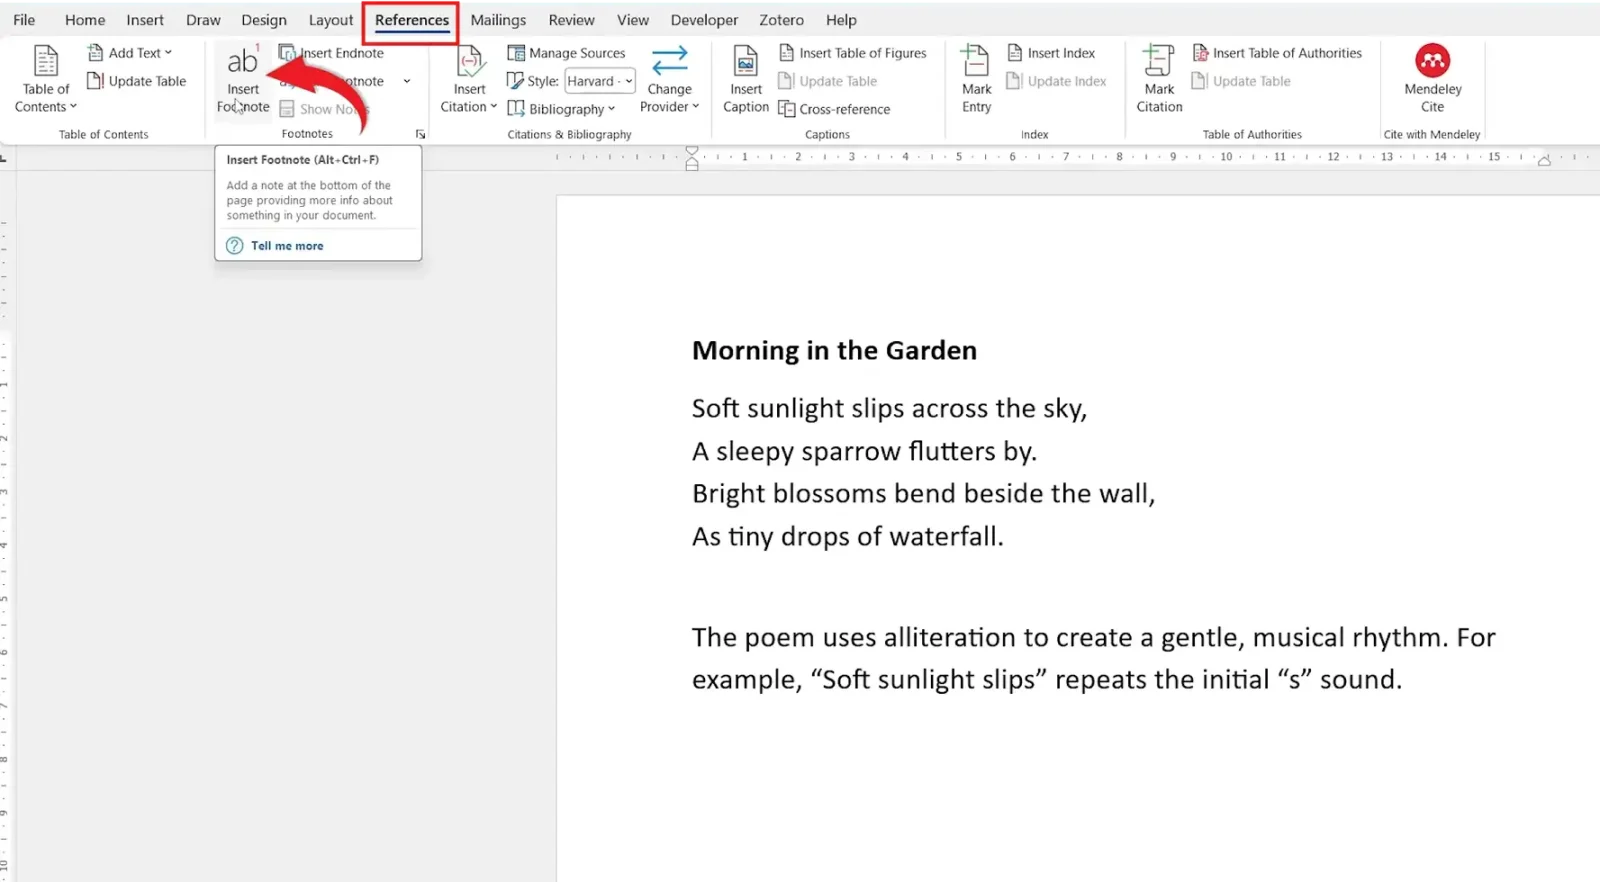
👉 Word adds a small superscript 1 after the word and moves the cursor to the bottom of the page.
Step 3: Type the Definition
Type or paste the definition next to the matching number below the short line. This is how you add definitions at the bottom of a page in Word without breaking up the paragraph above.

Step 4: Return to Your Text
Double-click the number at the start of the footnote. Word jumps back to the word in your text, so you can carry on writing.
Method 2: Use the Keyboard Shortcut
The quickest way to add definitions at the bottom of a page in Word is the footnote shortcut.
- Click straight after the word.
- Press Ctrl + Alt + F.
- Type the definition, then double-click its number to return.
👉 Need the note at the end of the document instead? Press Ctrl + Alt + D to insert an endnote. For more time-savers, see these reference shortcuts in Word.
Check a Definition Without Scrolling
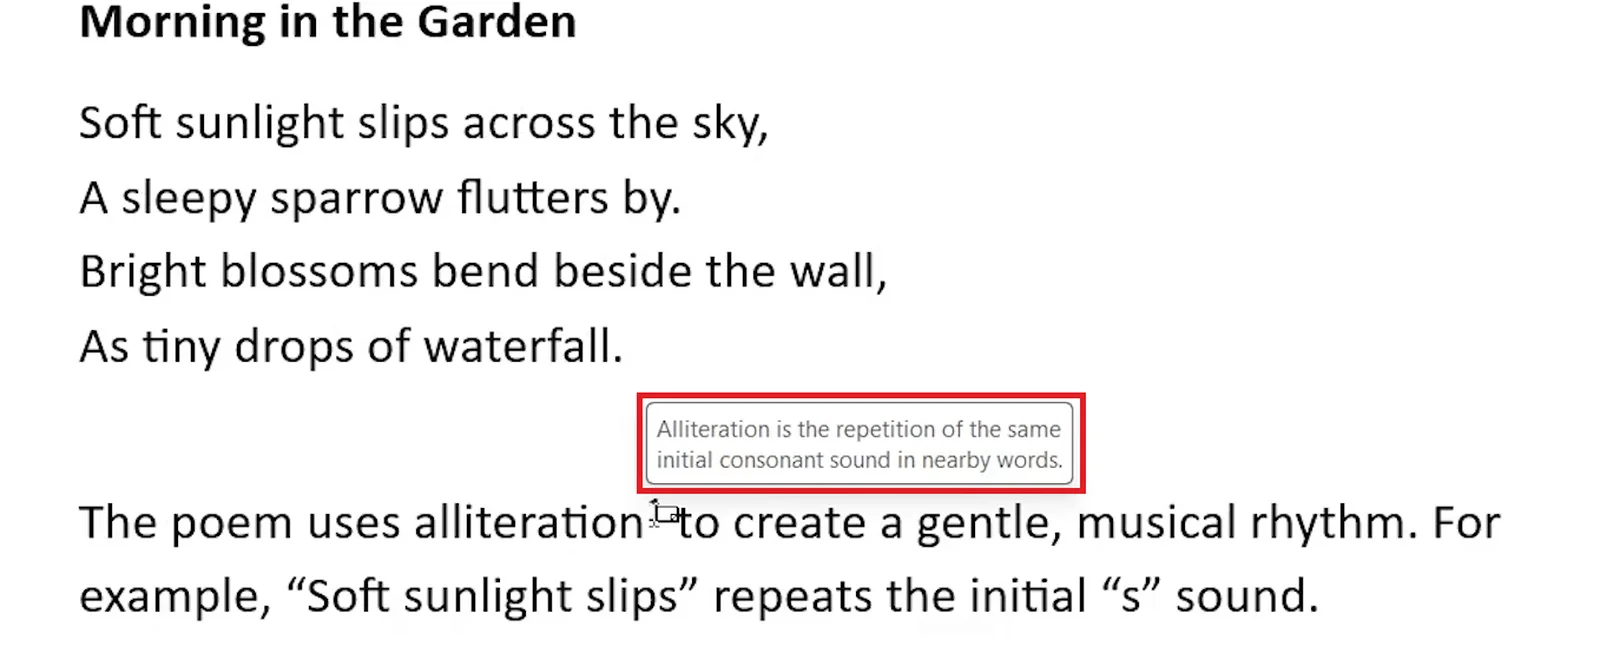
Point at the small number in your text. Word shows the definition in a ScreenTip, so you and your readers can check it without leaving the paragraph.
Footnote or Endnote?
| You want… | Use | Shortcut |
|---|---|---|
| The definition on the same page as the word | Footnote | Ctrl + Alt + F |
| All notes gathered at the end of the document | Endnote | Ctrl + Alt + D |
| A list of every term and where it appears | An index | Alt + Shift + X to mark an entry |
For short definitions, a footnote is almost always the best choice, because readers find the meaning on the same page.
Quick Tips
- Keep definitions short: one sentence is ideal at the bottom of a page.
- Change the numbering: select the small arrow in the corner of the Footnotes group to switch to letters or symbols.
- Delete a definition: select the number in the text and press Delete. Word renumbers the rest automatically.
Common Problems
The Definition Went to the End of the Document
You inserted an endnote. Press Ctrl + Z, then use Insert Footnote or Ctrl + Alt + F instead.
The Number Is in the Wrong Place
The cursor was not directly after the word. Delete the number in the text, click straight after the word and insert the footnote again.
I Cannot See the Footnote
Footnotes only show in Print Layout. Select View > Print Layout, or open References > Show Notes to jump to them.
FAQs
How do I add definitions at the bottom of a page in Word?
Click straight after the word, select References > Insert Footnote (or press Ctrl + Alt + F) and type the definition. Word numbers the word and places the definition at the bottom of the same page.
What is the keyboard shortcut for a footnote in Word?
Press Ctrl + Alt + F to insert a footnote. Press Ctrl + Alt + D for an endnote instead.
What is the difference between a footnote and an endnote?
A footnote appears at the bottom of the page where the word is used. An endnote appears at the end of the document, so it suits longer notes and source lists.
How do I get back to my text after typing the definition?
Double-click the number at the start of the footnote. Word jumps back to the matching number in your text.
Can readers see the definition without scrolling down?
Yes. Pointing at the small number in the text shows the definition in a ScreenTip, so readers can check it without leaving their place.
How do I delete a footnote definition?
Select the small number in the main text and press Delete. Word removes the footnote and renumbers the others automatically.
Conclusion
To add definitions at the bottom of a page in Word, click after the word, select References > Insert Footnote or press Ctrl + Alt + F, and type the definition. Double-click the footnote number to get back to your text.
Microsoft covers footnotes and endnotes in more detail in its guide to inserting footnotes and endnotes. For longer documents, you can also create a table of contents in Word.
Related Tutorials
- How to Create an Index in Word: 5 Easy Steps
- How to Add Mendeley Cite in Word
- Reference Shortcuts in Word: 28 Essential Keys
Word Tutorials
Recent Microsoft Word Tutorials
Browse the complete collection for help with formatting, layout, pages, tables, images, and document setup.
For Microsoft support documentation, visit the official Microsoft guidance.
Leave a Reply