You can add a line under a header in Word in under a minute, using nothing but a button already on the ribbon. A horizontal line beneath the header separates it cleanly from the body text — useful for letterhead, reports, invoices, and anything that needs to look like it came from a template, not a blank page.
In this guide, you’ll learn three ways to add a line under a header in Word — a paragraph border, a built-in horizontal line tool, and a drawn shape — plus how to customise or remove each one. If you’re working on a document with page numbers in Word too, both sit comfortably in the same header.
What Is a Header in Word?
A header is the section at the top of every page, set apart from the main body text. Content placed there repeats automatically on each page unless you specify otherwise. Headers commonly hold:
- Document titles
- Company names or logos
- Page numbers
- Dates
- Author information
A header packed with information can start to blur into the body text without a visual break. That’s exactly what you fix when you add a line under a header in Word.
Watch the Video Tutorial
If you prefer to see this in action, the full video walkthrough is below, showing each method step by step.
How to Add a Line Under a Header in Word: Step-by-Step
Three methods cover almost every case. Start with the border if you just want it done.
Method 1: How to Add a Line Under a Header in Word Using a Bottom Border
A bottom border is the fastest option — it’s tied to the header paragraph, so it stretches the full width automatically and stays put.
Steps:
- Double-click at the top of the page to open the header area.
- Type your header text.
- Click anywhere in the header paragraph — you don’t need to select the text.
- Go to the Home tab, Paragraph group.
- Click the Borders dropdown arrow and select Bottom Border.
- Go to Header & Footer → Close Header and Footer.
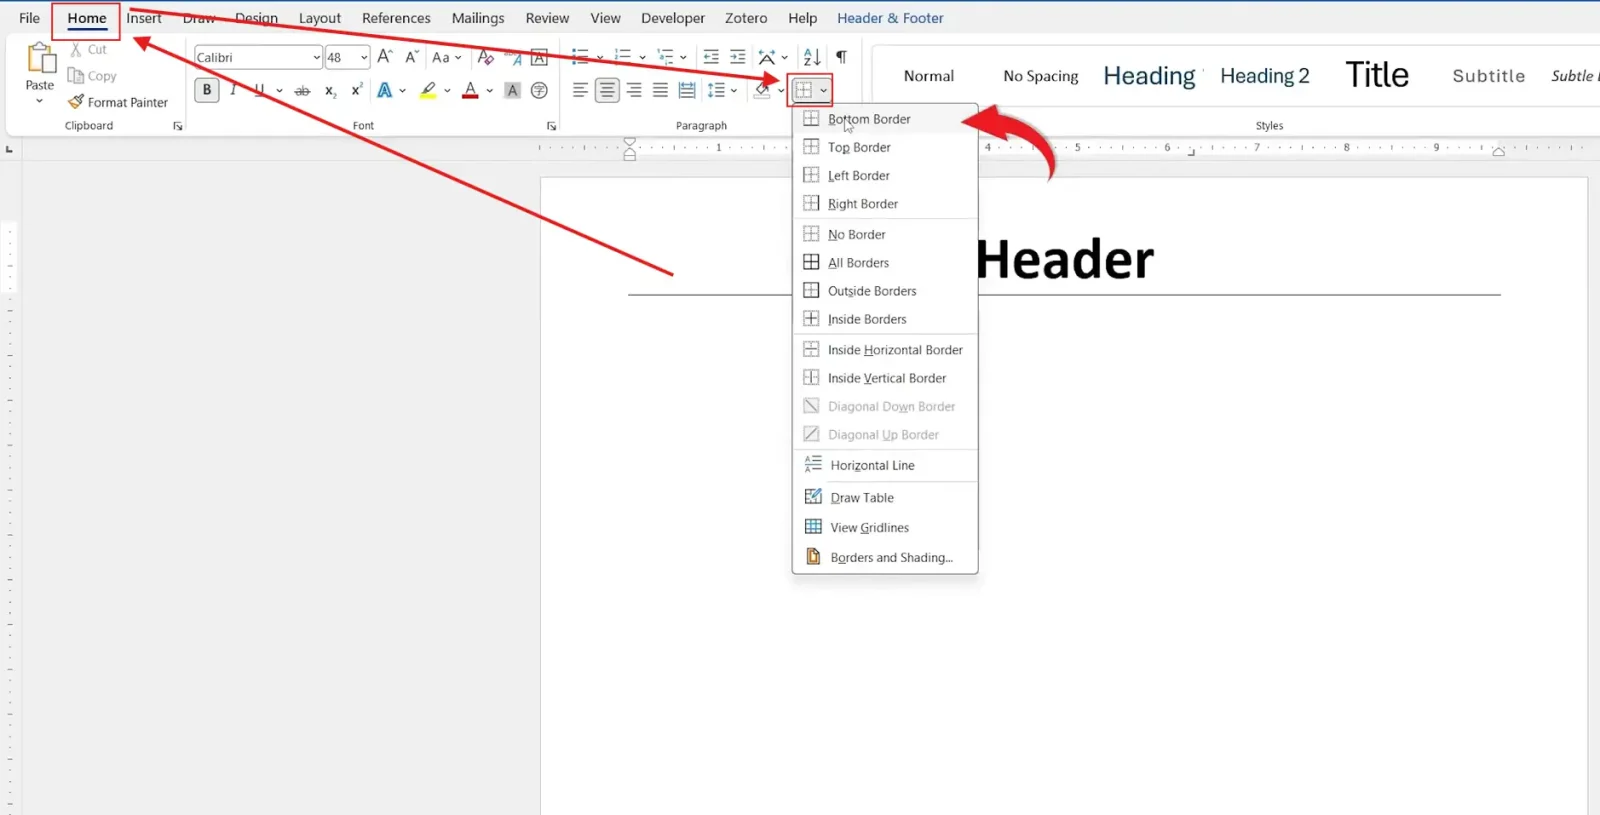
👉 The line appears instantly, spanning the full width of the header. To adjust its thickness or colour, reopen Borders → Borders and Shading, set the style, colour, and width — 3 pt and a brand colour reads well on letterhead — then click OK and reapply the border if the new style doesn’t show immediately. For every option in the dialog, see Microsoft’s border documentation.
For sibling formatting on the same page, the guide on how to add a bottom border in Word covers applying the same border style to body paragraphs, not just headers.
Method 2: How to Add a Line Under a Header in Word Using the Horizontal Line Tool
Hidden in the same Borders dropdown is a separate way to add a line under a header in Word — Horizontal Line — that inserts a graphic line object instead of a paragraph border. It can be resized and recoloured independently of the header text.
Steps:
- Double-click the header area to open it.
- Place your cursor on a new line below the header text.
- Go to Home → Borders dropdown.
- Select Horizontal Line.
- Double-click the inserted line to open Format Horizontal Line and adjust width, height, or colour.
👉 Word drops in a ready-made line you can drag wider, narrower, thicker, or thinner without touching the header text itself. Full details on this tool sit in Microsoft’s horizontal line documentation.
Method 3: How to Add a Line Under a Header in Word Using a Shape
A drawn shape gives you the most control — useful when you don’t want the line to run the full page width, or you want it positioned independently of the text.
Steps:
- Double-click the header area.
- Go to Insert → Shapes.
- Select the Line tool.
- Hold Shift and drag to draw — this keeps the line perfectly horizontal.

With the line selected, go to Shape Format → Align → Align Center to centre it, or nudge it with the arrow keys for fine positioning. For colour and thickness, select Shape Format → Shape Outline, choose a colour, then Weight for a heavier line — 3 pt in an accent colour creates a noticeably stronger divider than the default border.

👉 This is the only method that lets the line stop short of the page edge — handy if you only want it under a logo, not the whole header. For more on drawing precise lines elsewhere in a document, see the guide on how to draw a line in Word.
Which Method Should You Use?
Each way to add a line under a header in Word takes under a minute — the right pick depends on how much control you need.
- Want it done in one click? Use the Bottom Border.
- Want a line that’s independent of the text? Use the Horizontal Line tool.
- Need it shorter than the full page width, or precisely placed? Use a Shape.
Common Problems When Adding a Line Under a Header in Word
Even with three reliable ways to add a line under a header in Word, a few issues come up often enough to cover here.
I Can’t See the Line Under My Header
Confirm the border or line was applied while you were inside the header area, not the body text. If it’s still missing, check you’re not viewing the document in a mode like Draft view, which can hide some formatting.
The Border Doesn’t Span the Full Page Width
This happens when the border is applied to selected text rather than the whole paragraph. Click into the header line without selecting any text, then reapply the bottom border — it will stretch to the full paragraph width automatically.
The Shape Line Isn’t Perfectly Horizontal
This means Shift wasn’t held while drawing. Delete the line, draw it again while holding Shift from start to finish, then release the mouse before letting go of the key.
The Horizontal Line Won’t Resize
Click directly on the line itself, not the surrounding text, until small square handles appear at each end. Drag a handle to resize, or right-click and choose Format Horizontal Line for exact measurements.
Pro Tips for Header Lines in Word
Once you’ve added a line under a header in Word, a few small touches make it look intentional rather than default.
- Match the line colour to your logo or letterhead palette rather than defaulting to black — it reads as more deliberate.
- Keep the border at 1–3 pt for business documents; anything heavier starts to look decorative rather than functional.
- If your header content sits close to the edge of the page, double-check your margins in Word before adding a border, since tight margins can make a full-width line look cramped.
- Apply the same border style to your footer for a matching top-and-bottom frame — once you add a line under a header in Word, mirroring it below the body text ties the whole page together.
FAQs
How do I add a line under a header in Word?
To add a line under a header in Word, click inside the header, go to Home → Borders, and choose Bottom Border — the fastest of the three methods covered above.
Can I change the colour of the line?
Yes. Borders, horizontal lines, and shape lines can all be recoloured through their respective formatting menus.
Which method is better — border, horizontal line, or shape?
The bottom border is fastest, the horizontal line tool offers more visual styles, and shapes give you full control over position and length. None is objectively better — it depends on the layout.
Will the line appear on every page?
Yes — however you add a line under a header in Word, it repeats on every page that uses that header.
Can I make the line thicker?
Yes. Use Borders and Shading for border lines, Format Horizontal Line for the horizontal line tool, or Shape Outline → Weight for shape lines.
Can I add a line under a footer instead of a header?
Yes — all three ways to add a line under a header in Word work identically inside the footer area. If your header and footer differ by page, see the guide on different footers on each page in Word first.
Why did my line disappear after I closed the header?
This usually means the border or line was applied to the body text by mistake rather than the header paragraph. Double-click back into the header and reapply it there.
Conclusion
All three ways to add a line under a header in Word take under a minute once you know where to look.
Use the bottom border for speed, the horizontal line tool for a styled divider that’s independent of the text, and a shape when you need precise control over length and position.
Once the header is set, carry the same line treatment elsewhere in the document — the guide on how to insert a vertical line in Word covers the matching technique for dividing columns or sections in the body.
Related Tutorials

Recent Microsoft Word Tutorials

Looking for more help with Microsoft Word? Browse all step-by-step Word tutorials covering formatting, layout, pages, and document setup.
👉 View all Microsoft Word tutorials: https://wordmadeeasy.org/microsoft-word/
👉 Need more support – check out the official guidance: https://support.microsoft.com/en-au

Prefer watching instead of reading? Many Word tutorials are also available as short, step-by-step videos on the Word Made Easy YouTube channel.


Leave a Reply