If you need to blur text in Word to hide sensitive information, create a visual effect, or obscure content for training materials, there’s a simple workaround built right into Word’s picture editing tools. Microsoft Word has no direct “blur text” button — but you can blur text in Word by placing it inside a shape, converting it to an image, and applying the Blur artistic effect.
In this guide, you’ll learn exactly how to blur text in Word in eight steps, how to adjust the blur strength, and how to fix the most common problems.
Why Word Has No Direct Blur Text Option
Unlike image editing software, Microsoft Word treats text and images as entirely separate objects. This means you can’t blur text in Word directly — there is no dedicated blur button for standard typed text. Word’s Artistic Effects, which include the Blur option, only work on images. To blur text in Word, you must first convert the text into an image, then apply the effect.
Watch the Video Tutorial
If you prefer to see this in action, the full video walkthrough is below, showing each method step by step.
How to Blur Text in Word: Step-by-Step
Follow these eight steps to blur text in Word using a shape and the Blur artistic effect.
Method 1: How to Blur Text in Word Using a Shape and Picture Effect
Step 1: Type and Cut Your Text
Type the text you want to blur in Word — for example, “Confidential Information”. Select it and press Ctrl + X to cut it to your clipboard.
Step 2: Insert a Rectangle Shape
- Click the Insert tab.
- Select Shapes.
- Choose Rectangle and draw it on your page.

The size doesn’t need to be exact — you can adjust it later.
Step 3: Paste the Text Into the Shape
Click inside the rectangle and press Ctrl + V. Your text appears inside the shape. Resize and position the shape where you want the blurred text to appear.
Step 4: Remove the Shape Fill and Outline
Select the shape, go to Shape Format, click Shape Fill → No Fill, then click Shape Outline → No Outline. This makes the shape invisible, leaving only the text visible.

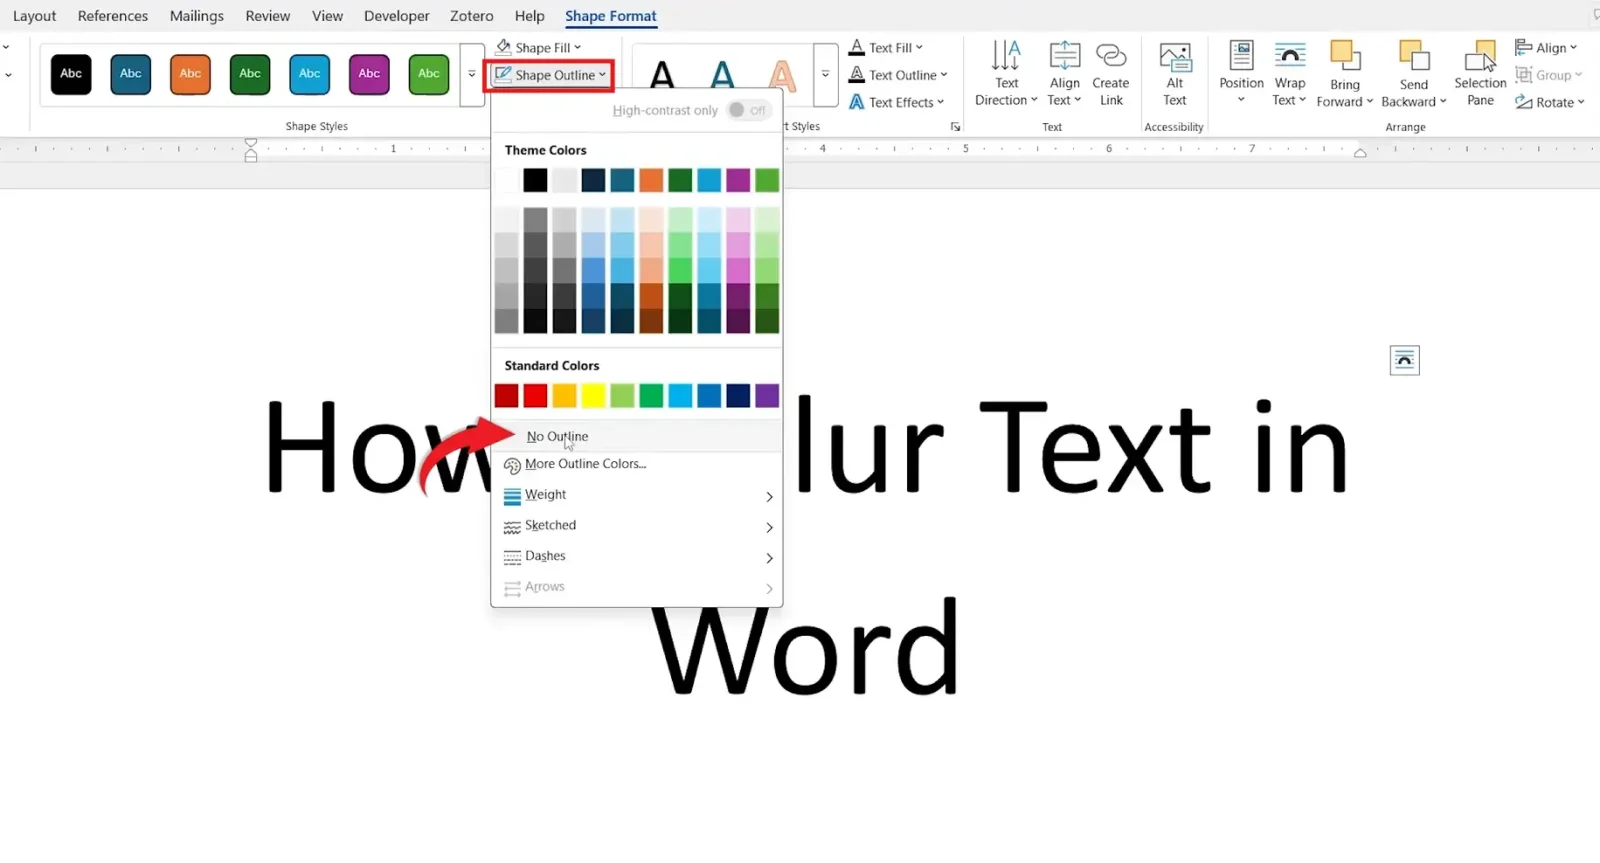
Step 5: Change the Text Colour (Optional)
Select the text inside the shape, click Text Fill, and choose a colour — black, grey, or red all work well. The blur effect will apply to whichever colour you set. For more colour options, see our guide on how to change font colour in Word.
Step 6: Convert the Shape Into a Picture
Word can only apply blur effects to images, not shapes. To convert:
- Select the shape, right-click, and choose Cut.
- Go to the Home tab and click the dropdown arrow under Paste.
- Select Paste as Picture.
The shape and its text are now a single image, ready for the blur effect.
Step 7: Apply the Blur Effect
- Select the picture.
- Go to Picture Format.
- Click Artistic Effects.
- Choose Blur.
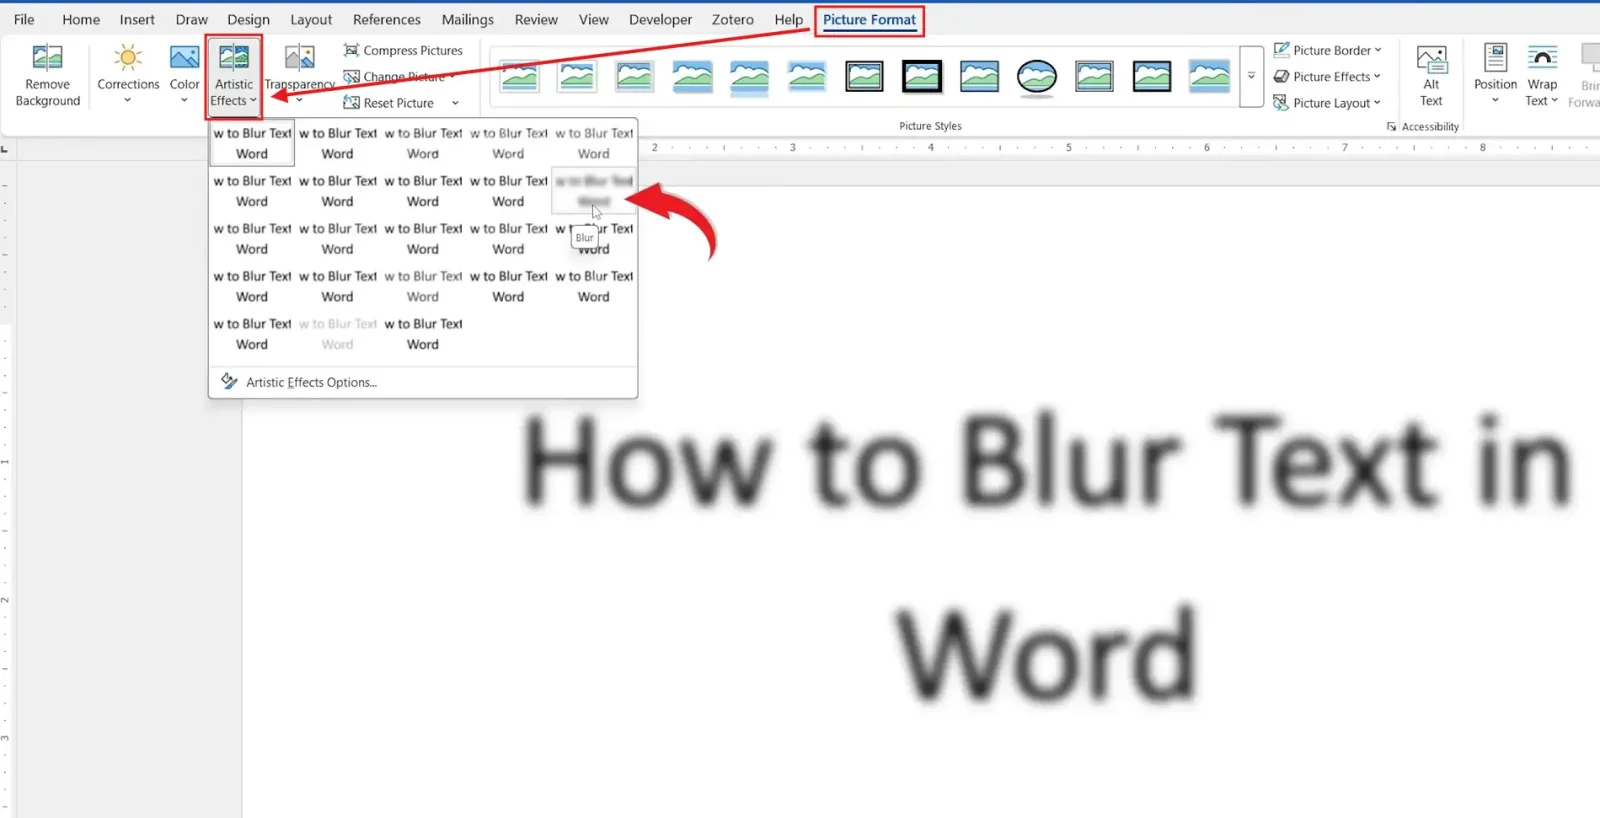
Your text will instantly become blurred.
Step 8: Adjust the Blur Strength
If the blur is too weak or too strong, select the image, go to Picture Format → Artistic Effects → Artistic Effects Options, and adjust the Radius slider — increase it for a stronger blur, decrease it for a lighter one.
When to Blur Text in Word
Knowing how to blur text in Word is useful in several situations:
- Hiding confidential information in screenshots or shared documents
- Creating document examples or redacting names and sensitive details
- Producing training materials and visual mockups
- Designing presentation handouts with partially hidden content
Keep in mind that blurring is a visual effect only — for highly sensitive information, permanently remove the content rather than relying on blur alone.
Which Blur Strength Should You Use?
| Use Case | Recommended Radius |
|---|---|
| Light obscuring — still partially readable | Low (10–20) |
| Moderate redaction — unreadable but hinted | Medium (30–50) |
| Full obscuring — completely hidden | High (80–100) |
Common Problems When You Blur Text in Word
The Blur Option Is Missing
Artistic Effects only appear when an image is selected. If the option is greyed out, the shape hasn’t been converted to a picture yet — repeat Step 6.
The Shape Is Still Visible
Confirm that both Shape Fill and Shape Outline are set to No Fill / No Outline before converting to a picture.
The Blur Is Too Strong or Too Weak
Open Artistic Effects Options and adjust the Radius slider up or down until the blur level suits your purpose.
Paste as Picture Isn’t Appearing
Use Home → Paste dropdown → Paste Special and select Picture (Enhanced Metafile) as an alternative.
Pro Tips
- Use a larger font size before converting — small text blurs into an unrecognisable smudge at high radius settings.
- Save a copy of the original document before converting text to an image — once it’s a picture, the text is no longer directly editable.
- If your document uses a watermark alongside blurred text, see our guide on how to add a watermark in Word — watermarks and blurred image objects can coexist without conflict.
- To make an image partially transparent instead of blurred, see how to make an image transparent in Word — a useful alternative for overlay effects.
FAQs
Can I blur text in Word directly?
No — Word has no built-in blur button for standard text. To blur text in Word, you must first convert it into an image using the shape method above.
How do I increase the blur effect in Word?
Select the blurred image, go to Picture Format → Artistic Effects → Artistic Effects Options, and increase the Radius setting.
Can I edit the text after applying blur?
Not directly. Once converted to a picture, the text is no longer editable as regular text. Always keep the original text in a separate document as a backup.
Can I blur only part of a sentence?
Yes — place only the words you want blurred inside the shape before converting it to an image. The rest of the sentence stays as normal editable text.
Does Word offer other image effects besides blur?
Yes — Word’s Artistic Effects include sketch, glow, pencil, mosaic, and several others, all available from the same Picture Format → Artistic Effects menu.
Is blurring text in Word secure for sensitive information?
Blur is a visual effect only — a determined reader with image editing software may be able to reverse mild blur. For truly confidential content, permanently delete or redact the text rather than relying on blur. To add document-level security, see our guide on how to password protect a Word document.
Can I undo the blur and get my text back?
Press Ctrl + Z immediately after converting to undo the steps. Once the document is saved and closed, the conversion cannot be reversed — which is why saving a backup copy first is strongly recommended.
Conclusion
Although Word has no direct option to blur text in Word, the shape-to-image method gives you full control over the effect — including the blur strength. Whether you need to redact a name, hide confidential content, or create a visual mockup, these eight steps let you blur text in Word cleanly and professionally.
If you want to go further with image effects in the same document, our guide on how to make an image transparent in Word covers another useful visual technique.
Related Tutorials
- How to Make an Image Transparent in Word
- How to Add a Watermark in Word
- How to Password Protect a Word Document

Recent Microsoft Word Tutorials

Looking for more help with Microsoft Word? Browse all step-by-step Word tutorials covering formatting, layout, pages, and document setup.
👉 View all Microsoft Word tutorials: https://wordmadeeasy.org/microsoft-word/
👉 Need more support – check out the official guidance: https://support.microsoft.com/en-au

Prefer watching instead of reading? Many Word tutorials are also available as short, step-by-step videos on the Word Made Easy YouTube channel.


Leave a Reply