
Learning how to draw in Word opens up a side of Microsoft Word most users never touch — sketching, annotating, converting freehand shapes into clean geometry, and even turning handwritten equations into editable maths. If you already know how to add the Developer tab in Word, enabling the Draw tab will feel familiar.
In this guide, you’ll learn how to enable the Draw tab, use every drawing tool, convert sketches into shapes, and insert handwritten math equations — across five clear steps.
What Is the Draw Tool in Microsoft Word?
The Draw feature lets you create freehand content directly inside a Microsoft Word document. It works with a mouse, stylus, touchscreen, graphics tablet, or interactive whiteboard, and it bundles together pens, pencils, highlighters, erasers, ink-to-shape conversion, and ink-to-math tools in a single tab.
You’ll typically use it for:
- Annotating documents and marking up drafts
- Teaching, presentations, and digital worksheets
- Handwritten notes and signatures
- Sketching diagrams, flowcharts, and rough layouts
- Converting freehand drawings into clean shapes or maths
Watch the Video Tutorial
If you prefer to see this in action, the full video walkthrough is below, showing each method step by step.
How to Draw in Word: Step-by-Step
The five steps below take you from a hidden Draw tab to inserting handwritten equations. Work through them in order the first time — after that, you can jump straight to whichever step you need.
Step 1: Enable the Draw Tab in Word
For most users, the Draw tab is hidden by default. You need to switch it on through the Customize Ribbon panel before any of the other steps will work.
- Click File in the top-left corner of the ribbon.

- Select Options at the bottom of the left-hand menu.
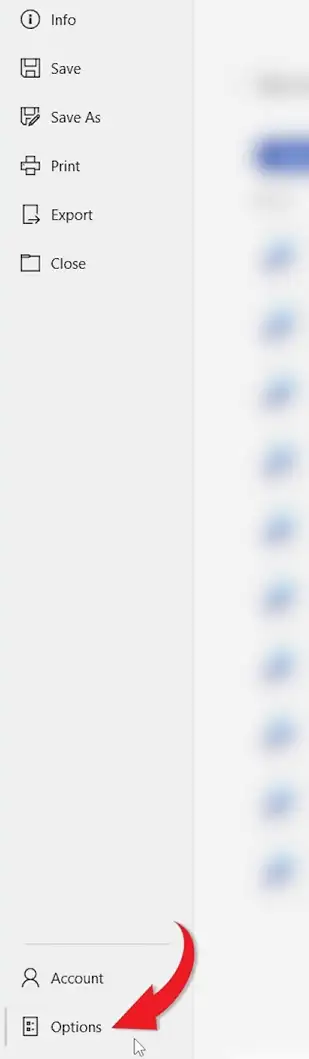
- Click Customize Ribbon on the left-hand side.
- In the right-hand list, scroll to Draw and tick the box beside it.
- Click OK to save the change.

👉 The Draw tab now appears in the ribbon between Insert and Design, ready for every step below.
Step 2: Draw in Word Using Pens, Pencils, and Highlighters
With the Draw tab visible, you can start sketching straight onto the page. The basic workflow is the same whether you use a mouse, stylus, or touchscreen.
- Open the Draw tab.
- Choose a tool — Pen, Pencil, or Highlighter.
- Click the same tool a second time to open colour and thickness options.
- Hold down the left mouse button (or press your stylus to the screen) and draw directly on the document.

You can also use Ctrl + Z to undo a stroke, add custom pen styles, and switch between colours mid-drawing without losing your place.
👉 A stylus or touchscreen produces noticeably smoother strokes than a mouse, but a mouse is fine for quick annotations and signatures.
Step 3: Erase Drawings in Word Cleanly
Word gives you two different erasers in the Draw tab, and choosing the right one saves a lot of frustration.
- Click the Eraser tool in the Draw tab.
- Click the small dropdown arrow beside it.
- Choose Point Eraser to remove part of a stroke, or Stroke Eraser to delete the entire line in one click.
- Click or drag across the ink you want to remove.
👉 Use Point Eraser when you’ve made a tiny mistake inside a clean drawing, and Stroke Eraser when you want a fresh start.
Step 4: Convert Sketches to Shapes with Ink to Shape
Ink to Shape is the feature that makes the Draw tab genuinely useful for diagrams. It watches your freehand sketch and snaps it to a clean geometric equivalent — circles, squares, rectangles, triangles, and more. If you also need clean rectangles for layouts with images inside them, the guide on how to insert a picture into a shape in Word pairs well with this step.
- In the Draw tab, click Ink to Shape to turn it on.
- Select any pen and draw a shape freehand — a circle, square, rectangle, or triangle.
- Release the mouse or lift the stylus, and Word converts the sketch into a clean shape automatically.
👉 If the conversion fails, your sketch was probably too rough — close the shape fully and try again with a slower, steadier stroke.
Step 5: Convert Handwritten Equations with Ink to Math
Ink to Math turns handwritten equations into editable, properly formatted maths — a huge time-saver for teachers, students, and anyone documenting formulas.
- In the Draw tab, click Ink to Math.
- Write your equation in the preview box — for example,
1/2or a square-root expression. - Word renders the formatted version above your handwriting in real time.
- Click Insert to drop the clean equation into your document.
👉 Once inserted, the equation behaves like any other Word equation object — you can edit it, resize it, or restyle it from the Equation tab.
Which Draw Tool Should You Use?
| Tool | Best For | Device | Skill Level |
|---|---|---|---|
| Pen | Clean line work, signatures, sketches | Mouse, stylus, touch | Beginner |
| Pencil | Soft shading and rough notes | Stylus, touch | Beginner |
| Highlighter | Annotating and marking up drafts | Any | Beginner |
| Eraser (Point / Stroke) | Fixing or clearing ink | Any | Beginner |
| Ink to Shape | Clean diagrams and flowcharts | Stylus preferred | Intermediate |
| Ink to Math | Equations and formulas | Stylus or touch | Intermediate |
Common Problems When Drawing in Word
The Draw tab is missing from the ribbon
Go to File → Options → Customize Ribbon, tick the Draw box on the right, and click OK. If Draw still doesn’t appear, your version of Word may be too old — Microsoft 365 and Word 2019 onwards include it natively.
Lines come out shaky or jagged
A mouse will never match a stylus for smoothness. Slow your stroke down, or switch to a stylus or touchscreen device for cleaner lines. A thicker pen also helps — it hides minor wobble.
Ink to Shape isn’t converting my sketches
Confirm Ink to Shape is toggled on in the Draw tab before you start drawing. The sketch must also be a closed shape — Word can’t snap an open arc into a circle.
My ink disappears when I scroll or save
Save the document as .docx, not .doc — the older format strips ink layers. Word Online also has limited ink support, so reopen the file in the desktop app to see your strokes.
Pro Tips for Drawing in Word
- Use Ruled lines or Grid backgrounds from the Draw tab for cleaner handwritten notes and worksheets.
- For straight strokes that don’t need ink-to-shape — like underlines or dividers — use a regular line instead, see the guide on how to draw a line in Word.
- Lock the Draw tab to your Quick Access Toolbar so it’s one click away in every document.
- Drawings are stored as ink objects — you can move, resize, or wrap text around them like any other shape.
FAQs
How do I draw in Word?
To draw in Word, enable the Draw tab through File → Options → Customize Ribbon, then choose a pen, pencil, or highlighter from the Draw tab and sketch directly on the page using a mouse, stylus, or touchscreen.
Where is the Draw tab in Microsoft Word?
The Draw tab sits in the ribbon between Insert and Design, but it’s hidden by default. Tick the Draw box in Customize Ribbon to make it visible.
Can I draw in Word using a mouse?
Yes. A mouse works fine for annotations, signatures, and basic shapes, though a stylus or touchscreen gives noticeably smoother results.
What is Ink to Shape in Word?
Ink to Shape is a Draw tab feature that converts freehand sketches into clean geometric shapes — circles, squares, rectangles, and triangles — automatically.
Can Word convert handwritten math equations?
Yes. Use Ink to Math in the Draw tab to write equations by hand and convert them into editable formulas inside your document.
Does the Draw tab exist in all Word versions?
The Draw tab ships with Microsoft 365 and Word 2019 onwards. Older versions like Word 2016 and Word 2013 don’t include it.
How do I save drawings in a Word document?
Save the file as .docx. Ink strokes are stored as part of the document and stay editable when you reopen it in Word.
What’s the best device for drawing in Word?
A stylus on a touchscreen laptop or graphics tablet gives the smoothest, most accurate drawing experience in Word. Mice and trackpads work for simple sketches.
Conclusion
Knowing how to draw in Word turns a standard text editor into a flexible tool for annotations, diagrams, signatures, and handwritten maths — without leaving the document.
Once the Draw tab is enabled, the five steps above cover everything from quick mark-ups to converting sketches into shapes and equations. If you spend a lot of time on formulas, the next logical guide is how to write fractions in Word — pair it with Ink to Math and you’ve got a full equation workflow.
Related Tutorials
Word Tutorials
Recent Microsoft Word Tutorials
Browse the complete collection for help with formatting, layout, pages, tables, images, and document setup.
For Microsoft support documentation, visit the official Microsoft guidance.
Leave a Reply