
The fastest way to make 1×1 and 2×2 picture in Word is to crop the image to a 1:1 square, then set the height to exactly 1 inch or 2 inches — Word locks the aspect ratio automatically, so the width follows. No photo editor, no online tool, no subscription required.
In this guide, you’ll learn how to crop any photo into a clean square, resize it to the exact dimensions used for passports and school IDs, duplicate it across a single page, and save each copy as its own image file ready for printing.
Why Use Microsoft Word for ID Photos?
Microsoft Word already has every tool needed to size, duplicate, and print ID photos accurately — there is no reason to download a separate editor for a job this small. Using Word lets you:
- Resize images to exact dimensions in inches or centimetres
- Duplicate a photo in one keystroke
- Arrange multiple copies on a single page for printing
- Add a thin cutting border to separate the photos cleanly
- Export each sized image as a standalone file
Watch the Video Tutorial
If you prefer to see this in action, the full video walkthrough is below, showing each method step by step.
How to Make 1×1 and 2×2 Picture in Word: Step-by-Step
The process is always the same: insert the photo, crop it square, resize it to the exact dimension, then duplicate. The four methods below walk through each stage with the exact clicks needed.
Method 1: How to Make 1×1 and 2×2 Picture in Word by Inserting the Photo
Everything starts with getting the original image into the document. Use the Insert tab rather than dragging and dropping — it gives you cleaner results and reliable formatting.
- Open Microsoft Word and create a blank document
- Click the Insert tab on the ribbon
- Choose Pictures, then This Device

- Select your image from the file browser
- Click Insert

👉 The photo lands inside the document at its original size. Don’t worry about how large it looks right now — the next step crops it to a clean square.
Method 2: How to Make 1×1 and 2×2 Picture in Word by Cropping to a Square
ID photos require a 1:1 aspect ratio. Cropping the image square first is what guarantees that 1 inch and 2 inch settings produce true 1×1 and 2×2 photos rather than rectangles.
- Click the image once to select it
- Open the Picture Format tab on the ribbon
- Click the small dropdown arrow under Crop
- Choose Aspect Ratio, then under Square select 1:1
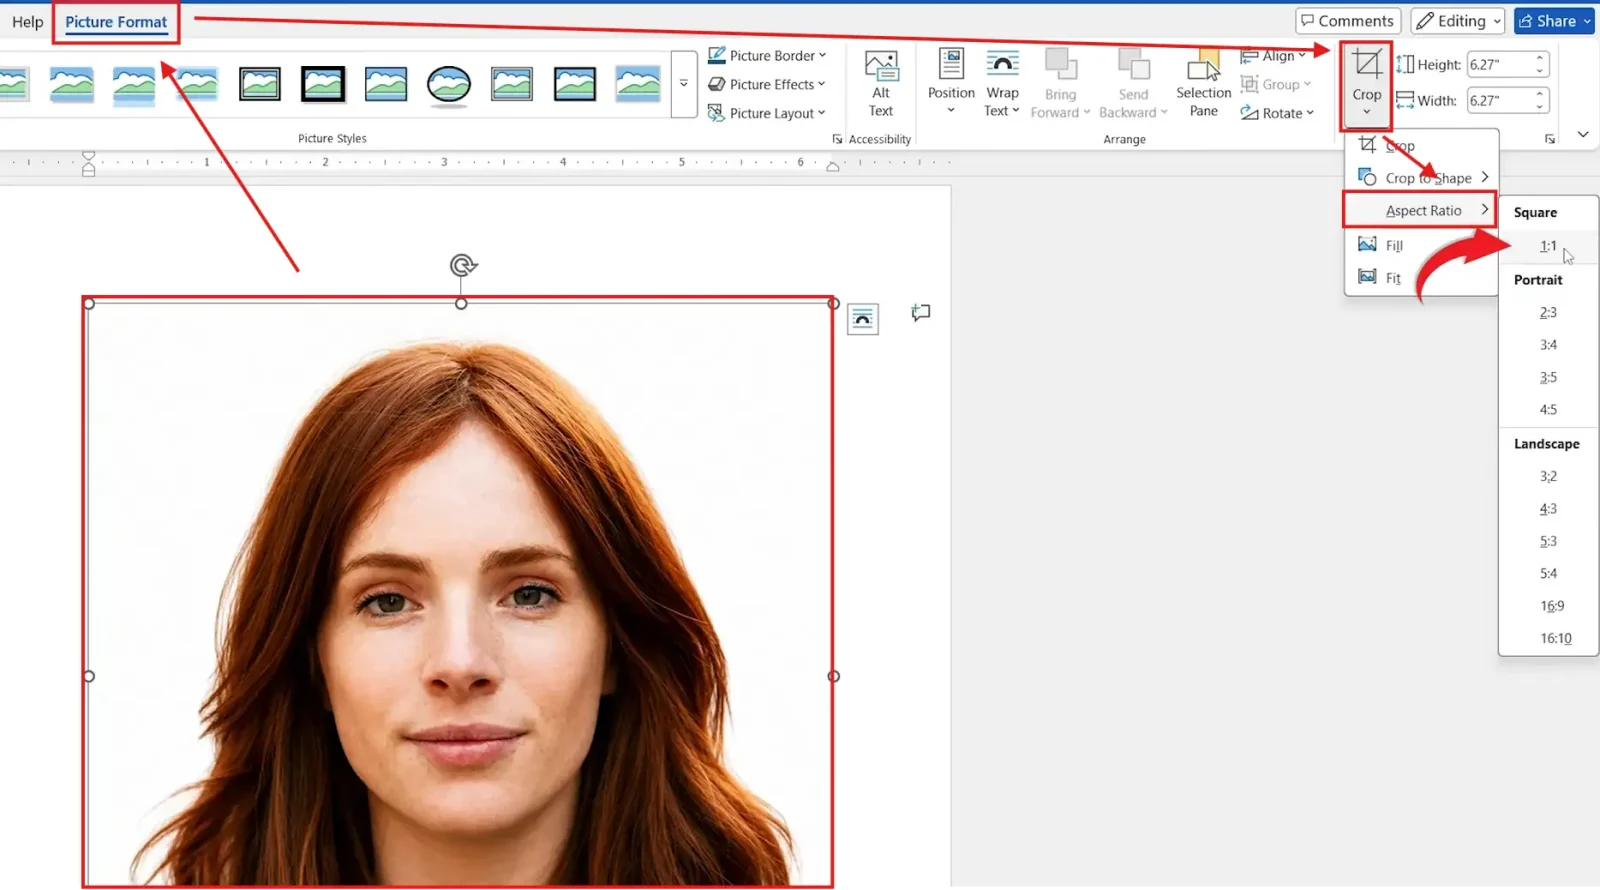
- Drag the black crop handles to centre the face or subject inside the square
- Click anywhere outside the image to confirm the crop
👉 The image is now a perfect square, ready to be resized to either 1×1 or 2×2 inches. For more precise positioning before you crop, the guide on how to move an image freely in Word is worth a read.
Method 3: How to Make 1×1 and 2×2 Picture in Word by Setting Exact Dimensions
This is where the actual sizing happens. Because the aspect ratio is locked, you only need to change the height — Word matches the width automatically.
- Click the image to select it
- Open the Picture Format tab
- Find the Height box on the right side of the ribbon
- Type 2″ for a 2×2 photo, or 1″ for a 1×1 photo, and press Enter
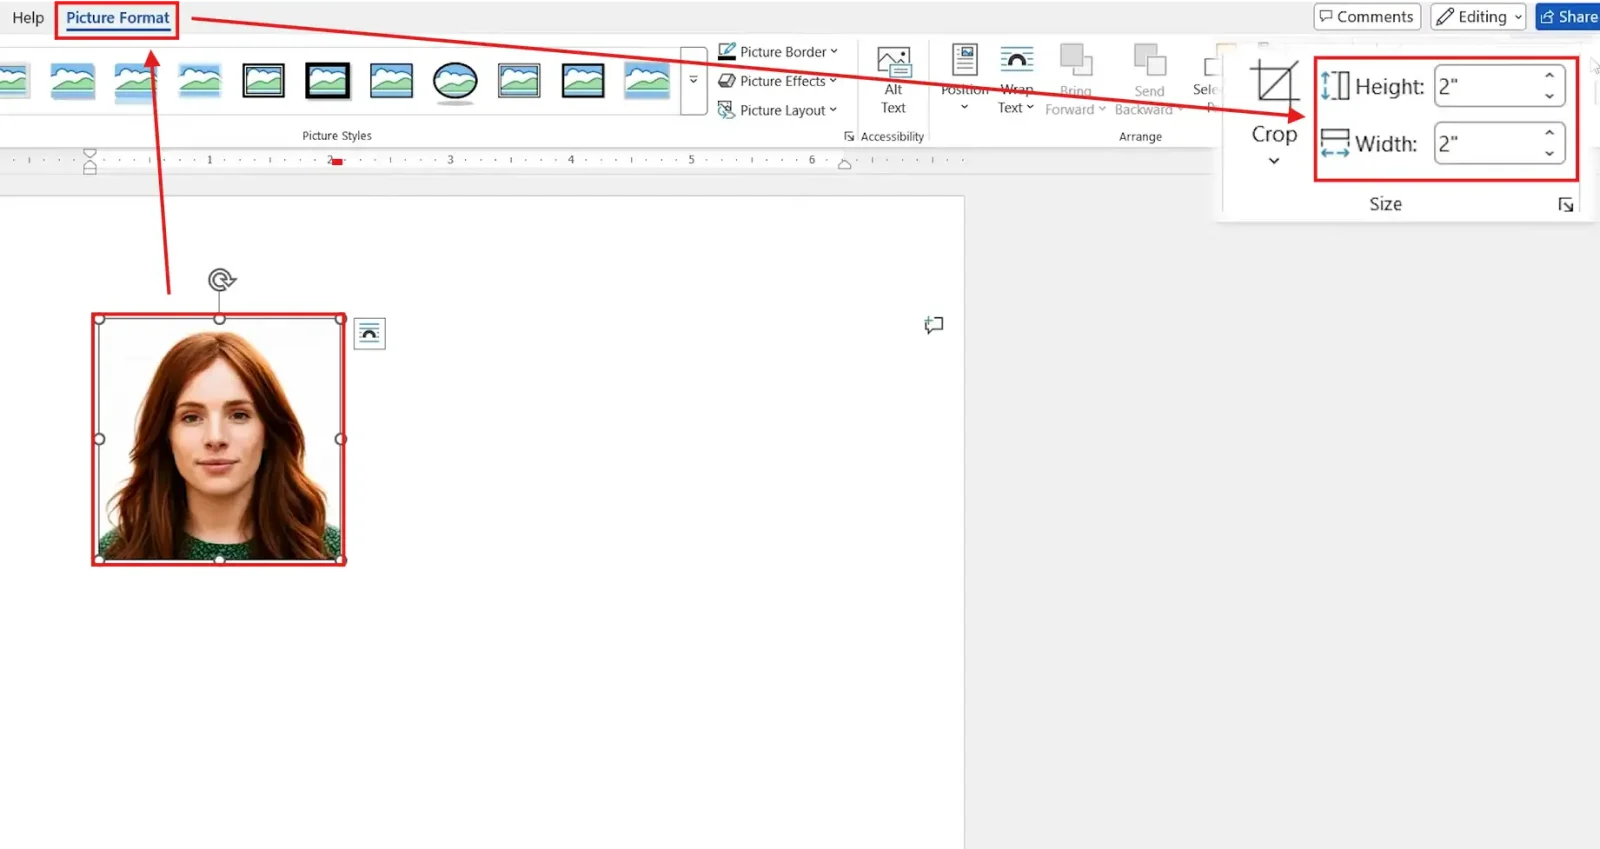
👉 The width updates instantly to match. You now have an image sized to exactly 2×2 inches (or 1×1, depending on what you typed) — accurate to the printed millimetre.
Method 4: How to Make 1×1 and 2×2 Picture in Word by Adding a Border and Duplicating
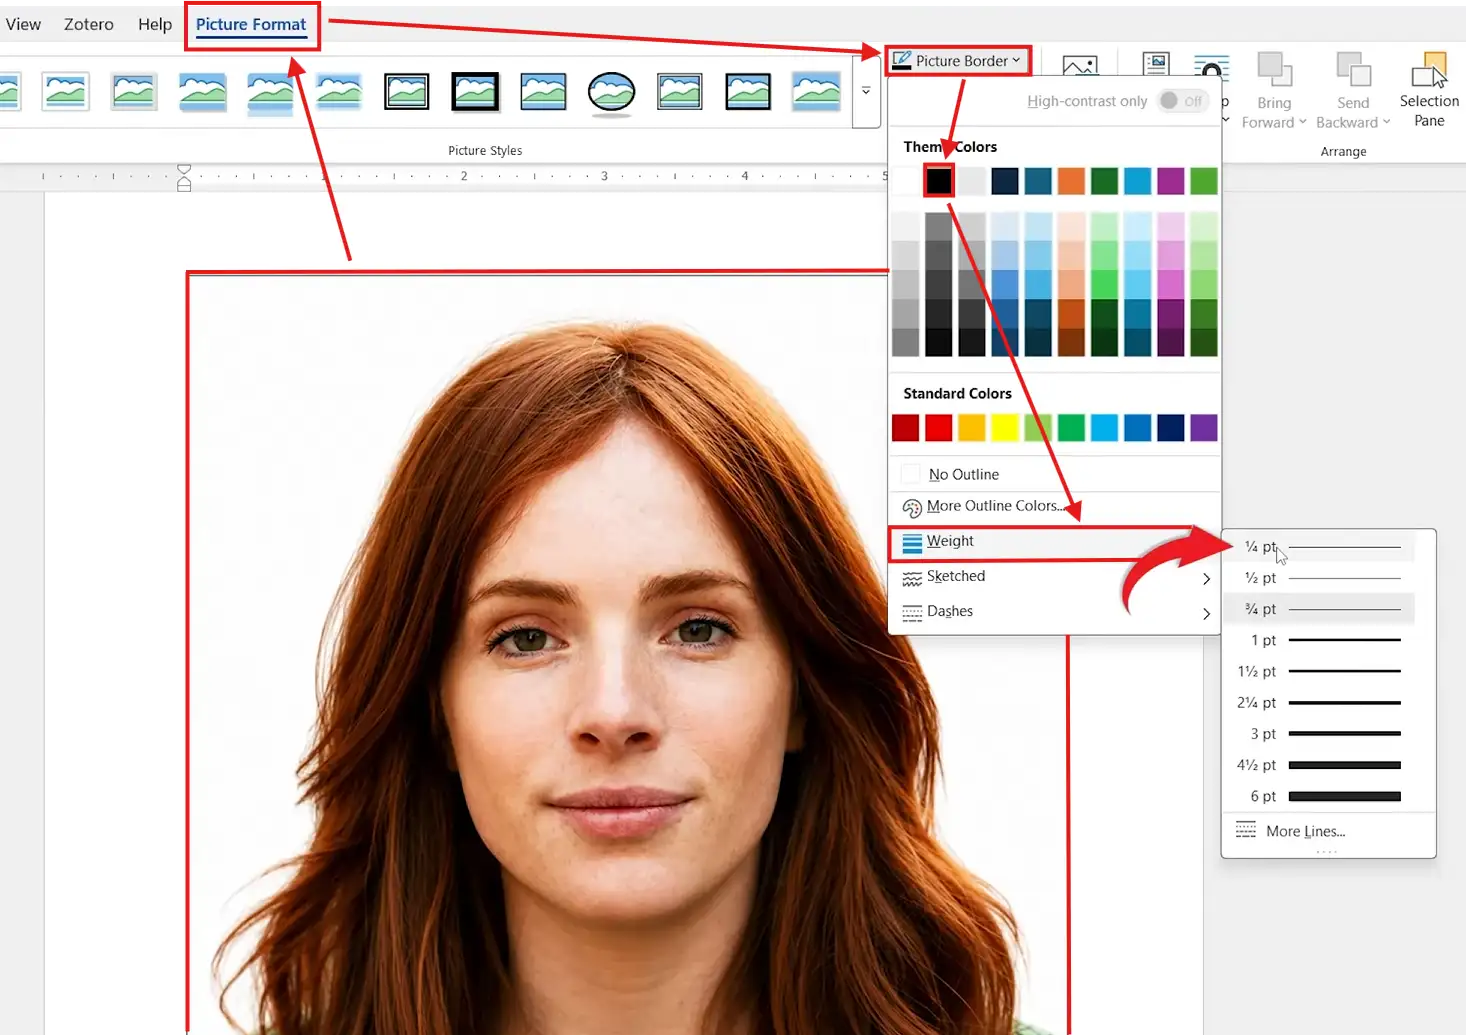
A thin black border gives you a cutting guide, and duplicating the sized image fills the page so a single sheet produces multiple ID photos.
- With the image selected, go to Picture Format → Picture Border
- Choose Black, then click Weight and select ¼ pt
- Select the image and press Ctrl + D to duplicate
- Drag each duplicate into position on the page
- Repeat until the page is filled
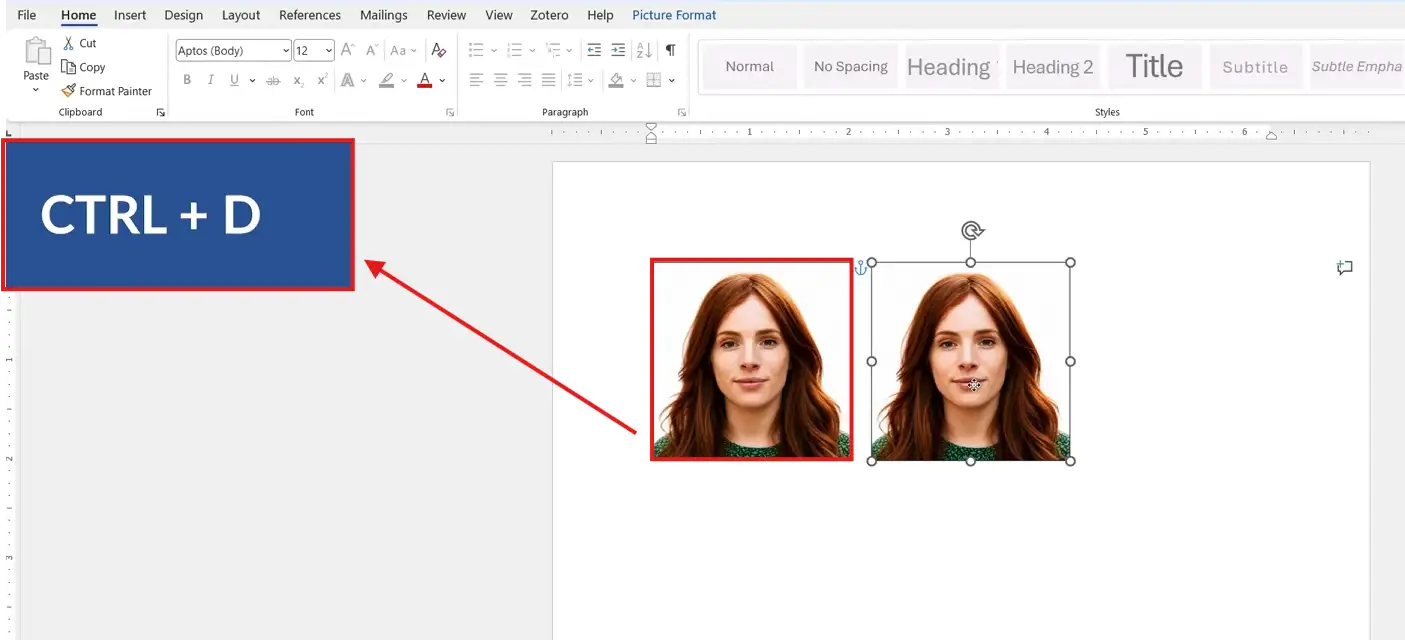
👉 To duplicate several photos in one action, hold Ctrl, click each image, then press Ctrl + D. A single sheet of photo paper can now produce eight or more printable ID photos in one pass.
Which Method Should You Use?
| Method | Best For | Effort |
|---|---|---|
| Insert → Pictures → This Device | Getting any photo into Word at original quality | Low |
| Crop → Aspect Ratio → 1:1 | Forcing a perfect square before resizing | Low |
| Picture Format → Height | Hitting exact 1×1 or 2×2 inch dimensions every time | Low |
| Picture Border + Ctrl + D | Printing multiple ID photos on one sheet | Medium |
For a single photo, Methods 1 to 3 are all you need. If you are printing a full sheet of passport or school IDs, run all four methods in order.
Common Problems When Making 1×1 and 2×2 Pictures in Word
The image looks stretched after resizing
This happens when the aspect ratio is unlocked. Right-click the image, choose Size and Position, and on the Size tab tick Lock aspect ratio. Re-enter the height and the width will follow automatically.
The photos will not align side by side
Snap alignment is off. Select an image, go to Picture Format → Align → Grid Settings, and tick Snap objects to other objects. Photos will then click into place against each other as you drag them.
The printed size is not exactly 1×1 or 2×2
The printer is scaling the page. In the print dialog, set Scale to 100% or Actual Size, and turn off Fit to Page. Measure one printed photo with a ruler to confirm.
I cannot drag the image freely around the page
The wrap setting is keeping the image locked inline with the text. Select the image, click Layout Options (the small icon that appears next to it), and choose In Front of Text or Square. The image will now move freely anywhere on the page.
Pro Tips for Printing ID Photos from Word
- Always start with the highest-resolution version of your photo — cropping reduces pixel count, and small ID photos print sharper from large originals
- Right-click any sized image and choose Save as Picture to export it as a standalone file ready for online passport uploads
- Print on photo paper at 100% scale for the cleanest result — standard A4 works for proofing but glossy paper gives the official passport-photo finish
- Leave a 3-5 mm gap between photos so scissors can cut cleanly without slicing into the next image — and if you are placing them inside a form or table, the guide on how to insert a picture in Word covers wrap settings that keep them aligned
FAQs
How do I make a 1×1 and 2×2 picture in Word?
Insert the photo, crop it to a 1:1 square aspect ratio under Picture Format → Crop → Aspect Ratio, then set the height to either 1 inch or 2 inches in the Height box on the Picture Format tab. The width updates automatically.
What is the exact size of a 1×1 and 2×2 photo?
A 1×1 photo measures 1 inch by 1 inch (2.54 cm × 2.54 cm). A 2×2 photo measures 2 inches by 2 inches (5.08 cm × 5.08 cm) — the standard US passport size.
Can I print multiple ID photos on one page?
Yes. After sizing one photo, press Ctrl + D to duplicate it, then drag each copy into position. A standard A4 sheet fits roughly eight 2×2 photos or up to 30 1×1 photos.
Why is my image not square after cropping?
The aspect ratio was not set. Go to Picture Format → Crop → Aspect Ratio and choose 1:1 under Square. Word will then constrain the crop to a perfect square.
Can I save the resized image as a separate file?
Yes. Right-click the sized image and choose Save as Picture. Pick a location and file format (PNG or JPEG), and the photo exports at its current dimensions — ideal for uploading to online ID portals.
How do I add a cutting border to ID photos in Word?
Select the photo, go to Picture Format → Picture Border, choose Black, then click Weight and select ¼ pt. A thin line will appear around every duplicate, giving you a clean guide for scissors or a paper trimmer.
Does this method work on Word for Mac and the web?
Yes on Mac — the menus are identical. Word for the web supports inserting and resizing pictures but the Crop → Aspect Ratio menu is limited, so do the cropping in the desktop app for the cleanest result.
Conclusion
Once you know how to make 1×1 and 2×2 picture in Word, you never need a separate photo editor for ID work again. Crop to 1:1, set the exact height, duplicate with Ctrl + D, and print at 100% scale — the same four steps cover passport photos, school IDs, and any other square photo format.
Save your finished layout as a template so future ID photo sheets take seconds rather than minutes. If you are printing on a non-standard page size, the guide on how to adjust margins in Microsoft Word covers the page setup tweaks that keep every photo printing edge-to-edge.
Related Tutorials
- How to Insert a Picture in Microsoft Word
- How to Move a Picture in Microsoft Word
- How to Move an Image Freely in Microsoft Word
Word Tutorials
Recent Microsoft Word Tutorials
Browse the complete collection for help with formatting, layout, pages, tables, images, and document setup.
For Microsoft support documentation, visit the official Microsoft guidance.
Leave a Reply