Building a drop-down list in Word turns a static page into something a reader can actually fill in — pick a department, choose a status, select an option — without typing a single character. It lives inside the Developer tab alongside the clickable checkbox control, and once you’ve set one up you can copy and reuse it across the whole document.
In this guide, you’ll learn how to enable the Developer tab, insert a fully customisable drop-down list, and fix the most common problems people hit when the placeholder text refuses to update.
What Is a Drop-Down List in Word?
A drop-down list in Word is an interactive content control that lets the reader pick an item from a predefined menu instead of typing it themselves. It’s one of the most useful tools for anyone building fillable forms in Word because it controls the answers — no spelling mistakes, no rogue formatting, no surprises.
Common uses include:
- Forms and questionnaires
- Employee onboarding documents
- Surveys and applications
- Checklists and reusable templates
- Educational worksheets
Watch the Video Tutorial
If you prefer to see this in action, the full video walkthrough is below, showing each method step by step.
How to Create a Drop-Down List in Word: Step-by-Step
There are three stages to building a working drop-down list in Word — turning on the Developer tab, inserting the content control, and customising the items and placeholder text. Each method below covers one stage in full.
Method 1: How to Create a Drop-Down List in Word by Enabling the Developer Tab
Word hides the form-building tools behind a separate ribbon tab called Developer. It’s off by default, so this is always the first step before you can insert any kind of content control.
- Open Microsoft Word and click the File tab in the top-left corner of the ribbon.

- Select Options at the bottom of the left-hand menu.

- Click Customize Ribbon, find Developer in the right-side list, tick the box, and click OK.

👉 Result: The Developer tab now appears in the ribbon between View and Help, giving you access to every form control Word offers — including the one you need next.
Method 2: How to Create a Drop-Down List in Word Using the Content Control
With the Developer tab visible, you can drop a list control into the document and then load it with your own items. This is the part most people skip past too quickly — the control itself does nothing until you configure it.
- Place your cursor where the list should appear, click the Developer tab, then click Drop-Down List Content Control in the Controls group.

- Click the new drop-down box, then click Properties in the Controls group to open the settings window.

- Give the control a clear Title (Fruits, Departments, Countries — whatever describes the list). This keeps your form organised when you have several drop-downs on one page.
- Under Drop-Down List Properties, click Add, type your first item, click OK, and repeat for every option you want in the list.
- Click OK to close the Properties window.
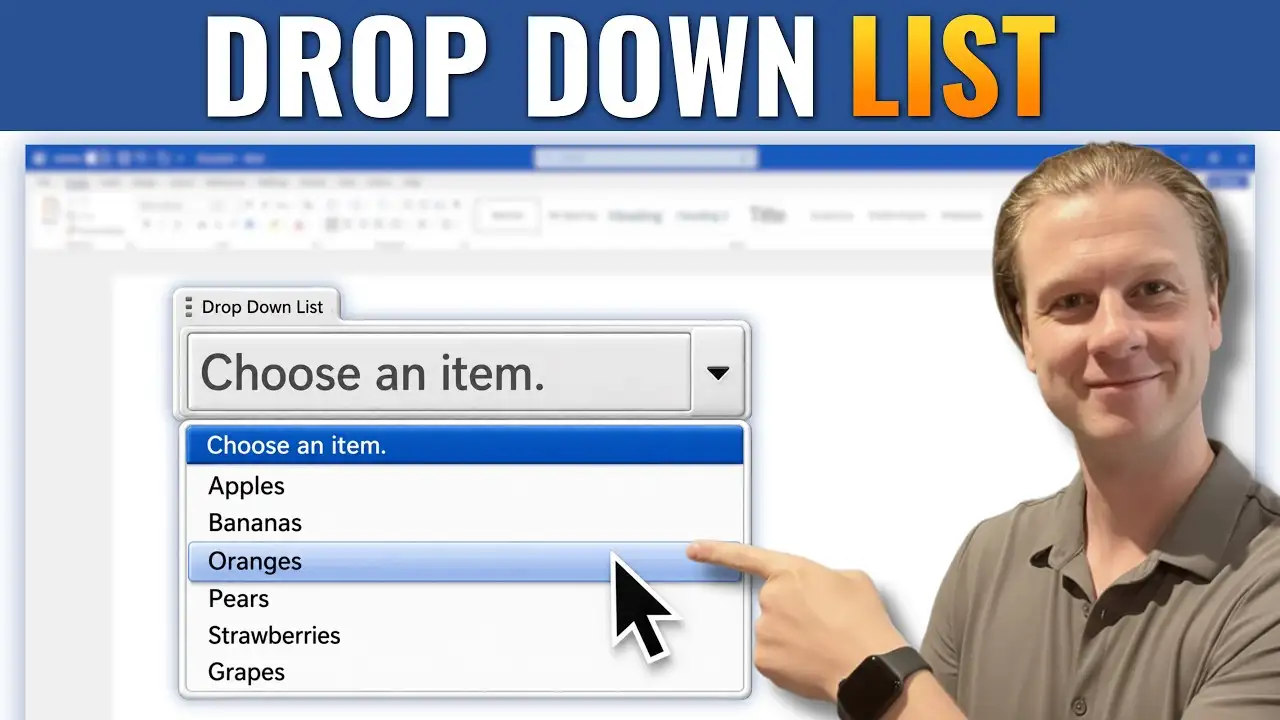
👉 Result: The drop-down arrow now reveals every item you added. Users can pick one with a single click, and the choice replaces the placeholder text inline.
Method 3: How to Create a Drop-Down List in Word With Custom Placeholder Text
By default Word shows the unhelpful prompt “Choose an item.” Swap it for something that actually tells the reader what to do — and then copy the finished control anywhere you need it.
- Click the Developer tab, then click Design Mode to unlock the placeholder text inside the control.
- Highlight the words “Choose an item” and type your own prompt — for example, Pick a fruit, Select a department, or Choose status.
- Click Design Mode a second time to exit and lock the new text in place.
- To reuse the same drop-down elsewhere in the document, select the control, press Ctrl + C, click the new location, and press Ctrl + V.
👉 Result: The drop-down now opens with custom guidance instead of generic placeholder text, and you can drop identical copies anywhere in the document without rebuilding the item list each time.
Which Method Should You Use?
| Method | Best For | Time Needed |
|---|---|---|
| Method 1 — Enable Developer tab | First-time setup on a new copy of Word | 1 minute |
| Method 2 — Insert content control | Building a fresh drop-down with your own items | 2–3 minutes |
| Method 3 — Customise placeholder & reuse | Polishing a form or duplicating controls across pages | 1–2 minutes |
In practice you’ll run all three in order the first time, then only Method 2 and Method 3 on every form after that.
Common Problems When Creating a Drop-Down List in Word
The Developer tab is missing from the ribbon
The Developer tab is hidden by default on every new Word install. Go to File > Options > Customize Ribbon, tick Developer in the right-hand panel, and click OK. The full walkthrough lives in the dedicated guide on how to add the Developer tab in Word.
The drop-down list won’t let you edit it
If clicking the control only shows the dropdown and won’t let you change the placeholder, you’re in normal editing mode. Switch on Design Mode in the Developer tab — that exposes the underlying text so you can rewrite it.
Placeholder text doesn’t update
Changing the Display Name in Properties doesn’t always rewrite what users see on the page. Use Design Mode to type directly over the placeholder text instead — that’s what actually controls the visible prompt.
The drop-down list disappears when the document is protected
If you’ve turned on Restrict Editing and the control vanishes, you’ve blocked content control interaction. Open Developer > Restrict Editing, set the editing restriction to Filling in forms, and your drop-down will come back fully interactive.
Pro Tips for Better Word Forms
- Keep placeholder text short and instructional — Select date beats Click here to choose a date from the list below every time.
- Cap each list at around 10 items. Anything longer becomes painful to scroll on a form.
- Pair drop-downs with other controls for cleaner layouts — see the guide on how to add a clickable checkbox in Word for the full toolkit.
- Give every control a descriptive Title in Properties so you can identify it later when editing complex forms.
FAQs
How do I create a drop-down list in Word?
To create a drop-down list in Word, enable the Developer tab through File > Options > Customize Ribbon, click Drop-Down List Content Control, then open Properties and add your items one by one.
Why can’t I see the Developer tab in Word?
The Developer tab is hidden by default. Turn it on manually through File > Options > Customize Ribbon and tick the Developer box in the right-hand panel.
Can I edit a drop-down list after creating it?
Yes. Click the drop-down control, choose Properties in the Developer tab, and use Add, Modify, or Remove to change the items at any time.
How do I duplicate a drop-down list in Word?
Select the existing drop-down, press Ctrl + C, click the new location, then press Ctrl + V. The duplicate keeps every item and setting from the original.
What is Design Mode in Word?
Design Mode is a toggle in the Developer tab that exposes the inner text of content controls so you can edit placeholder text directly. Turn it off again before sharing the document.
Can I add a drop-down list to a protected Word form?
Yes — build the drop-down first, then turn on Restrict Editing and choose Filling in forms. Users will be able to select items but not change the underlying structure.
What’s the difference between a drop-down list and a combo box in Word?
A drop-down list restricts users to your predefined options only. A combo box lets users either pick from the list or type their own answer. Use a drop-down when you need clean, controlled data.
Conclusion
A drop-down list in Word is one of the quickest wins for anyone who shares documents that other people need to fill in. Three short steps — enable the Developer tab, insert the content control, customise the placeholder — and the document goes from passive to interactive.
Once you’re comfortable with drop-downs, pair them with checkboxes, date pickers, and protected sections to build the full fillable form in Word from scratch.
Related Tutorials
- How to Create a Fillable Form in Word
- How to Add a Clickable Checkbox in Word
- How to Add the Developer Tab in Word

Recent Microsoft Word Tutorials

Looking for more help with Microsoft Word? Browse all step-by-step Word tutorials covering formatting, layout, pages, and document setup.
👉 View all Microsoft Word tutorials: https://wordmadeeasy.org/microsoft-word/
👉 Need more support – check out the official guidance: https://support.microsoft.com/en-au

Prefer watching instead of reading? Many Word tutorials are also available as short, step-by-step videos on the Word Made Easy YouTube channel.


Leave a Reply