
You can insert a vertical line in Word using four different methods — Shapes, Borders, Columns, or a Table — and the right choice depends on what your line needs to do: stay fixed, grow with text, or sit between content blocks. For more on drawing elements in Word, see the guide on how to draw a line in Word.
In this guide, you’ll learn all four methods with step-by-step instructions, when to use each one, and how to fix the most common problems.
Why Insert a Vertical Line in Word?
Vertical lines improve document readability by creating clear visual separation between content areas. They’re commonly used in professional and structured documents.
Typical uses include:
- Separating sections in reports and business documents
- Creating sidebar layouts in newsletters and brochures
- Dividing columns of text in multi-column layouts
- Adding structural lines to resumes and CVs
- Highlighting important paragraphs with a left border
- Improving visual organisation in academic and technical documents
Watch the Video Tutorial
If you prefer to see this in action, the full video walkthrough is below, showing each method step by step.
How to Insert a Vertical Line in Word: Step-by-Step
Word offers four methods for adding a vertical line. Each suits a different document type — choose the one that matches how your line needs to behave.
Method 1: How to Insert a Vertical Line in Word Using Shapes
This is the most flexible method — the line can be placed anywhere on the page, resized freely, and styled with custom colours, thickness, and dash patterns.
Steps:
- Click the Insert tab.
- Click Shapes in the Illustrations group.
- Under the Lines section, select the straight line tool.
- Click and drag from top to bottom to draw the line — hold Shift while dragging to constrain it to a perfect vertical.
- Release the mouse when you’re satisfied with the length and position.


👉 The line is now placed as a floating object. Click it to select it, then use the Shape Format tab to change colour, weight, or dash style.
Method 2: How to Insert a Vertical Line in Word Using Borders
Paragraph borders attach directly to text and grow automatically as you type more content — making this the best choice when your vertical line needs to stay flush with a block of text.
Steps:
- Select the paragraph or text block where you want the vertical line to appear.
- Click the Design tab.
- Click Page Borders.
- In the dialog, click the Borders tab.
- Choose your preferred style, colour, and width.
- In the preview diagram, click the Left or Right border button to apply a single vertical side.
- Under Apply to, select Paragraph.
- Click OK.
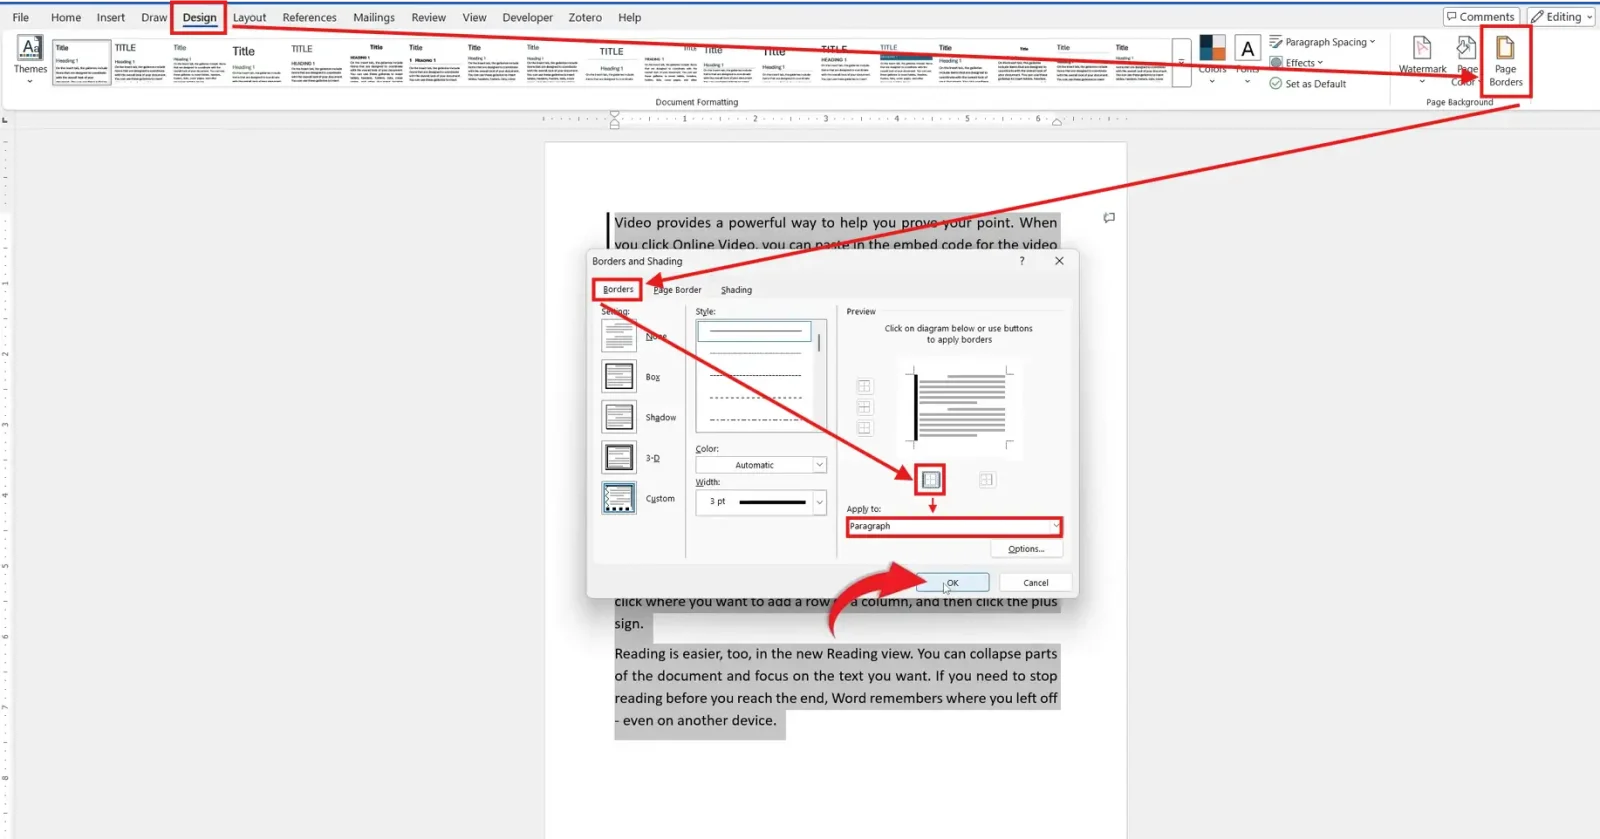
👉 A vertical line now appears to the left or right of your selected paragraph and extends automatically as more text is added — for more on controlling paragraph layout, see the guide on how to add a bottom border in Word.
Method 3: How to Insert a Vertical Line in Word Between Columns
If your document uses a multi-column layout — newsletters, brochures, or academic papers — Word can insert a vertical line between columns automatically via the Columns dialog.
Steps:
- Press Ctrl + A to select all text, or select only the section you want formatted as columns.
- Click the Layout tab.
- Click Columns, then select More Columns.
- Choose your column count (Two, Three, Left, or Right).
- Tick the Line Between checkbox.
- Click OK.
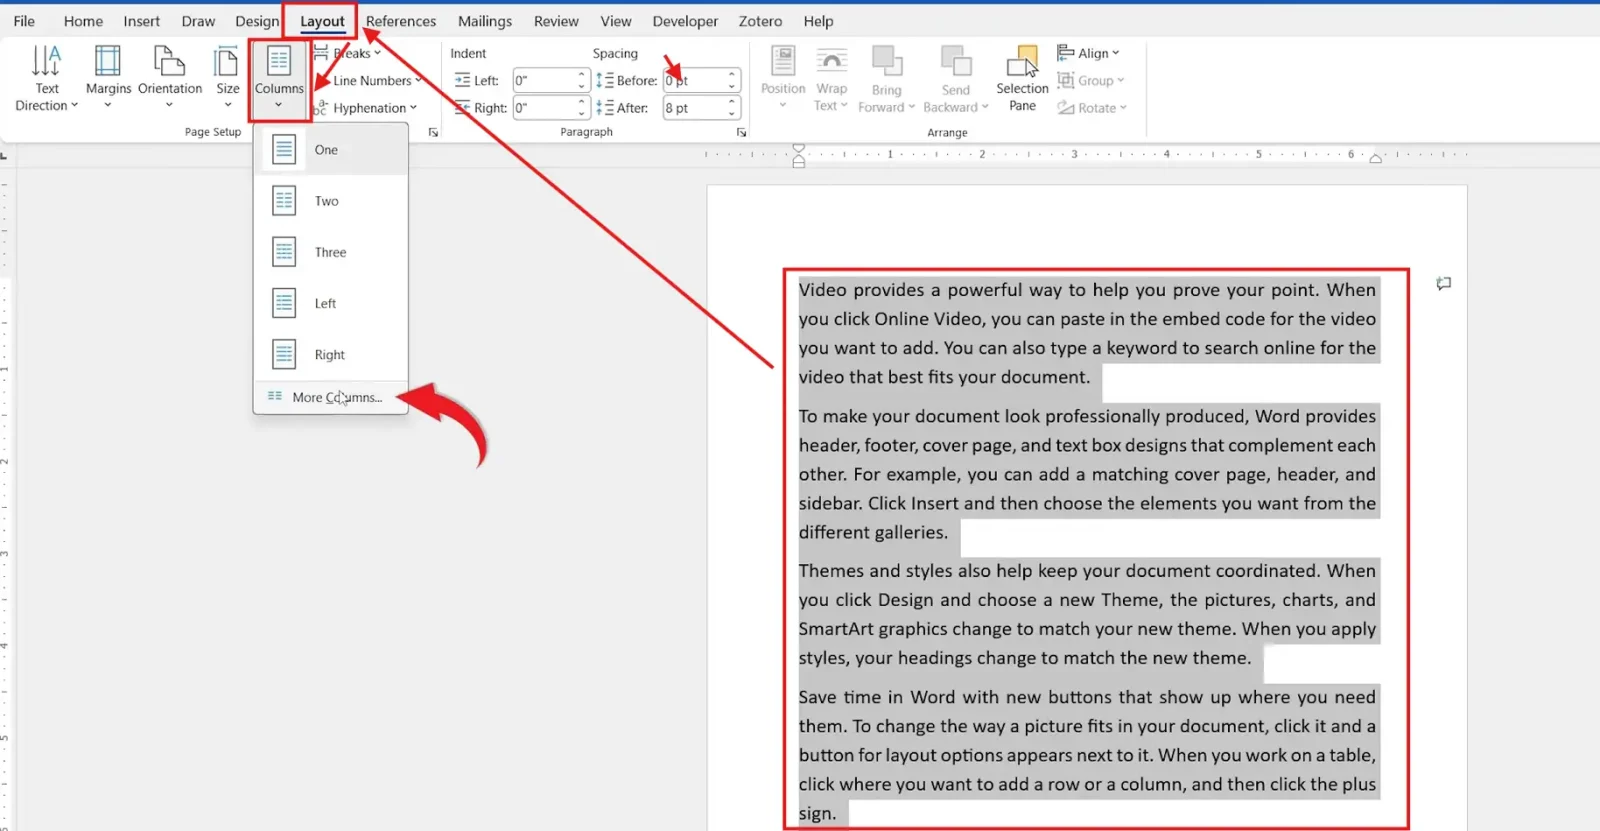
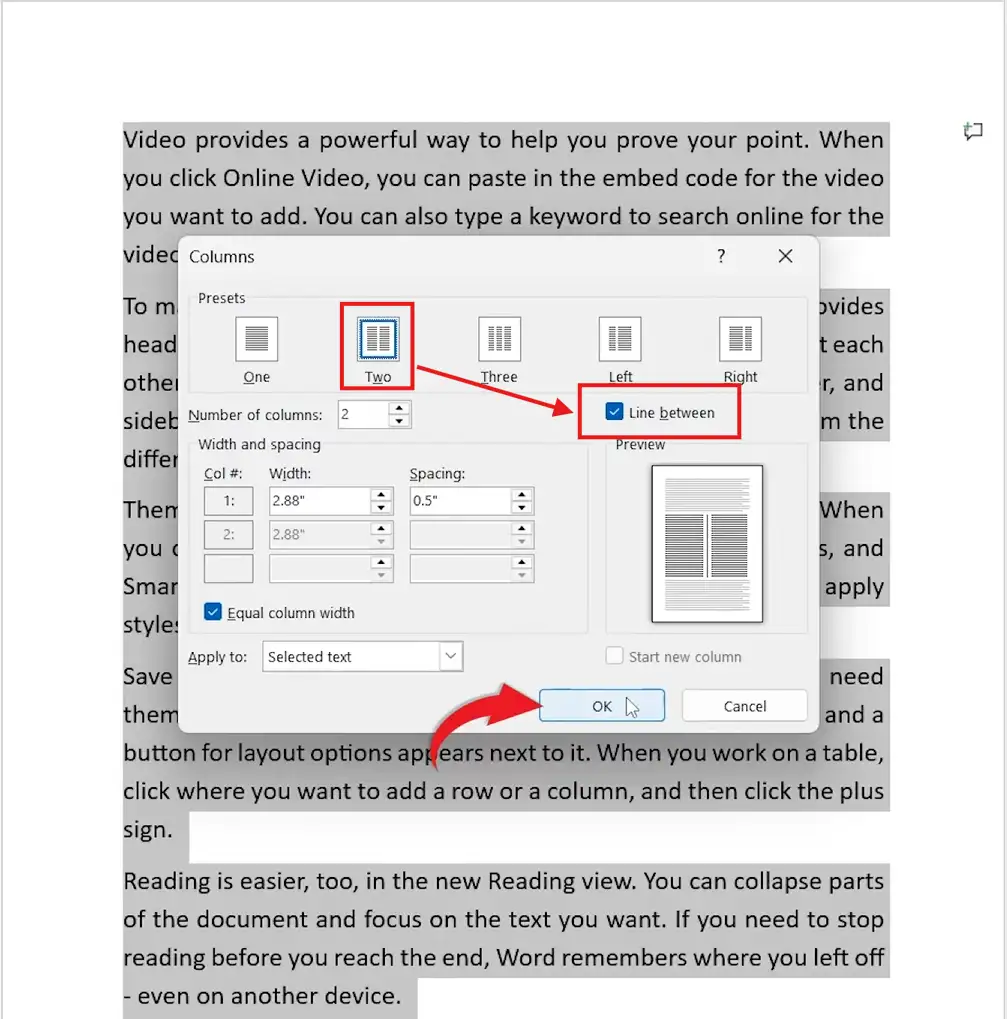
👉 Word inserts a vertical line running the full height of both columns. The line adjusts automatically as content in either column grows.
Method 4: How to Insert a Vertical Line in Word Using a Table
Using a table with selective border visibility gives you a vertical line that aligns precisely with content on either side — ideal for resumes, side-by-side comparisons, or any layout requiring exact column alignment.
Steps:
- Click Insert → Table and create a 1×2 table (one row, two columns).
- Click inside the table, then go to the Table Design tab.
- Click Borders → No Borders to remove all visible borders.
- Reopen the Borders menu and select Inside Vertical Border to show only the centre dividing line.
- Paste or type your content into each cell.
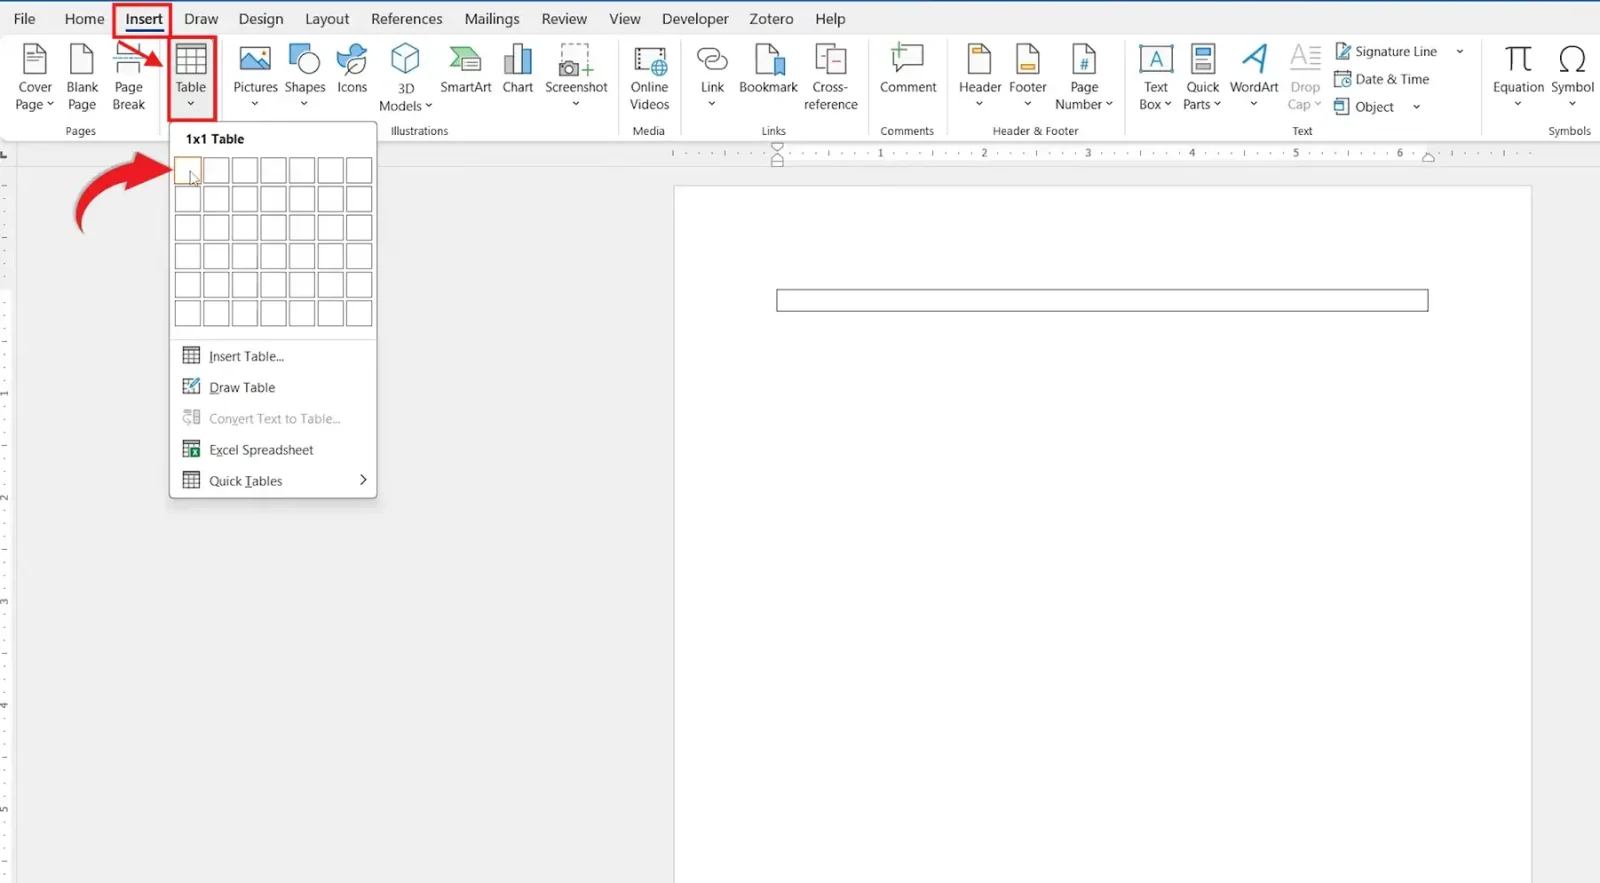
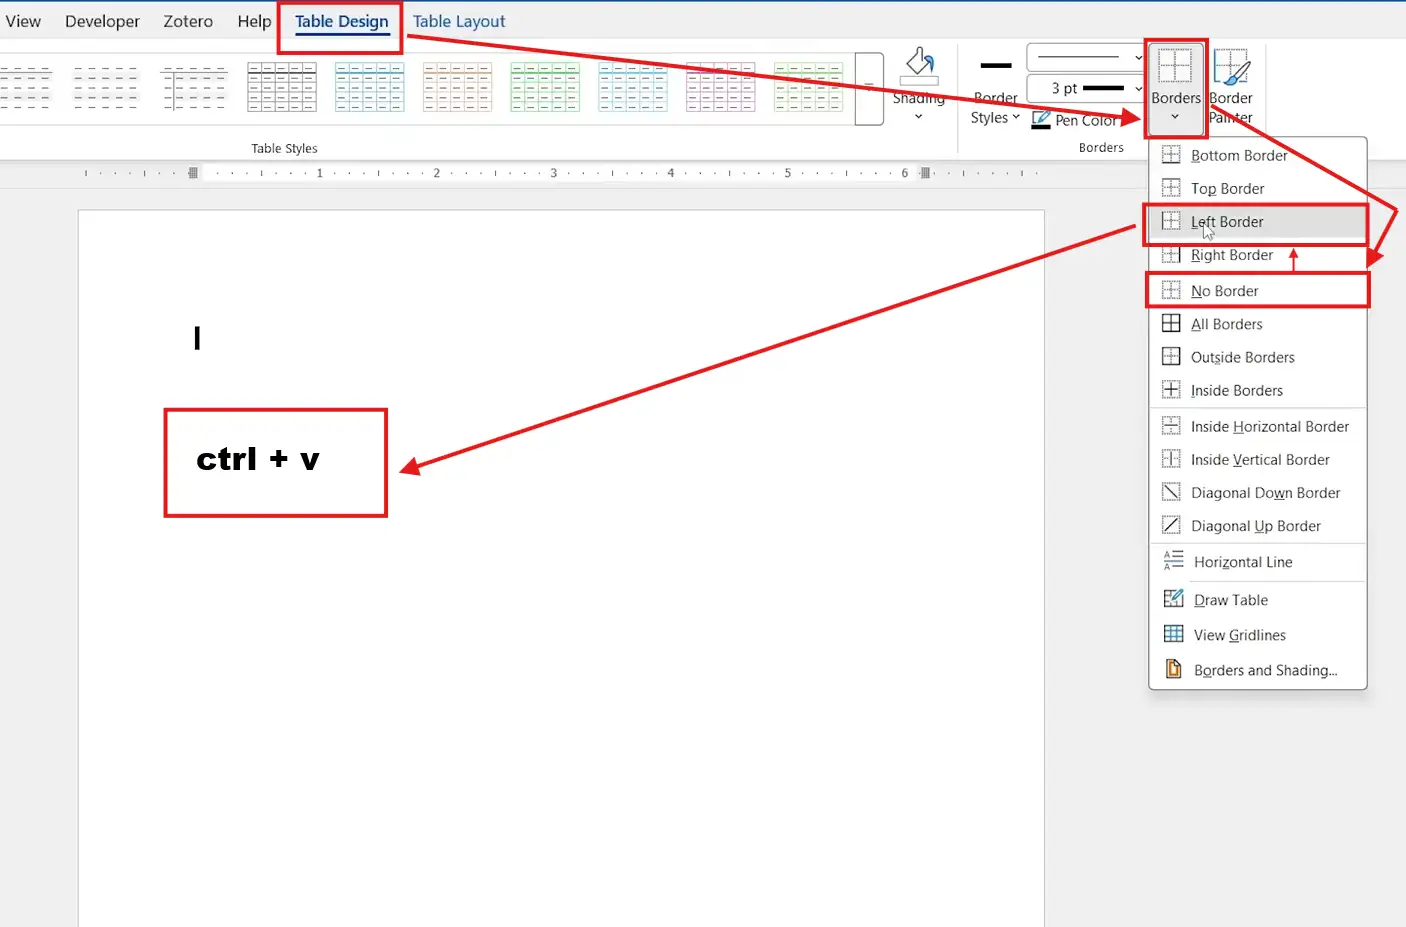
👉 The table borders are invisible except for the single vertical line between cells. Content in each cell aligns independently on either side of the line.
Which Method Should You Use?
| Purpose | Best Method |
|---|---|
| Decorative or freestanding line | Method 1 — Shapes |
| Line that grows with paragraph text | Method 2 — Borders |
| Line between newspaper-style columns | Method 3 — Columns |
| Resume or side-by-side content layout | Method 4 — Table |
Common Problems When Inserting a Vertical Line in Word
Line Isn’t Perfectly Straight
When using Shapes, hold Shift while dragging to constrain the line to exactly 90°. Without Shift, the line can drift diagonally by even a small mouse movement.
Border Doesn’t Extend Far Enough
Paragraph borders only extend as far as the text they’re applied to. If you need the border to cover multiple paragraphs, select all of them before opening the Borders dialog — or apply the border to the entire section.
Column Line Doesn’t Appear
The Line Between option must be ticked in the Columns dialog (Layout → Columns → More Columns). If your document shows two columns but no line, reopen the dialog and check the box.
Table Border Looks Uneven
Uneven table borders are usually caused by inconsistent row heights or cell padding. Right-click the table, choose Table Properties, set a fixed row height under the Row tab, and ensure cell spacing is set to zero — for more on controlling table layout, see the guide on how to hide table lines in Word.
Pro Tips for Inserting Vertical Lines in Word
- Lock a Shape line in position. Right-click the line → Format Shape → Layout → In Front of Text — then drag it where needed. For precise positioning, use Shape Format → Position → More Layout Options to set exact coordinates.
- Match your line colour to brand colours. Select the line, go to Shape Format → Shape Outline → More Outline Colors, and enter a hex value for exact colour matching.
- Use a table for resume layouts. A 1×2 table with only the inside vertical border visible gives you two text columns with a clean divider — far more reliable than a floating Shape line that can shift when you edit text.
- Combine methods for complex layouts. Use Method 3 (Columns) for the overall page structure, then add a Method 1 (Shape) line inside a specific column for an additional visual divider — for a full overview of line and border options, see the guide on how to draw in Word.
FAQs
How do I insert a vertical line in Word?
Go to Insert → Shapes, select the straight line tool, and drag vertically while holding Shift to keep it straight. Alternatively, use Borders, Columns, or a Table depending on your layout needs.
How do I make a perfectly straight vertical line in Word?
Hold Shift while dragging the Shapes line tool. This constrains the line to exact vertical, horizontal, or 45° angles.
Can I change the colour of a vertical line in Word?
Yes. Select the line and go to Shape Format → Shape Outline to pick a colour. For paragraph borders, reopen the Borders dialog and change the colour setting before applying.
How do I add a line between two columns in Word?
Go to Layout → Columns → More Columns, choose your column count, tick Line Between, and click OK. Word adds the vertical separator automatically.
Which method is best for a resume?
Method 4 — a 1×2 table with only the inside vertical border visible — gives the cleanest result for resumes. The line stays aligned with content in both columns regardless of how much text you add.
Will the vertical line move when I add more text?
It depends on the method. Shape lines are fixed and don’t reflow with text. Paragraph borders and column lines extend automatically as content grows.
Can I insert a vertical line in Word Online?
The Shapes and Columns methods work in Word Online. Paragraph borders via the full Borders dialog have limited support in the browser version — use the desktop app for full control.
Conclusion
All four methods covered here will insert a vertical line in Word — the difference is how the line behaves once it’s in place.
Use Shapes for a freestanding decorative line, Borders when you need the line to grow with paragraph text, Columns for newspaper-style multi-column layouts, and a Table when precise side-by-side alignment matters most.
Once you’re comfortable with lines and borders, it’s worth exploring what else you can do with Word’s drawing tools — the guide on how to insert arrows in Word covers the next logical step for annotating and decorating documents.
Related Tutorials
Word Tutorials
Recently Added on Word Made Easy
Browse the complete collection for help with formatting, layout, pages, tables, images, and document setup.
For Microsoft support documentation, visit the official Microsoft guidance.
Leave a Reply