
To rotate text in Word, you place it inside a text box or shape and then drag the rotation handle to any angle — standard body text typed directly into the page cannot be rotated. For more on working with text containers, see the guide on how to draw in Word.
In this guide, you’ll learn three methods to rotate text in Word, how to remove the text box border for a clean finish, and how to fix the most common problems.
What Is Text Rotation in Word?
Text rotation in Word changes the angle of text relative to the page. Standard body text cannot be rotated — it must first be placed inside a text box, shape, or WordArt object, which can then be rotated to any angle using the rotation handle or the Shape Format tab.
Common uses for rotated text include:
- Vertical labels on file tabs, organisational documents, and narrow table columns
- Angled headings and callouts on flyers, posters, and brochures
- Sidebar text in multi-column layouts and reports
- Decorative text effects using WordArt
- Watermark-style diagonal text across a page
Watch the Video Tutorial
If you prefer to see this in action, the full video walkthrough is below, showing each method step by step.
How to Rotate Text in Word: Step-by-Step
There are three methods: free rotation using the drag handle, precise rotation using preset angles from the ribbon, and rotation inside a shape instead of a text box.
Method 1: How to Rotate Text in Word Using a Text Box
This is the most common method — insert a text box, add your content, and drag the rotation handle to any angle. The border can be hidden afterwards for a clean result.
Steps:
- Click the Insert tab.
- Click Text Box and select Simple Text Box.
- Type or paste your text into the box — use Ctrl + V to paste.
- Click the edge of the text box to select the container (not the text inside it).
- Click and drag the circular rotation handle at the top of the box to rotate to your desired angle.
- To remove the text box border: go to Shape Format → Shape Outline → No Outline.
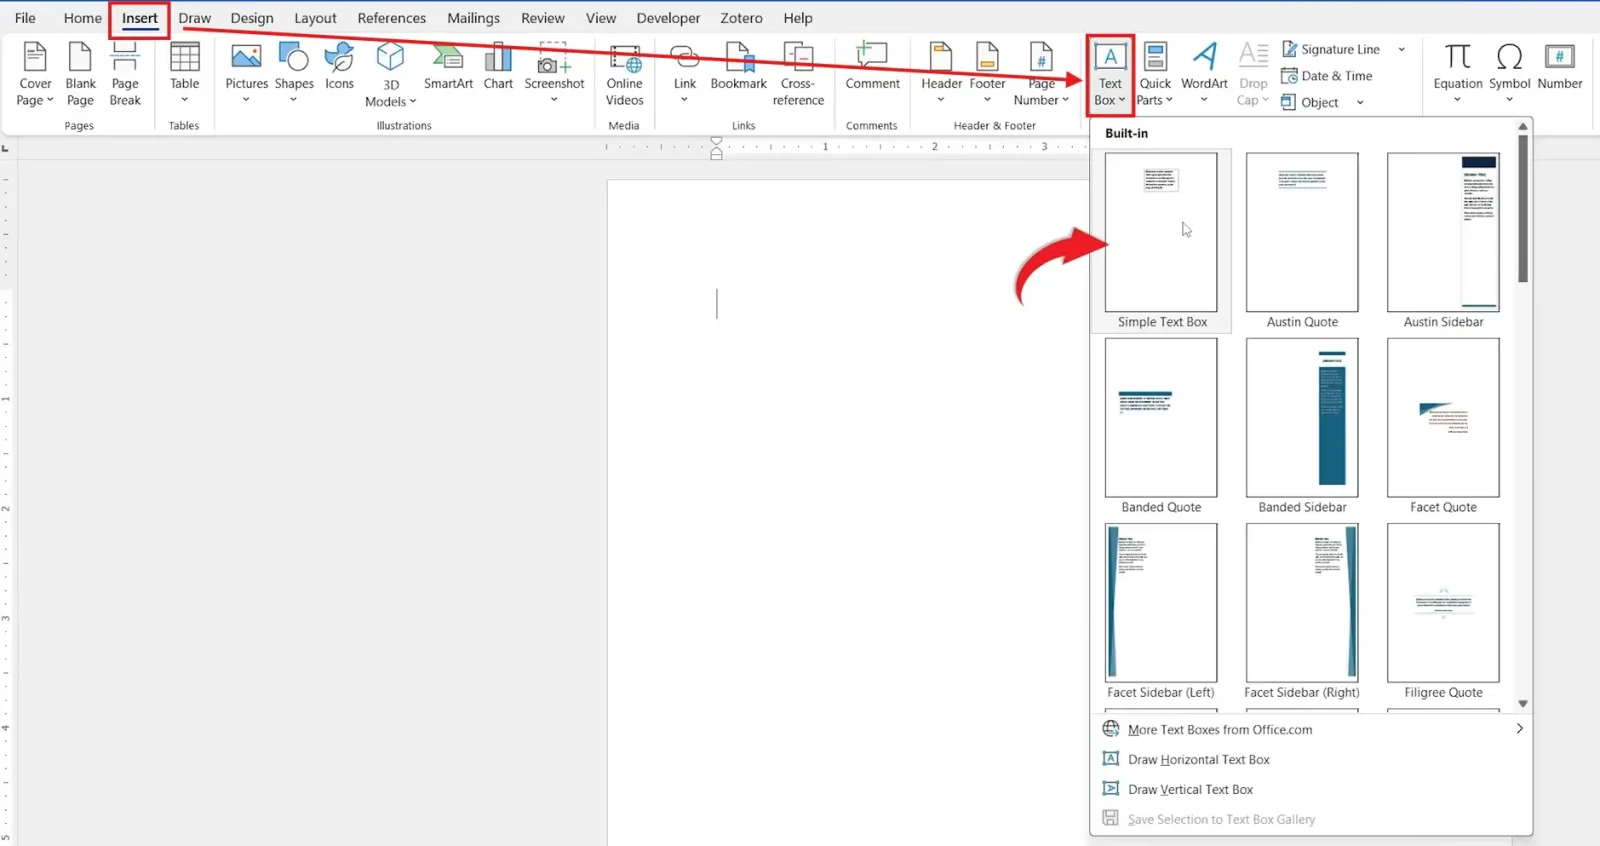

👉 The text box rotates to the angle you set. Once you click No Outline, the border disappears and only the rotated text remains visible on the page.
Method 2: How to Rotate Text in Word Using Preset Angles
If you need a specific standard angle — 90° left, 90° right, or flipped — use the Rotate menu in the Shape Format tab instead of dragging the handle manually. This gives exact results without eyeballing.
Steps:
- Insert a text box and add your text (follow Steps 1–3 from Method 1).
- Click the edge of the text box to select it.
- Click the Shape Format tab.
- Click Rotate in the Arrange group.
- Choose from: Rotate Right 90°, Rotate Left 90°, Flip Vertical, or Flip Horizontal. For a custom angle, click More Rotation Options and enter a precise degree value.
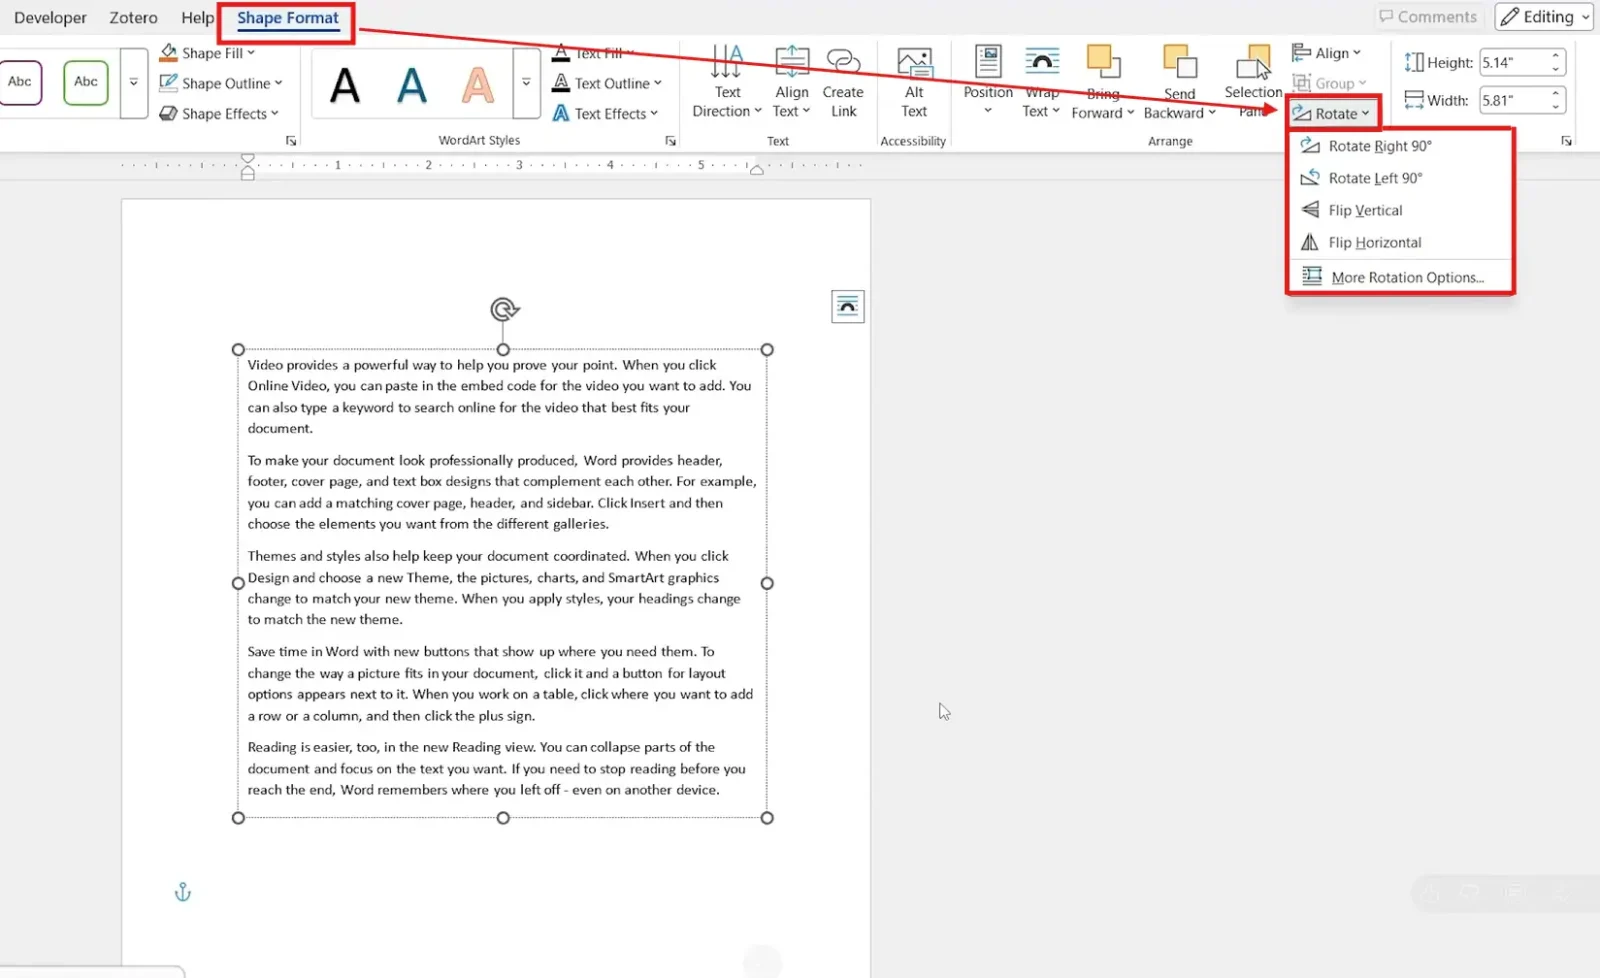
👉 The text box snaps to the selected angle instantly. Use More Rotation Options to enter any custom degree between 0° and 360°.
Method 3: How to Rotate Text in Word Using a Shape
Any Word shape can contain text and be rotated — useful when you want the rotated text to sit inside a visible container like a banner, badge, or callout box, rather than floating as plain text.
Steps:
- Click the Insert tab → Shapes and select any shape.
- Draw the shape on the page.
- Right-click the shape and select Add Text.
- Type your text inside the shape.
- Click the edge of the shape to select the container.
- Drag the rotation handle or use Shape Format → Rotate to set the angle.
👉 The text rotates together with the shape. To use WordArt instead, go to Insert → WordArt, choose a style, type your text, then rotate the WordArt object the same way — for more on inserting and working with shapes, see the guide on how to group objects in Word to lock multiple rotated elements together.
Which Method Should You Use?
- Free rotation to any angle? Use Method 1 — drag the rotation handle on a text box.
- Need exactly 90° or 180°? Use Method 2 — the preset Rotate menu snaps to standard angles without guessing.
- Text inside a visible container or decorative design? Use Method 3 — shapes and WordArt give you styling options a plain text box doesn’t.
Common Problems When Rotating Text in Word
Text Won’t Rotate
Standard body text typed directly into the document cannot be rotated. It must be placed inside a text box, shape, or WordArt object first. If you’ve selected text inside a text box (cursor blinking in the text), click the border of the text box instead — you need the container selected, not the text.
Rotation Handle Doesn’t Appear
The circular rotation handle only appears when the text box or shape container is selected — not when the text cursor is active inside it. Click the edge or border of the text box to switch from text-editing mode to object-selection mode; the handle will appear at the top.
Text Box Border Remains Visible
Go to Shape Format → Shape Outline → No Outline. If the border reappears while editing, this is normal — Word temporarily shows the container during editing. Click outside the box and the border will disappear again.
Text Appears Misaligned After Rotation
After rotating, the text may sit too high, too low, or off-centre within the box. Click inside the text box, select all text with Ctrl + A, and adjust alignment using the paragraph alignment buttons on the Home tab. Resize the text box by dragging its handles if the text is clipping at the edges — for more on controlling text positioning, see the guide on how to change line spacing in Word.
Pro Tips for Rotating Text in Word
- Hold Shift while dragging the rotation handle to snap the rotation to 15° increments — useful for achieving exact 45°, 90°, or 135° angles without using the Rotate menu.
- Use More Rotation Options for exact angles. Go to Shape Format → Rotate → More Rotation Options and type any degree value directly — useful when you need to match the rotation of another element on the page.
- Remove the text box fill as well as the outline. Go to Shape Format → Shape Fill → No Fill — this prevents the white background of the text box from covering content beneath it when the box is positioned over other elements.
- Group rotated text boxes with related objects. After rotating, if your text box sits alongside an image or shape, select both and group them — changes to position or size will then affect both together — for the full walkthrough, see the guide on how to group objects in Word.
FAQs
How do I rotate text in Word?
Insert a text box via Insert → Text Box, add your text, click the box border to select it, then drag the circular rotation handle at the top to your desired angle.
Can I rotate normal text in Word without a text box?
No. Standard body text in Word cannot be rotated. It must be placed inside a text box, shape, or WordArt object before rotation becomes available.
How do I rotate text vertically in Word?
Insert a text box, click its border, go to Shape Format → Rotate → Rotate Right 90° or Rotate Left 90°. The text will run vertically. Remove the border via Shape Outline → No Outline for a clean finish.
How do I remove the text box border after rotating text?
Select the text box, go to Shape Format → Shape Outline → No Outline. Also go to Shape Fill → No Fill if the white background is covering content beneath the box.
Can I rotate text to a custom angle in Word?
Yes. Go to Shape Format → Rotate → More Rotation Options and enter any degree value. Alternatively, hold Shift while dragging the rotation handle to snap to 15° increments.
Can I rotate text in Word Online?
Yes. The text box rotation handle and the Shape Format Rotate menu are available in Word Online, though some advanced formatting options may differ from the desktop version.
What is the difference between rotating a text box and flipping it?
Rotating turns the text box around its centre point to a new angle. Flipping mirrors it — Flip Horizontal produces a mirror image left-to-right; Flip Vertical mirrors it top-to-bottom. Both options are in Shape Format → Rotate.
Conclusion
Rotating text in Word requires a text box, shape, or WordArt — once the container is in place, dragging the handle or using the Rotate menu gives you full control over the angle.
Remove the border and fill after rotating to make the text blend into the page layout. For exact angles, the Shape Format Rotate menu is more reliable than dragging — and holding Shift while dragging snaps to clean 15° increments.
Once you’re comfortable positioning rotated text, it’s worth knowing how to lock it in place alongside other elements — the guide on how to group objects in Word shows how to bind a rotated text box to an adjacent shape or image so they move together.
Related Tutorials
Word Tutorials
Recently Added on Word Made Easy
Browse the complete collection for help with formatting, layout, pages, tables, images, and document setup.
For Microsoft support documentation, visit the official Microsoft guidance.
Leave a Reply