
To make a picture fill a page in Word, set the picture to Behind Text, then drag its corner handles out to the edges of the page. This is the technique behind full-page backgrounds, flyers, worksheets, covers and posters. If the document has no image in it yet, start with how to insert a picture in Word.
In this guide, you’ll learn 2 easy methods to make a picture fill a page in Word, how to match the picture to the page orientation, and how to adjust transparency when the background makes your text difficult to read.
Why Make a Picture Fill a Page in Word?
A full-page picture changes how a document reads. It works particularly well for posters, covers, worksheets, flyers and any layout where an image needs to sit behind the text rather than beside it.
Five things decide whether the result looks deliberate or accidental:
- Match the picture orientation to the page — portrait image, portrait page.
- Place the picture behind the text so it can move freely.
- Resize from the corners to keep the image proportions.
- Adjust transparency when the background swamps the text — and if you want the text sitting in its own box on top instead, see how to put text over an image in Word.
- Check Print Preview before printing — screen and printer rarely agree on page edges.
Watch the Video Tutorial
If you prefer to see this in action, the full video walkthrough is below, showing each method step by step.
How to Make a Picture Fill a Page in Word: Step-by-Step
There are two stages. Method 1 covers the actual work — orientation, wrapping and resizing. Method 2 is what you reach for when the finished page looks right but the text no longer reads clearly.
Method 1: How to Make a Picture Fill a Page in Word Using Behind Text
The core technique to make a picture fill a page in Word is to place the picture behind your text. Word then stops treating the image as a character in a line, which is what lets you drag it anywhere on the page.
Check the Page Orientation
Decide whether the page should be portrait or landscape before you position anything. The video uses a portrait page, but every setting below works the same way on a landscape document.
- Go to Layout.
- Select Orientation.
- Choose Portrait or Landscape.
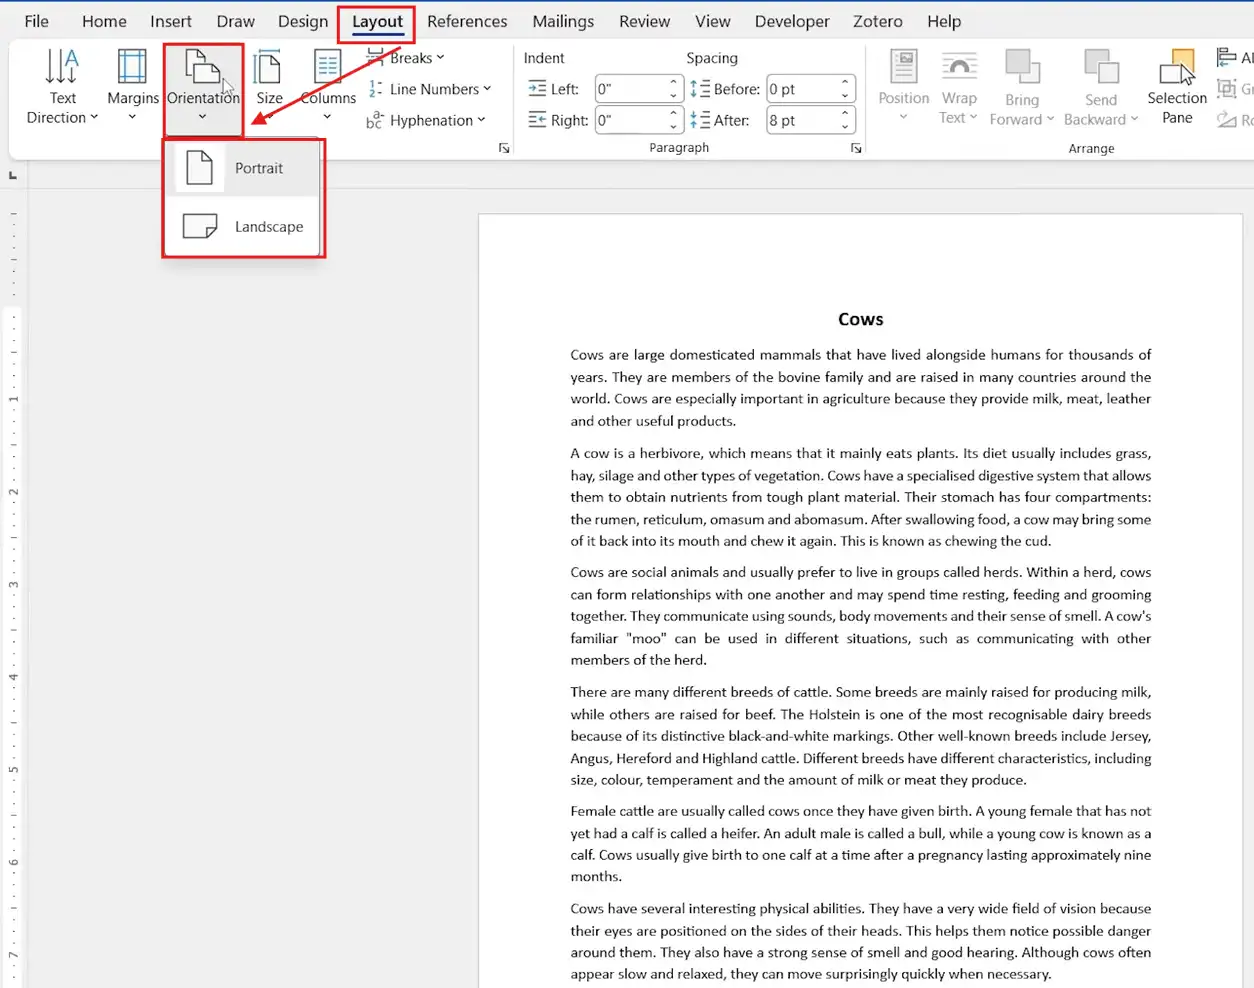
👉 Match the picture to the page. A portrait photo on a portrait page fills the space with almost no cropping; a landscape photo on the same page loses its top and bottom.
Select the Picture
Insert the picture and click it once. Handles appear around the edges, which confirms the image is selected and the picture tools are available.
Change the Layout Option
- Select the picture.
- Click Layout Options.
- Choose Behind Text.
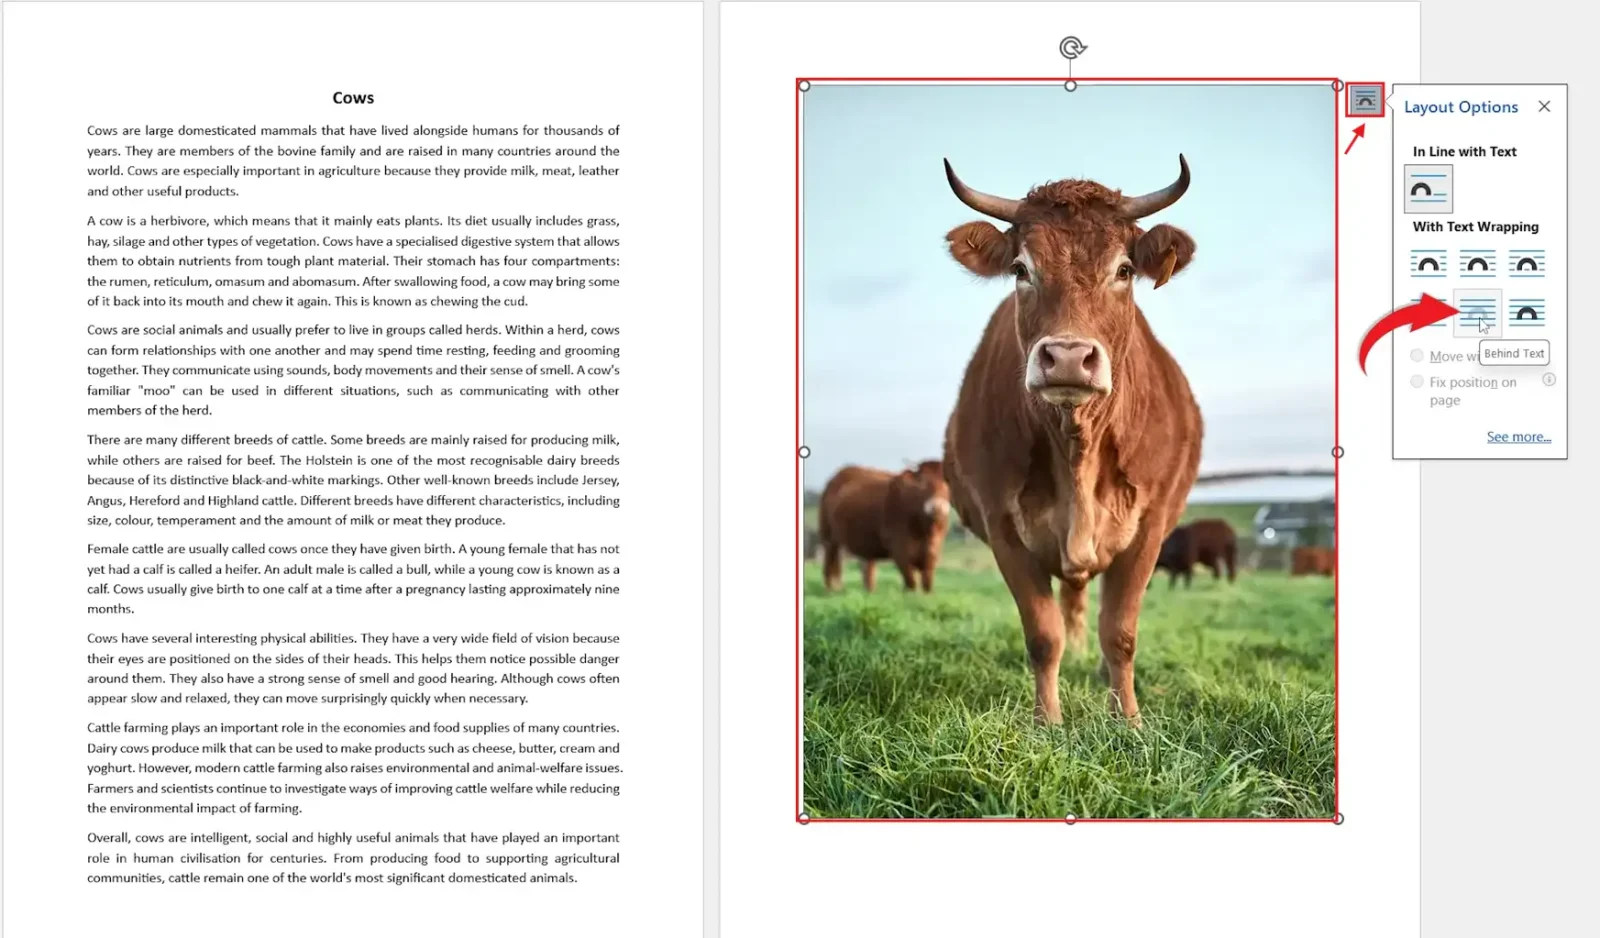
👉 The picture drops behind the text and can now be dragged anywhere on the page.
Resize the Picture
Drag the picture outwards until it reaches the edges of the page. Use the corner handles, never the side handles — corners keep the width and height in step, so the image cannot stretch.
Reposition the picture so the important part of the image — a face, a logo, a horizon — sits where you want it, not wherever the crop happens to leave it.
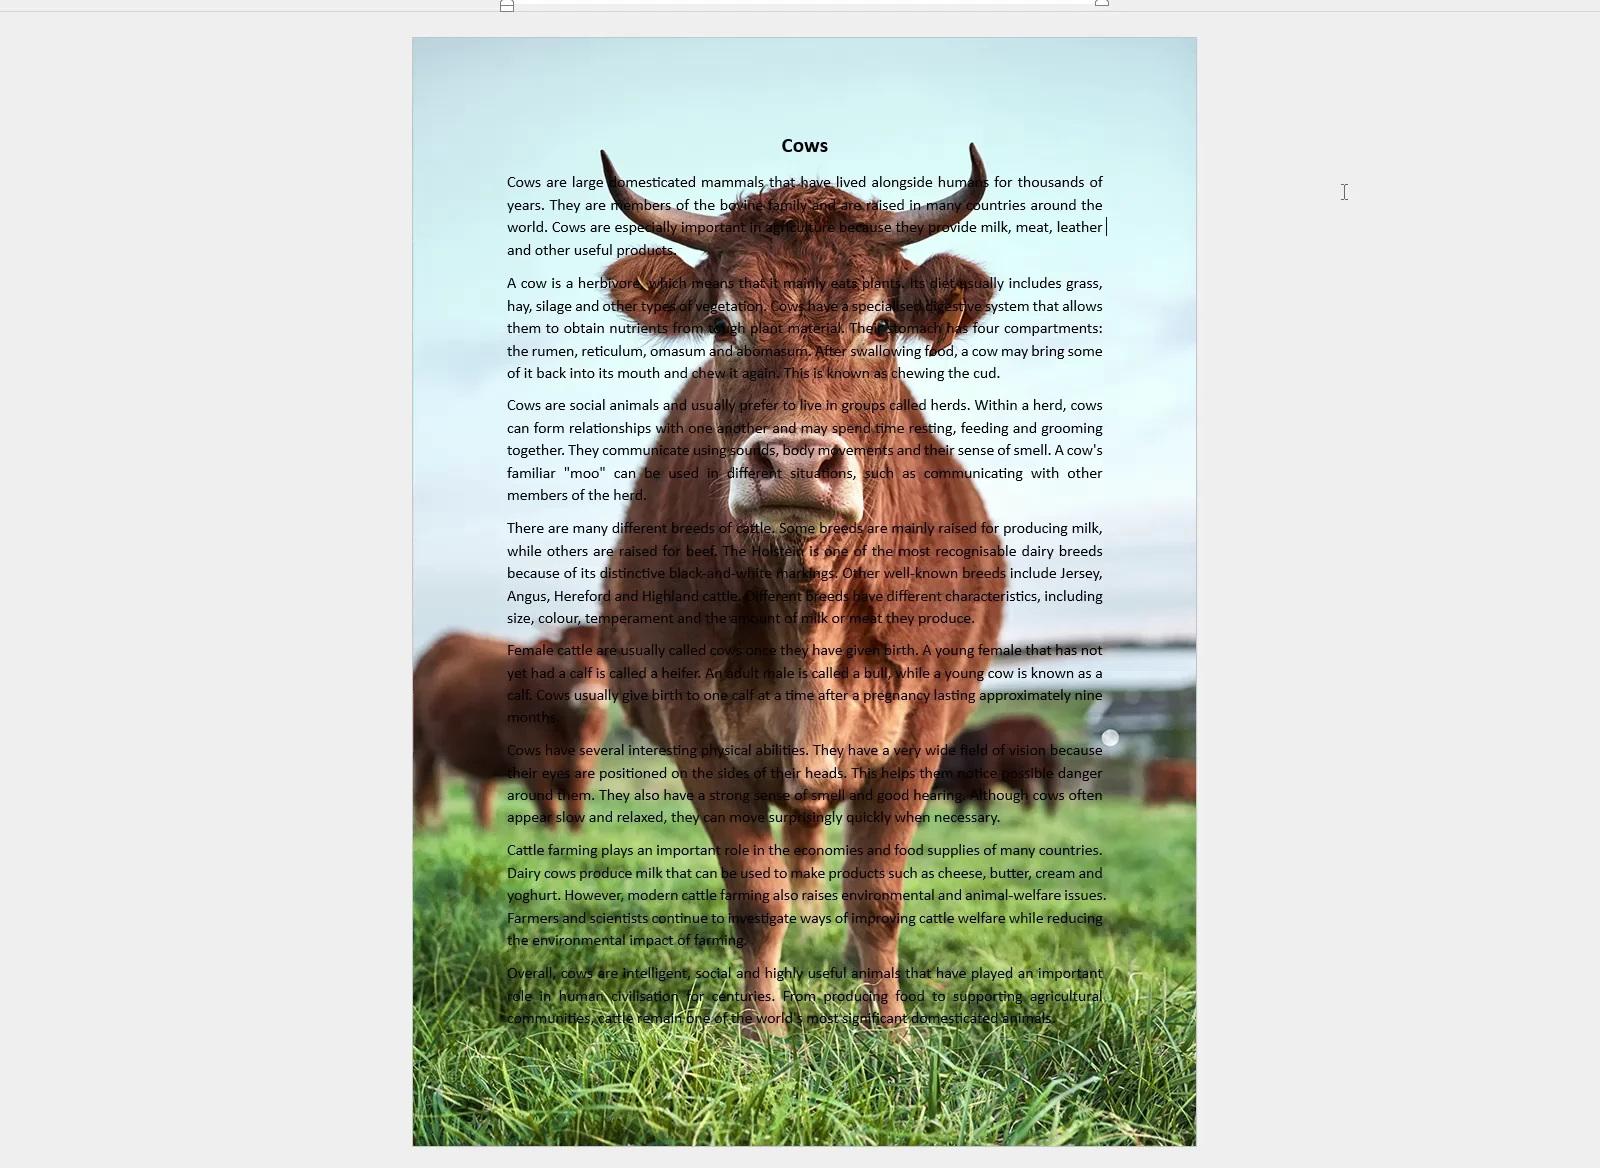
👉 The picture now covers the page from edge to edge with the text sitting on top of it.
Remove an Unwanted Second Page
Resizing often pushes a stray empty page onto the end of the document. Click into that page and press Backspace to clear it — for the stubborn cases, see how to delete an extra page in Word.
Method 2: How to Make a Picture Fill a Page in Word with Transparency
Sometimes the picture covers the page perfectly and the text becomes unreadable. Fade the image back rather than moving the text: make a picture fill a page in Word first, then reduce the picture’s opacity until the words sit clearly on top.
Open Picture Format
- Click the picture.
- Select Picture Format on the ribbon.
- Find Transparency.
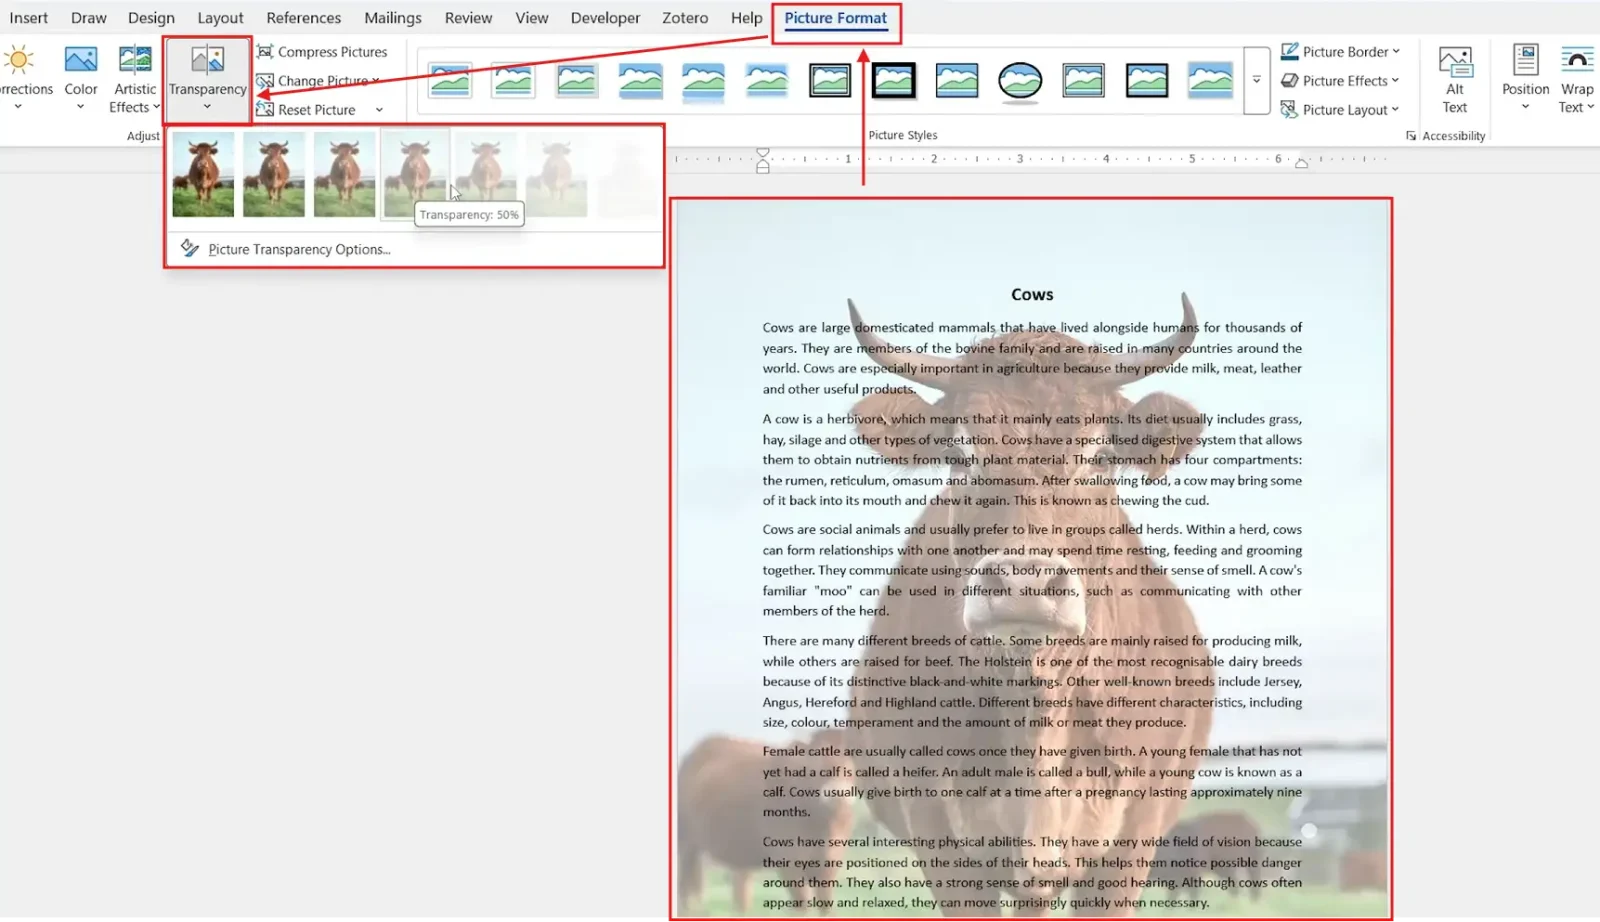
The presets preview each level as you hover. Pick the one that clears the text without washing the picture out completely.
Adjust Picture Transparency
- Select Picture Transparency Options for finer control.
- Use the Transparency slider in the side panel.
- Adjust until the text reads cleanly.
- Close the side panel.
👉 The picture stays behind the text, but the lighter finish lets the words carry the page.
Which Method Should You Use?
| Approach | Best For | What You Do |
|---|---|---|
| Method 1 — Behind Text | Filling the page with a movable picture | Use Layout Options → Behind Text, then resize from the corners |
| Method 2 — Transparency presets | Making text readable over the picture | Use Picture Format → Transparency |
| Method 2 — Custom transparency | Precise control over the fade | Open Picture Transparency Options and use the slider |
Best choice: Method 1 does the actual job. Add Method 2 only when the background is fighting your text.
Common Problems When Making a Picture Fill a Page in Word
The Picture Won’t Move Freely
The picture is still inline with the text. Select it, open Layout Options and change the wrapping to Behind Text.
The Picture Looks Stretched
A side handle was used instead of a corner handle. Undo with Ctrl + Z and resize from a corner so the proportions hold.
The Text Is Difficult to Read
Reduce the picture’s transparency. Select the picture, open Picture Format, choose Transparency, then pick a preset or open the detailed options.
There Is a White Edge When Printing
Most home printers cannot print to the paper edge. The picture reaches the page edge on screen and still prints inside a white margin. Check your printer’s borderless setting, or accept the margin and design around it.
Pro Tips for Making a Picture Fill a Page in Word
- Set the page size before you resize anything — changing it afterwards forces you to redo the fit, so confirm it first using how to change page size in Word.
- Use a picture at least 1,500 pixels wide. Small images look sharp at thumbnail size and blur badly at full page.
- Corner handles only. Side handles distort.
- If the text sits over a busy part of the photo, move the picture rather than the text — the picture has nowhere to be, the text does.
- Check Print Preview before printing. Screen and printer disagree about page edges more often than not.
FAQs
How do I make a picture fill a page in Word?
To make a picture fill a page in Word, select the picture, open Layout Options, choose Behind Text, then resize and position it using the corner handles.
How do I put a picture behind text in Word?
Select the picture, click Layout Options and choose Behind Text. The picture sits behind the text and can then be repositioned anywhere on the page.
How do I make a picture cover the whole page in Word?
Choose Behind Text from Layout Options, then drag the corner handles until the picture reaches every page edge. Corners keep the proportions intact.
How do I make a background picture less visible in Word?
Select the picture, open Picture Format and use Transparency. Choose a preset, or open Picture Transparency Options for the slider.
Why is my picture difficult to move in Word?
The picture is using a text-wrapping setting that pins it to the text. Select it, open Layout Options and choose Behind Text.
How do I stop a full-page picture from looking stretched?
Resize with the corner handles rather than the side handles. Corners scale width and height together and preserve the original proportions.
Why does my full-page picture print with a white border?
Your printer probably does not support borderless printing. The picture reaches the page edge on screen while the printer still enforces a white printable margin.
Can I make a picture fill a page in Word on Mac?
Yes. Word for Mac uses the same Behind Text wrapping and corner-handle resizing. The Layout Options button sits in the Picture Format tab rather than beside the image.
Conclusion
To make a picture fill a page in Word, set the orientation, select the picture, choose Behind Text and drag the corner handles to the page edges. Four steps, and the whole thing takes under a minute once you’ve done it once.
If the text stops reading cleanly, fade the picture with the transparency controls rather than shrinking it. And check Print Preview before you commit the document to paper — a white edge on screen is a white edge in print.
For a different route to the same look — one that applies to every page at once rather than a single sheet — see how to add a background in Word.
Related Tutorials
- How to Insert a Picture into a Shape in Word
- How to Make an Image Transparent in Word
- How to Crop a Picture into a Circle in Word: 2 Easy Steps
Word Tutorials
Recently Added on Word Made Easy
Browse the complete collection for help with formatting, layout, pages, tables, images, and document setup.
For Microsoft support documentation, visit the official Microsoft guidance.

Leave a comment
Stuck on a step, or know a quicker way? Ask or share it below.