
To crop a picture into a circle in Word, select the picture and choose Picture Format → Crop → Crop to Shape → Oval. Then set Crop → Aspect Ratio → 1:1 to turn the oval into a perfect circle.
In this guide, you’ll learn the two steps needed to create the circle and how to reposition the picture so the subject sits exactly where you want it. If your document does not contain an image yet, start with how to insert a picture in Word.
What Does Cropping a Picture into a Circle Do?
When you crop a picture into a circle in Word, Word displays the image inside a circular crop while keeping the original picture available within the document. This works well for profile photos, staff pages, invitations, posters and other layouts where a standard rectangle feels too rigid.
The process uses two controls. Crop to Shape → Oval changes the outline first, while Aspect Ratio → 1:1 makes the width and height equal. That second setting is what turns the oval into a true circle. The official crop-to-shape guidance also confirms that Word can crop pictures to shapes and adjust the crop afterwards.
- Use Crop to Shape → Oval to change the picture outline.
- Use Aspect Ratio → 1:1 to create equal width and height.
- Move the picture while Crop is active to centre the subject.
- Keep page placement separate from cropping — if the whole image needs moving, see how to move a picture in Word.
Watch the Video Tutorial
If you prefer to see this in action, the full video walkthrough is below, showing each method step by step.
How to Crop a Picture into a Circle in Word: Step-by-Step
You need two stages to crop a picture into a circle in Word. First, crop the picture to an oval. Then apply a 1:1 aspect ratio and reposition the image inside the crop area.
Method 1: How to Crop a Picture into a Circle in Word Using Crop to Shape
Start with Crop to Shape. This changes the rectangular picture to an oval and prepares it for the square aspect ratio used in the next step.
Select the Picture
- Select the picture you want to change.
- Open the Picture Format tab on the ribbon.
- Select the arrow underneath Crop.
- Point to Crop to Shape.
- Under Basic Shapes, select Oval.

👉 The picture changes to an oval. You are halfway there.
At this stage, the image may look circular if the original dimensions were already square. For most pictures, however, you still need the next step to reliably crop a picture into a circle in Word.
Method 2: How to Crop a Picture into a Circle in Word with a 1:1 Aspect Ratio
Now finish the process to crop a picture into a circle in Word. Setting the crop to 1:1 makes the width and height equal, which turns the oval into a perfect circle.
Apply a 1:1 Aspect Ratio
- Select the oval picture again.
- Open Picture Format.
- Select the arrow underneath Crop.
- Select Aspect Ratio.
- Choose 1:1.
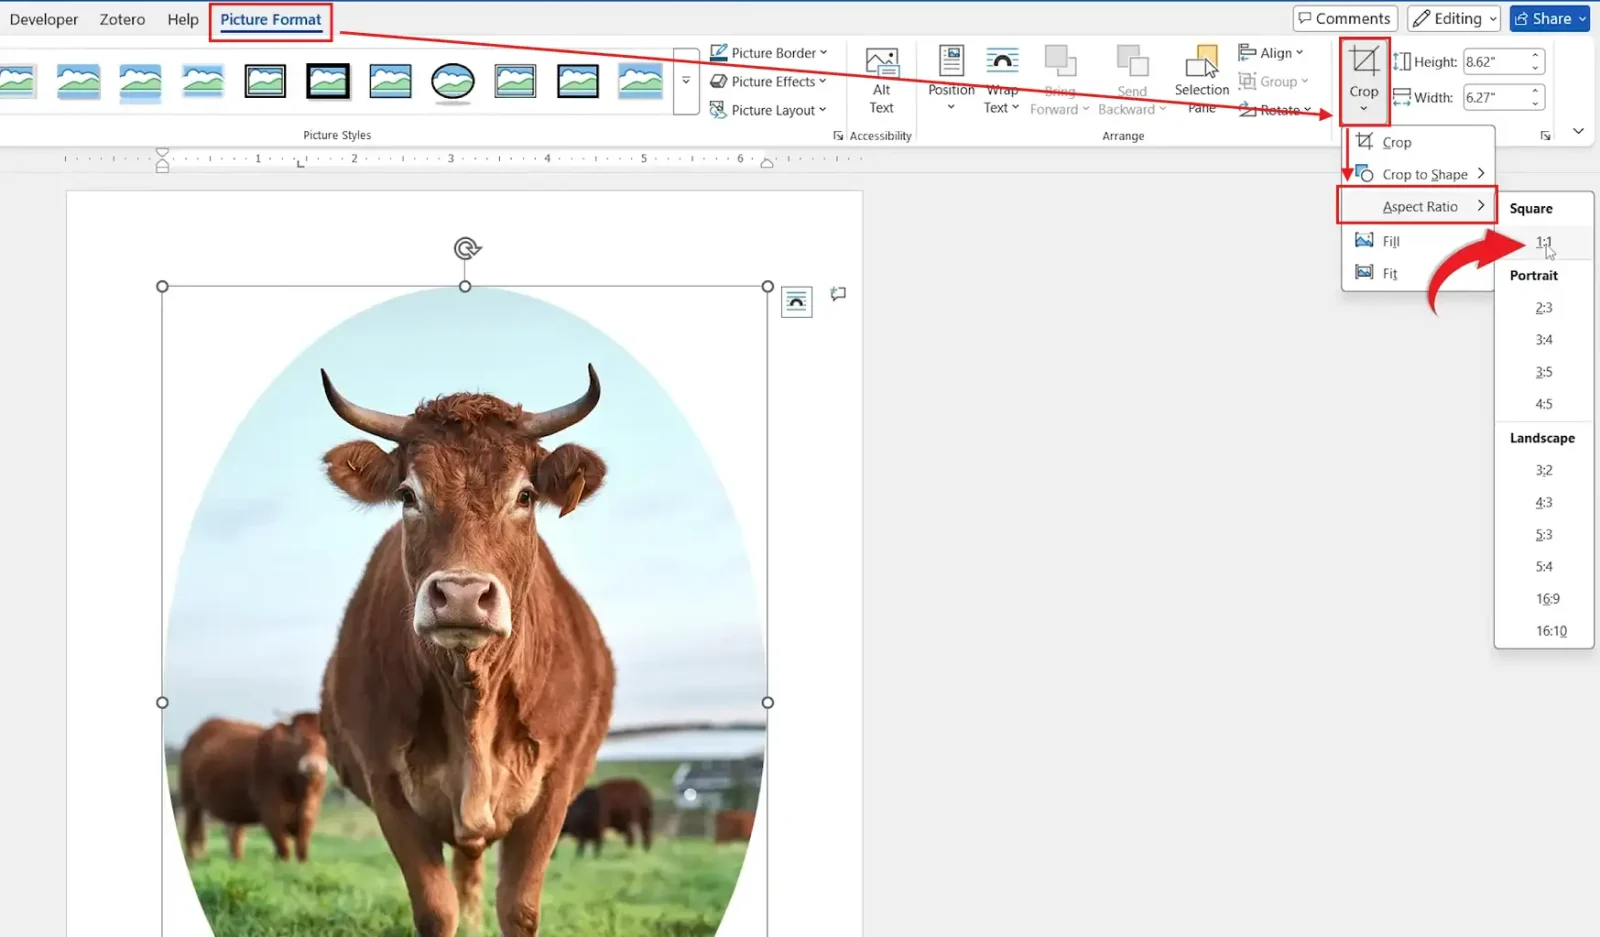
👉 The crop now has equal width and height, creating a true circle.
Position the Picture Inside the Circle
While the crop controls are active, Word darkens the area outside the visible crop and displays black crop indicators. Drag the picture itself to choose which part of the original image appears inside the circle.
- Drag the picture until the main subject is centred.
- Use the available handles if you need to change how the picture fits.
- Check that the important part of the image remains inside the circular area.
- Select outside the picture when you are happy with the result.
👉 Done. You now have a picture displayed inside a perfect circle.
If a circle is not the effect you need, Word can place pictures inside many other shapes — see how to insert a picture into a shape in Word.
Which Method Should You Use?
| Stage | What It Does | Setting |
|---|---|---|
| Crop to Shape | Changes the rectangular picture to an oval | Oval |
| Aspect Ratio | Makes the oval a perfect circle | 1:1 |
| Crop adjustment | Controls which part of the picture remains visible | Move the picture inside the crop |
Best approach: Use both stages. Crop to Shape → Oval creates the outline, while Aspect Ratio → 1:1 completes the process to crop a picture into a circle in Word.
Common Problems When Cropping a Picture into a Circle
The Picture Is an Oval, Not a Circle
Selecting Oval alone does not always create a perfect circle. Select the picture again and choose Crop → Aspect Ratio → 1:1. Equal width and height fix the problem.
The Wrong Part of the Picture Is Visible
Reopen Crop and drag the picture rather than the circular frame. Move the subject until the correct part sits inside the visible area.
The Picture Does Not Fit the Circle
Keep the crop controls active and adjust the picture until the subject fits comfortably inside the circular frame. Check the edges before finishing the crop.
Crop to Shape Is Missing
Select the picture first. Then open Picture Format and select the arrow underneath Crop. The Crop to Shape command appears in that menu on supported desktop versions.
Pro Tips for Circular Picture Crops
- Use Oval first and 1:1 second. Both settings matter when you crop a picture into a circle in Word.
- Centre faces or other important subjects before closing the crop controls.
- Move the picture inside the crop when the subject is misplaced; do not restart the whole process.
- Keep the circular crop separate from page positioning — for more control, see how to move an image freely in Word.
- If you want a softer image effect after cropping, learn how to make an image transparent in Word.
FAQs
How do I crop a picture into a circle in Word?
To crop a picture into a circle in Word, select the picture and choose Picture Format → Crop → Crop to Shape → Oval. Then choose Crop → Aspect Ratio → 1:1 and position the picture inside the circle.
Why does my circular picture look like an oval?
The picture needs equal width and height. Select it and choose Crop → Aspect Ratio → 1:1 to turn the oval into a circle.
Where is Crop to Shape in Word?
Select the picture, open Picture Format and select the arrow under Crop. Then choose Crop to Shape.
Which shape should I choose for a circular picture?
Choose Oval from Crop to Shape, then apply a 1:1 aspect ratio to make it a perfect circle.
Can I move the picture inside the circle?
Yes. Reopen Crop and drag the picture until the part you want is positioned inside the circular area.
Does cropping to a circle delete the rest of the picture?
Cropping changes which part of the picture is displayed in the document. The original image remains available within the file unless cropped areas are removed separately.
Can I use other shapes instead of a circle?
Yes. Word includes other Crop to Shape options. For a separate walkthrough, see how to insert a picture into a shape in Word.
Conclusion
To crop a picture into a circle in Word, apply Crop to Shape → Oval, then set Aspect Ratio → 1:1. Those two settings create the circular frame.
Before finishing, reposition the picture inside the crop so the subject is centred and nothing important is hidden. That’s it. The image remains editable, so you can reopen Crop whenever the framing needs adjustment.
If the finished circular picture also needs repositioning on the page, continue with how to move a picture in Word.
Related Tutorials
- How to Insert a Picture in Word
- How to Insert a Picture into a Shape in Word
- How to Make an Image Transparent in Word
Word Tutorials
Recent Microsoft Word Tutorials
Browse the complete collection for help with formatting, layout, pages, tables, images, and document setup.
For Microsoft support documentation, visit the official Microsoft guidance.
Leave a Reply