
To make a document read only in Word, open Review → Restrict Editing, enable Allow only this type of editing in the document, and choose No changes (Read only). You can then enforce the restriction with a password so other people cannot simply remove it.
In this guide, you’ll learn how to restrict editing, protect the restriction with a password, remove the protection when you need to edit again and reapply it later. For stronger protection that controls opening the file itself, see how to password protect a Word document.
What Does Read-Only Password Protection Do?
When you make a document read only in Word with Restrict Editing, people can view the document but cannot make ordinary changes while protection is enforced. Adding a password controls who can use Stop Protection and return the file to an editable state.
This is different from simply asking Word to open a file as read-only. Microsoft explains that Restrict Editing can enforce No changes (Read only) and optionally protect that restriction with a password in its official read-only document guidance.
- Use No changes (Read only) when viewers should not edit the document.
- Add a password when only authorised people should be able to remove the restriction.
- Use Stop Protection when you need to edit the protected document again.
- If you need a fixed sharing format instead, see how to save a Word document as a PDF.
Watch the Video Tutorial
If you prefer to see this in action, the full video walkthrough is below, showing each method step by step.
How to Make a Document Read Only in Word: Step-by-Step
You need two stages to make a document read only in Word with password protection. First, set the editing restriction to read-only. Then start enforcing that restriction and create the password.
Method 1: How to Make a Document Read Only in Word Using Restrict Editing
Start by opening the Restrict Editing pane. This is where you tell Word which type of editing the document should allow.
Open Restrict Editing
- Open the document you want to protect.
- Select the Review tab.
- Select Restrict Editing.

👉 The Restrict Editing pane opens on the right side of the document.
Set No Changes (Read Only)
- Under Editing restrictions, select Allow only this type of editing in the document.
- Open the editing restriction list if necessary.
- Choose No changes (Read only).
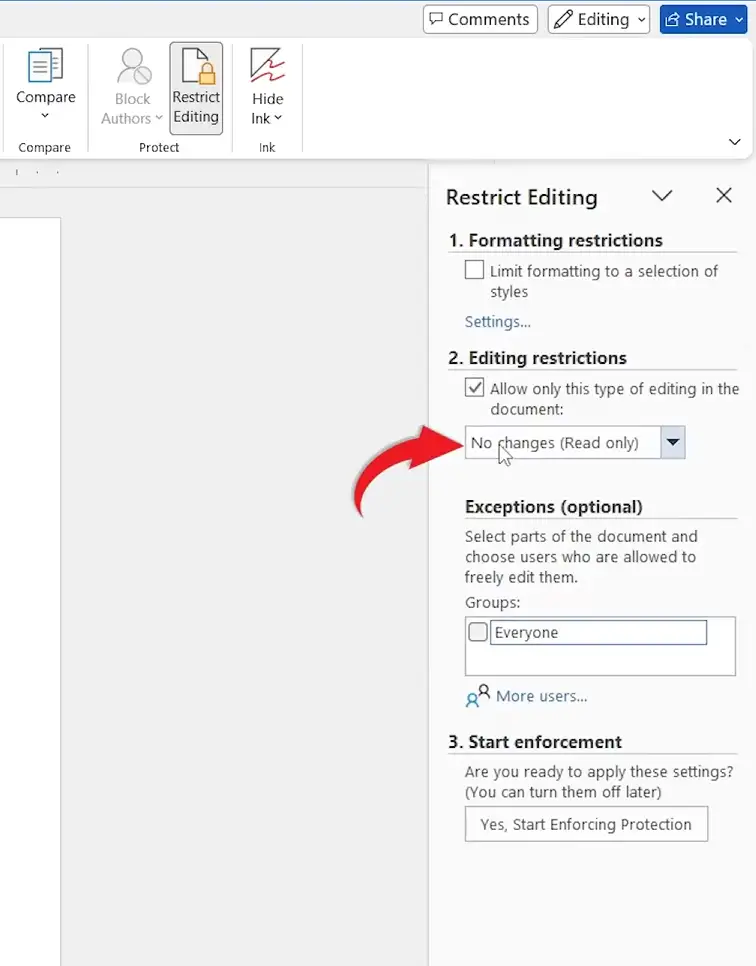
👉 Word is now configured to allow viewing without ordinary editing once you enforce the protection.
Method 2: How to Make a Document Read Only in Word with a Password
The second stage is to enforce the restriction. This is where you make a document read only in Word and add the password required to remove that protection later.
Start Enforcing Protection
- Select Start Enforcing Protection.
- Enter the password you want to use.
- Enter the same password again to confirm it.
- Select OK.
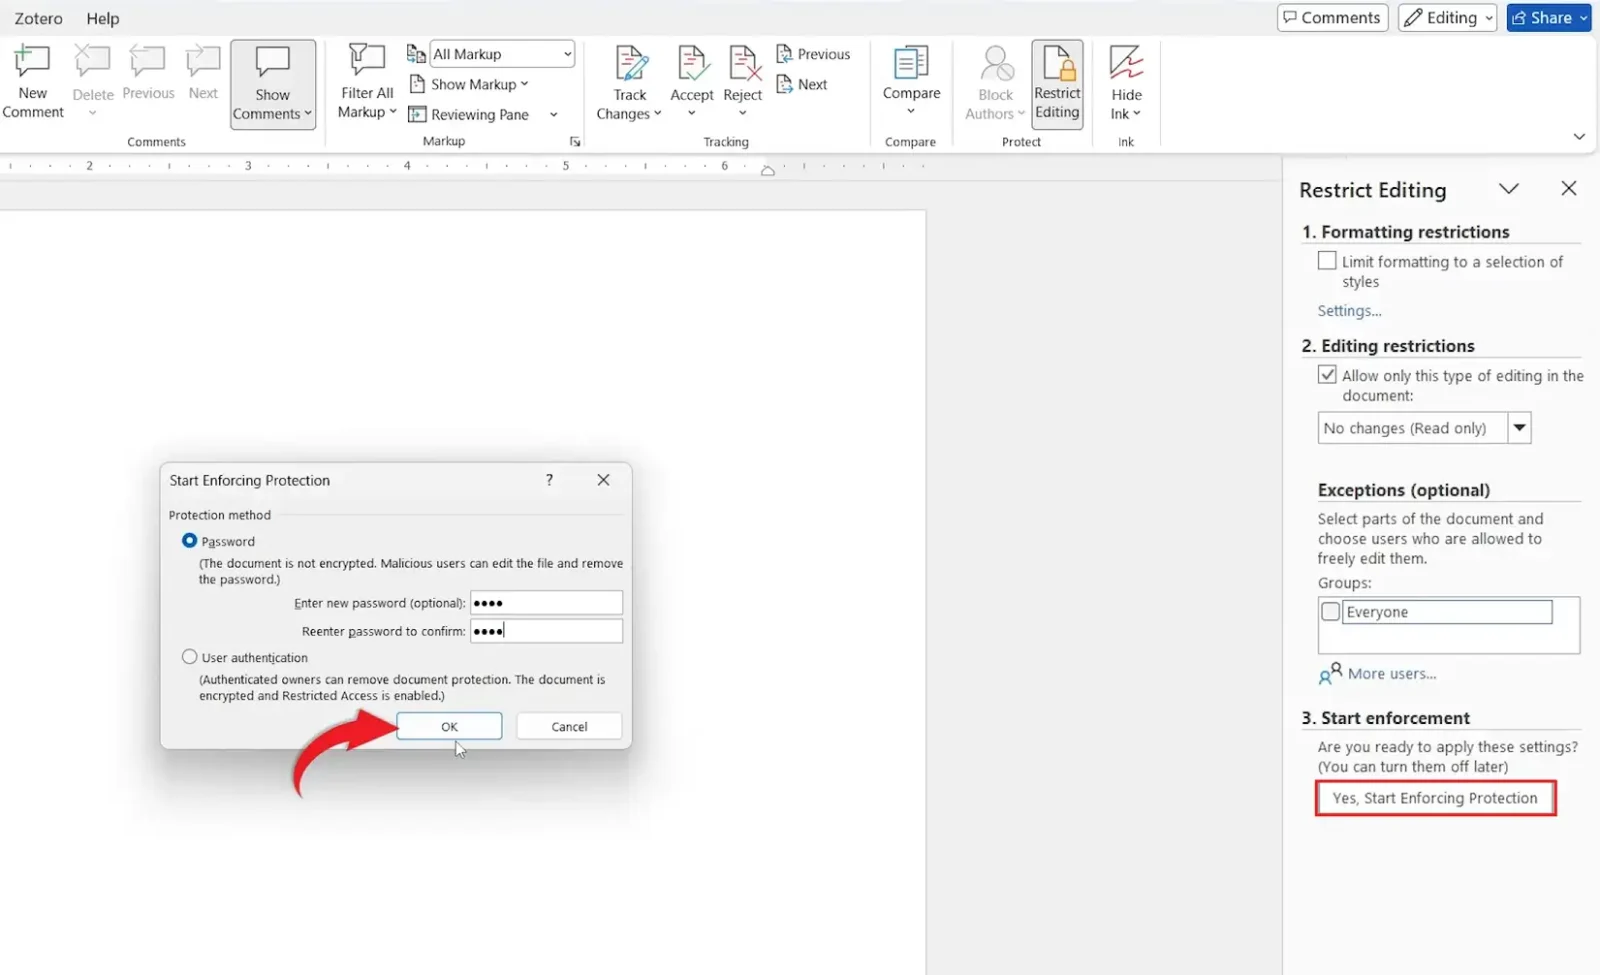
👉 Done. The document is protected and ordinary editing is blocked.
Important: Store the password somewhere secure. The video warns that Word cannot retrieve the protection password for you if you lose it.
Confirm the Document Is Read Only
With protection enforced, switch to the viewing mode shown in the video and try to edit the document. Editing and reviewing should be unavailable while the restriction remains active.
👉 You can view the document, but you cannot make normal changes to it.
How to Remove Read-Only Password Protection
Protection is reversible when you know the password. Use Stop Protection to return the document to an editable state.
- Open the Restrict Editing pane.
- Select Stop Protection.
- Enter the protection password.
- Select OK.
👉 Editing and reviewing become available again.
Reapply Read-Only Protection
To protect the document again, return to Restrict Editing, select Start Enforcing Protection, enter the password and select OK.
Which Protection Option Should You Use?
| Option | Best For |
|---|---|
| Restrict Editing | Setting the document to No changes (Read only) |
| Password protection | Controlling who can remove the editing restriction |
| Stop Protection | Returning the document to an editable state |
Best approach: Use No changes (Read only) and a password together when you need to make a document read only in Word and prevent viewers from simply turning the restriction off.
Common Problems When You Make a Document Read Only in Word
Restrict Editing Is Missing
Open the Review tab and look for Restrict Editing. The video uses this command to open the protection pane before any restriction is applied.
The Document Can Still Be Edited
Check that Allow only this type of editing in the document is selected and that the list says No changes (Read only). You must also select Start Enforcing Protection; choosing the restriction alone does not finish the process.
You Forgot the Password
Keep the password in a secure password manager or another protected location when you create it. The video explicitly warns that Word cannot retrieve the protection password if you lose it.
You Need to Edit the Document Again
Open Restrict Editing, select Stop Protection, enter the password and select OK. Editing and reviewing become available again.
Pro Tips for Read-Only Document Protection
- Record the protection password before you close the document.
- Test editing after protection is applied rather than assuming the restriction is active.
- Use No changes (Read only) when you need to make a document read only in Word rather than merely discourage editing.
- Use Stop Protection before making your own updates, then reapply protection afterwards.
- If you need a password to protect access to the file itself, see how to password protect a Word document.
FAQs
How do I make a document read only in Word?
To make a document read only in Word, open Review → Restrict Editing, select Allow only this type of editing in the document, choose No changes (Read only) and start enforcing protection.
How do I password protect a read-only document?
After selecting No changes (Read only), choose Start Enforcing Protection, enter a password, confirm it and select OK.
How do I remove read-only protection from a document?
Open the Restrict Editing pane, select Stop Protection, enter the password and select OK.
Can people still view a protected read-only document?
Yes. The restriction demonstrated in the video allows the file to be viewed while ordinary editing and reviewing are blocked.
What happens if I forget the protection password?
The video warns that Word cannot retrieve the protection password for you. Store it securely when you create the restriction.
Can I reapply read-only protection after editing?
Yes. Return to Restrict Editing, choose Start Enforcing Protection, enter the password and select OK.
Is read-only protection the same as password protecting a document?
No. Restrict Editing controls changes to the document. For a separate file-protection workflow, see how to password protect a Word document.
Conclusion
To make a document read only in Word, use Review → Restrict Editing, choose No changes (Read only) and enforce the restriction with a password.
Keep the password secure because you need it to stop protection and return the file to an editable state. After making changes, you can enforce the protection again in seconds.
If your next step is sharing a version that preserves the finished layout, continue with how to save a Word document as a PDF.
Related Tutorials
- How to Password Protect a Word Document
- How to Save a Word Document as a PDF
- How to Merge Documents in Word
Word Tutorials
Recent Microsoft Word Tutorials
Browse the complete collection for help with formatting, layout, pages, tables, images, and document setup.
For Microsoft support documentation, visit the official Microsoft guidance.
Leave a Reply