
To crop an image in Word, select the picture, open Picture Format → Crop, and drag a black crop handle inward. Click outside the picture to finish. Cropping changes the visible framing; the hidden parts usually remain in the file until you explicitly delete cropped areas.
This guide covers Microsoft Word for Windows. For related instructions, see How to Insert a Picture in Word: 3 Easy Methods (Quick Guide).
What Does Cropping a Picture Do?
Cropping hides unwanted edges so the useful part of an image takes up more of the visible frame. It differs from resizing, which changes how large the whole picture appears on the page. This guide covers ordinary inserted pictures in the Windows desktop version of Word.
Watch the Video Tutorial
If you prefer to see this in action, the full video walkthrough is below, showing each method step by step.
Crop an Image in Word with Picture Format
Start with a picture that is already inserted into the document. Save a copy of the original image when you may want a different composition later.
- Select the picture once. The Picture Format tab appears when a picture is selected.
- Open Picture Format and choose Crop in the Size group. If you open its menu, select the ordinary Crop command.
- Drag a black side handle to trim one edge, or a corner handle to adjust two edges together.
- Check that important text, faces or details remain inside the visible frame.
- Click outside the picture, or press Esc, to apply the crop.
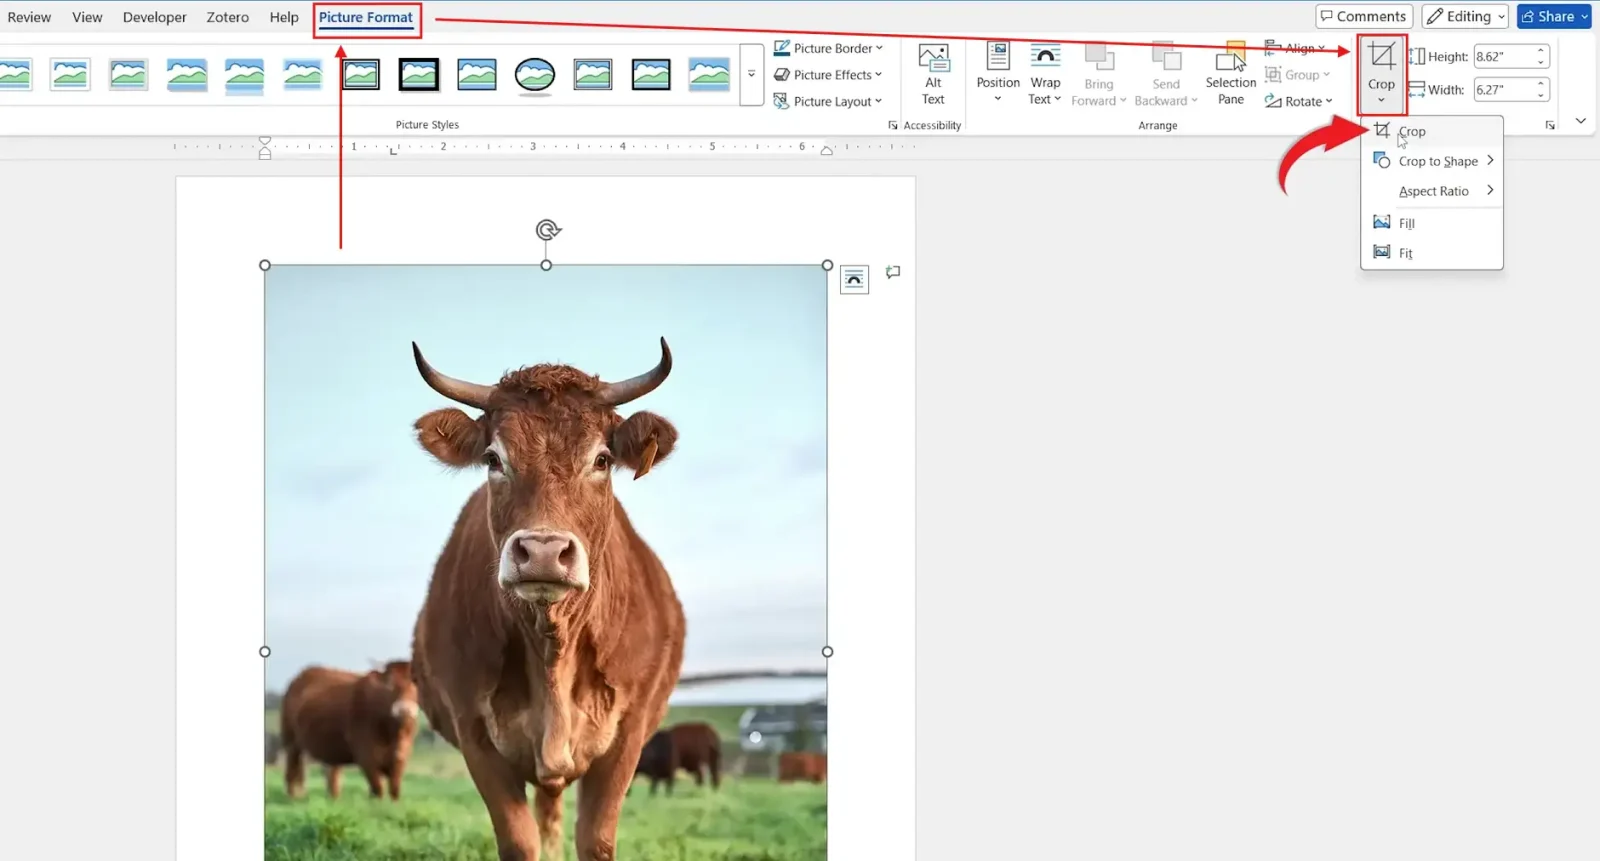
Use the black crop handles while Crop is active. The ordinary picture sizing handles resize the image instead. If the whole image becomes smaller, leave the operation and make sure you have entered Crop mode.
Adjust the Framing After Cropping
You can revisit a crop when the first result feels too tight. Select the picture and choose Crop again to see the frame and any retained image area outside it.
- Select the cropped picture and reopen Picture Format → Crop.
- Move the crop handles to refine the visible area. If necessary, drag the picture within the crop frame to reposition the subject.
- Keep the part you want to show inside the frame, then click outside the picture to finish.

A crop cannot reveal image detail that was never present in the source. It also cannot restore areas that have already been permanently removed from the document’s stored picture data.
Use an Aspect Ratio for Consistent Pictures
For a group of pictures that should share the same proportions, select a picture and open the Crop menu. Choose Aspect Ratio and select the ratio you need, then adjust the framing before finishing.
An aspect ratio controls the relationship between width and height. It does not make a low-resolution source sharper. After cropping, avoid enlarging a small remaining area so far that it looks blurred in the final document.
Remove Cropped Areas When You Need to
Ordinary cropping hides content. If you need the hidden area removed from the document file, use the desktop picture compression options on a separate saved copy.
- Select the picture and open Picture Format → Compress Pictures.
- Check Apply only to this picture if the change should affect only the selected image.
- Select Delete cropped areas of pictures, review the other compression settings, and confirm.
- Save the file and check the result before sharing it.
Do not rely on an ordinary crop to remove information permanently. Keep the original separately if you may need to reframe the picture later. Microsoft documents cropping and removing cropped areas in its picture cropping guide.
Common Picture Cropping Problems
- Picture Format is missing: select the picture itself. A shape, text box or other object may show a different contextual tab.
- The image changes size instead of cropping: enter Crop mode and use its black handles.
- The subject is cut off: reopen Crop and adjust the frame or picture position, provided the hidden area is retained.
- The picture moves on the page: check its text wrapping and position separately from the crop.
Finish the crop before fine-tuning the picture’s final page size. That makes it easier to judge both the visible composition and its relationship to nearby text.
FAQs
How do I crop an image in Word?
Select the picture, choose Picture Format → Crop, drag the black handles, and click outside the picture to finish.
Is cropping the same as resizing?
No. Cropping changes the visible part of a picture. Resizing changes its displayed dimensions.
Can I undo a crop later?
You can usually reopen Crop and adjust retained image areas. Areas permanently removed with Delete cropped areas cannot be recovered from the remaining picture data.
Why can someone still see the hidden area?
Word normally retains cropped image data. Use Compress Pictures → Delete cropped areas of pictures when the hidden area must be removed from the file.
Can I crop several pictures to matching proportions?
Yes. Use an Aspect Ratio from the Crop menu for each picture, then adjust each frame to suit its subject.
Does cropping improve image quality?
No. It can improve composition, but it does not create extra detail. Enlarging a small crop may make the image look blurred.
Conclusion
Crop the unwanted edges, check the subject and then set the picture’s final size. Keep the original image when you may need another version, and remove cropped data deliberately when preparing a file for sharing. For the next step, see How to Move a Picture in Word: 3 Easy Methods (Quick Guide).
Related Tutorials
- How to Insert a Picture in Word: 3 Easy Methods (Quick Guide)
- How to Move a Picture in Word: 3 Easy Methods (Quick Guide)
- How to Insert a Picture into a Shape in Word
Word Tutorials
Recent Microsoft Word Tutorials
Browse the complete collection for help with formatting, layout, pages, tables, images, and document setup.
For Microsoft support documentation, visit the official Microsoft guidance.
Leave a Reply