Skip to content
Word Made Easy
Home Word Tutorials Word Templates Google Docs PowerPoint Tutorials YouTube Videos

How to Insert the Rupee Symbol in Word (₹ Shortcut): 2 Easy Methods

Microsoft Word, Word Formatting Basics

Updated 13 November 2026 · By Patrick Elliott

To insert rupee symbol in Word, open Insert → Symbol → More Symbols and select ₹, or type 20B9 and press Alt + X. The Unicode method is quicker once you use the sign regularly, and it works the same way when you type the square root symbol in Word.

In this guide, you’ll learn 2 easy methods to insert rupee symbol in Word on desktop Word for Windows, how to confirm the correct character code, and how to fix the font and conversion problems that stop ₹ appearing properly.


Contents hide
1 What Is the Indian Rupee Symbol?
2 How to Insert Rupee Symbol in Word: Step-by-Step
3 Method 1: How to Insert Rupee Symbol in Word Using the Symbol Menu
4 Method 2: How to Insert Rupee Symbol in Word Using Unicode 20B9
5 Which Method Should You Use?
6 Common Problems When Inserting the Rupee Symbol
7 Pro Tips for Using the Rupee Symbol
8 FAQs
9 Conclusion
10 Related Tutorials
11 Word Tutorials

What Is the Indian Rupee Symbol?

The Indian rupee symbol is ₹. Its Unicode value is U+20B9, which identifies the official currency sign for the Indian rupee. Word gives you two routes to it: pick it visually from the Symbol window, or convert the hexadecimal code 20B9 with a keyboard shortcut.

The Unicode Consortium identifies U+20B9 as the Indian Rupee Sign. Do not confuse it with the older generic rupee sign at U+20A8.

  • Use the Symbol window when you want to find the character visually.
  • Use 20B9 followed by Alt + X when you want a repeatable keyboard method.
  • The same two routes work for other currency signs — the steps to insert the peso sign in Word follow an identical pattern with a different code.

Watch the Video Tutorial

If you prefer to see this in action, the full video walkthrough is below, showing each method step by step.


How to Insert Rupee Symbol in Word: Step-by-Step

There are two reliable ways to insert rupee symbol in Word. Method 1 is the safest when you want to see the character before you commit to it. Method 2 is faster once the code is in your head.


Method 1: How to Insert Rupee Symbol in Word Using the Symbol Menu

Use the Symbol window when you do not remember the Unicode value or want to confirm you have selected the correct currency sign.

  1. Place the cursor where you want ₹ to appear.
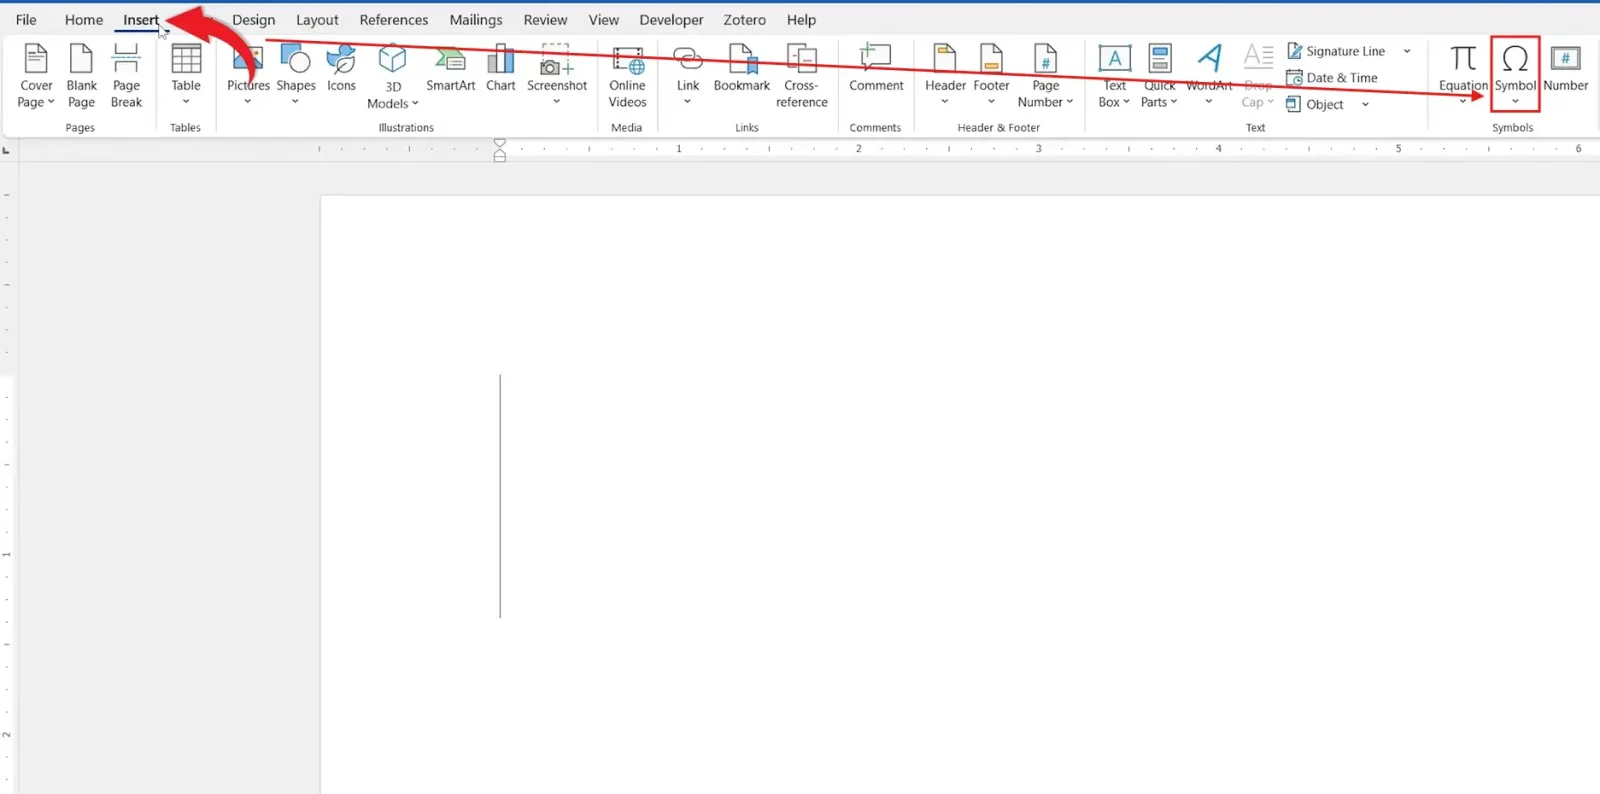
  2. Open the Insert tab.
  3. Select Symbol, then More Symbols.
Microsoft Word Insert tab showing the Symbol menu with More Symbols selected to insert rupee symbol in Word
  1. Choose a font that contains the character, such as Segoe UI Symbol.
  2. Open the Subset list and choose Currency Symbols.
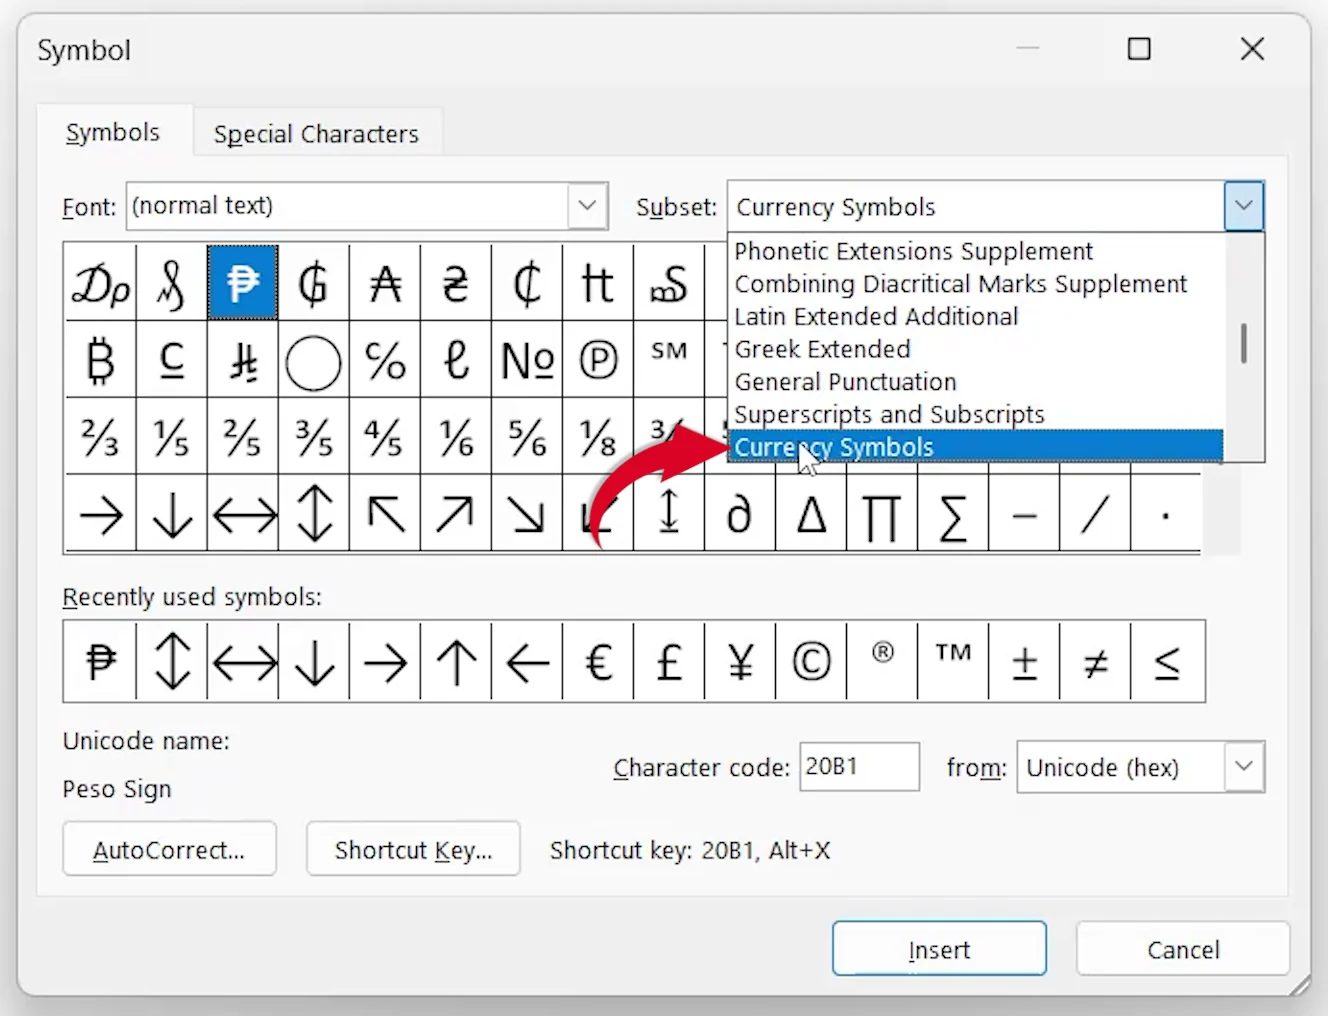
Symbol dialog with the Subset list open on Currency Symbols to insert rupee symbol in Word
  1. Select the ₹ character.
  2. Confirm the Character code box shows 20B9 and the from box shows Unicode (hex).
  3. Select Insert, then select Close.
Microsoft Word Symbol dialog showing the Indian Rupee Sign selected under Currency Symbols with character code 20B9

👉 Word inserts ₹ at the cursor position. That’s it — no add-ins and no external character map.

Microsoft’s guide to inserting a symbol in Word also explains why the selected font affects which characters appear.


Method 2: How to Insert Rupee Symbol in Word Using Unicode 20B9

Use this method when ₹ appears repeatedly in the same document. Word for Windows converts a hexadecimal Unicode value straight into its matching character.

  1. Place the cursor where the rupee sign should appear.
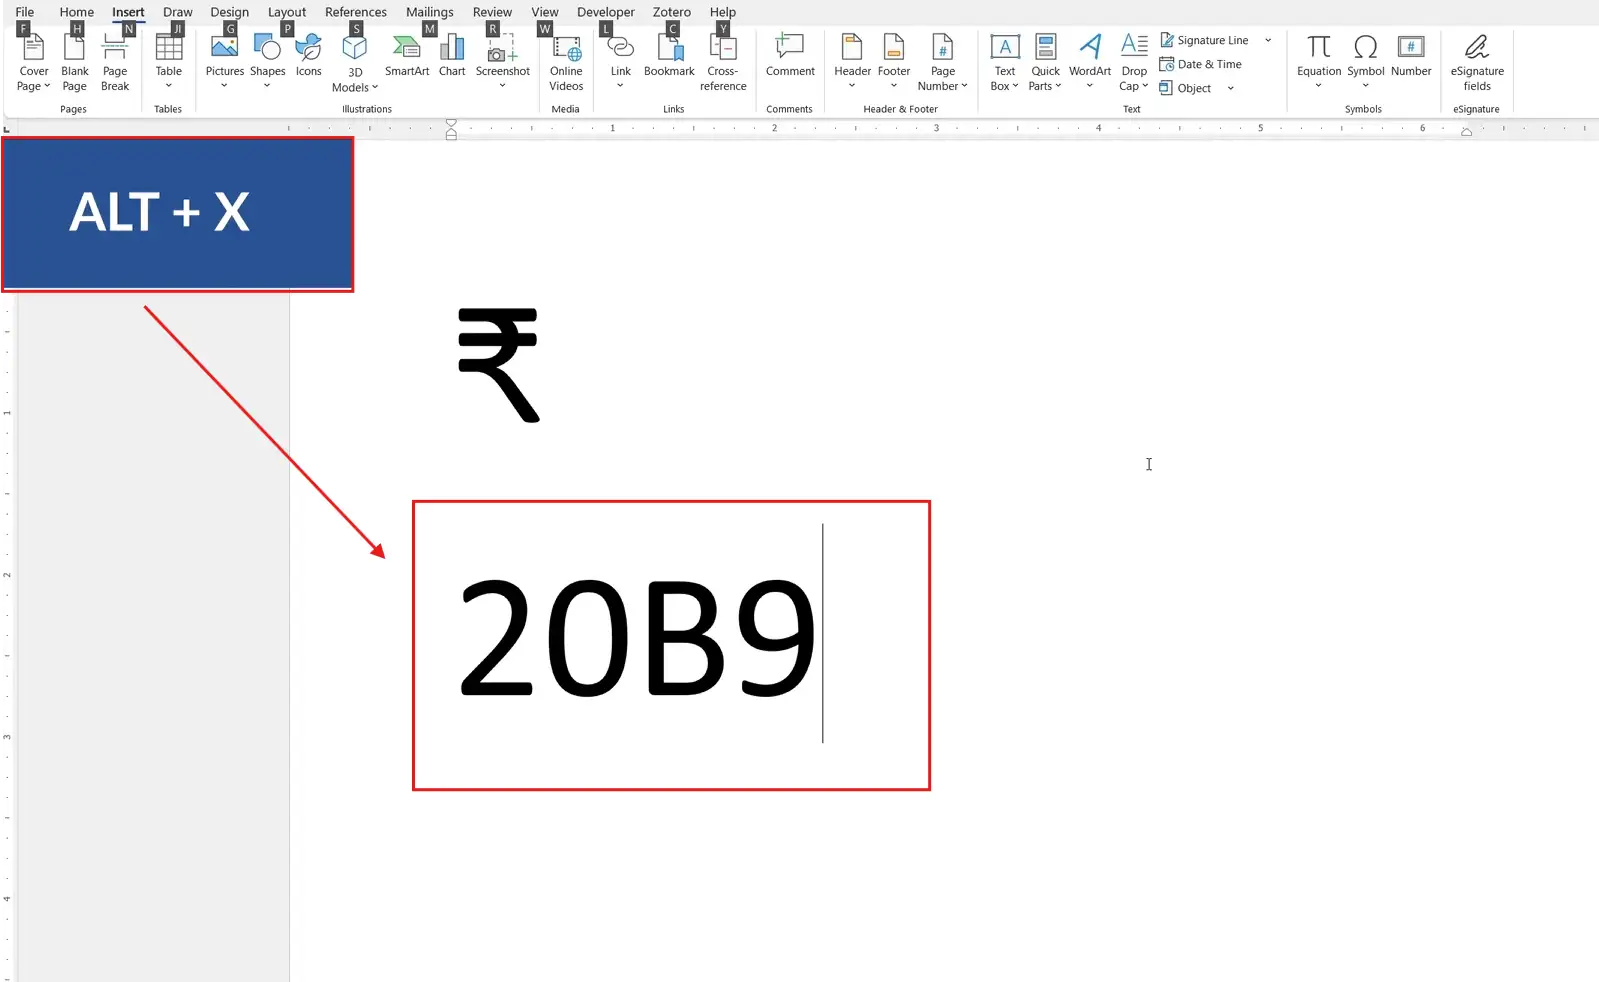
  2. Type 20B9 without spaces.
  3. Keep the cursor immediately after the code.
  4. Press Alt + X.
Microsoft Word document showing the code 20B9 converted into the rupee sign after pressing Alt and X

👉 The code changes from 20B9 to ₹. Press Alt + X again to switch the character back to its code.

The same conversion trick works across dozens of characters — for the shortcut set that surrounds it in long research documents, see the reference shortcuts in Word.


Which Method Should You Use?

ApproachUse it whenMain advantage
Method 1 — Symbol menuYou need to find or verify the sign visuallyShows the character, font, subset and code together
Method 2 — Unicode 20B9You insert ₹ regularlyNo menus once you remember the code
Copy and pasteThe symbol already exists in the documentConvenient for repeated use within the same file

Common Problems When Inserting the Rupee Symbol

The Rupee Symbol Shows as a Box

The current font does not contain ₹. Select the character and apply a Unicode font such as Segoe UI Symbol. The rest of the document keeps its original font.

Alt + X Does Not Convert the Code

Check that you typed 20B9, not the older rupee code 20A8. Put the cursor directly after the final character, or select the complete code, then press Alt + X.

The Wrong Character Appears

Select only 20B9 before using Alt + X. This stops a neighbouring hexadecimal letter or number becoming part of the conversion.

The Symbol Changes When You Share or Export the File

The recipient’s device may not have the font you used. Export to PDF, or embed the font through File → Options → Save → Embed fonts in the file, so ₹ renders the same everywhere.


Pro Tips for Using the Rupee Symbol

  • Use a non-breaking space (Ctrl + Shift + Space) between ₹ and an amount so they never split across two lines.
  • Check the chosen font contains ₹ before you apply that font across a whole financial document.
  • Build an AutoCorrect entry if you type ₹ daily — and if Word keeps changing entries you want left alone, see how to turn off AutoCorrect in Word.
  • Keep 20B9 written on a sticky note until the Unicode method becomes automatic.

FAQs

How do I insert rupee symbol in Word?

To insert rupee symbol in Word, open Insert → Symbol → More Symbols and select ₹, or type 20B9 and press Alt + X.

What is the Unicode code for the Indian rupee sign?

The Indian rupee sign is Unicode U+20B9. In Word, type 20B9 without the U+ prefix before using the conversion shortcut.

What keyboard shortcut inserts ₹ in Word?

Type 20B9 and press Alt + X. Word converts the code into ₹ at the cursor position.

Why does the rupee symbol appear as an empty box?

The selected font does not contain the Indian rupee character. Select the symbol and apply a Unicode font such as Segoe UI Symbol.

Why does Alt + X create the wrong symbol?

A neighbouring hexadecimal character was included in the conversion. Select only 20B9 and press Alt + X again.

Can I copy and paste the Indian rupee symbol?

Yes. Once ₹ appears correctly, copy and paste it anywhere in the document. The destination font must still support the character.

How do I type the rupee symbol on an Indian keyboard?

Most Indian keyboard layouts place ₹ on Ctrl + Alt + 4. If your layout does not include it, the Unicode method works on any keyboard.

Does the Unicode method work in Word for Mac or Word on the web?

The Alt + X conversion is for desktop Word on Windows. On other platforms, use the Symbol menu or the system character viewer.


Conclusion

You can insert rupee symbol in Word from the Symbol window or by converting 20B9 with Alt + X. The menu is better for finding and confirming the character; the Unicode method wins on speed once you use ₹ regularly.

Learn the code once and you’ll never open the Symbol window again. If you work with character codes and keyboard commands often, keep the Microsoft Word Keyboard Shortcuts Cheat Sheet open alongside it.


Related Tutorials

  • How to Insert Tick Marks in Word: 3 Easy Methods
  • How to Insert Peso Sign in Word: 2 Easy Methods
  • How to Type Square Root Symbol in Word: 3 Easy Methods

Word Tutorials

Recently Added on Word Made Easy

  • How to Mail Merge Certificates in Word: 7 Easy Steps

    November 12, 2026
  • How to Split a Cell in Word: 2 Easy Methods

    November 11, 2026
  • How to Add Mendeley Citations in Word: 9 Easy Steps

    November 11, 2026

Browse the complete collection for help with formatting, layout, pages, tables, images, and document setup.

View all Word tutorials
Watch on YouTube

For Microsoft support documentation, visit the official Microsoft guidance.

← PreviousReference Shortcuts in Word: 28 Essential Keys
Next →How to Make a Picture Fill a Page in Word (Full Page): 2 Easy Methods

Leave a comment Cancel reply

Stuck on a step, or know a quicker way? Ask or share it below.

Meet the Author

Patrick Elliott standing outdoors holding his dog.

I’m Patrick Elliott, the creator of Word Made Easy. I’ve worked in schools for over 10 years and I’m now an Inclusion Lead in the UAE. I use Microsoft Word and PowerPoint every day for planning, documentation and classroom resources.

Every guide is tested step by step before publishing (usually in Microsoft 365), and every free template is one I made myself in Word. You’ll also find practical walkthroughs on my YouTube channel.

Browse

  • Word TutorialsStep-by-step guides for every feature
  • Word Beginners HubFree 12-chapter Word course
  • Word TemplatesFree, editable downloads
  • Word Shortcut Cheat SheetsFree printable PDFs
  • Google Docs TutorialsStep-by-step Docs guides
  • PowerPoint TutorialsClear, simple slide guides
  • YouTube VideosWatch the video walkthroughs

Watch on YouTube

Prefer to watch? Most guides have a short video walkthrough on the Word Made Easy channel.

  • 147videos
  • 1.88Mviews
  • 8,000+subscribers
Subscribe on YouTube

Recently Added

  • Printable Logic Puzzles: 12 Free Number Puzzles with AnswersNovember 13, 2026
  • Directed Drawing Worksheets: 4 Free Grid Drawing Printables with AnswersNovember 13, 2026
  • Abacus Worksheets: 3 Free Place Value Printables to 9,999November 13, 2026
  • Find the Letter Worksheets: 2 Free A to Z Letter Hunt BookletsNovember 13, 2026
  • Color Code Worksheets: 4 Free Color by Code Puzzles for KidsNovember 13, 2026

Most Downloaded

  • Free Microsoft Word Keyboard Shortcuts Bundle: 14 Cheat Sheets (PDF)65 downloads in the last 30 days
  • Microsoft Word for Beginners: Free Guide and PDF62 downloads in the last 30 days
  • Free Fillable Form Templates for Word: 4 Easy Forms53 downloads in the last 30 days
  • Free Printable Alphabet Charts for Word: 5 Easy Designs50 downloads in the last 30 days
  • Free ILAW Lesson Plan Templates for Word: English and Filipino (DO 16, s. 2026)35 downloads in the last 30 days
Word Made Easy

Free, step-by-step Microsoft Word tutorials, written and tested by teacher Patrick Elliott.

Subscribe on YouTube Follow on Facebook Follow on Pinterest

Explore

  • Home
  • Word Tutorials
  • Word Templates
  • Google Docs Tutorials
  • PowerPoint Tutorials
  • YouTube Videos

Microsoft Word

  • Page Layout & Sections
  • Tables, Images & Media
  • Formatting Basics
  • Productivity & Automation
  • Beginners Hub
  • Templates
  • Shortcut Cheat Sheets

Google Docs

  • All Google Docs Tutorials

About

  • About Me
  • Contact
Privacy Policy Cookie Policy Terms of Use
© 2012–2026 Word Made Easy. All rights reserved.
Manage your privacy

To provide the best experiences, we and our partners use technologies like cookies to store and/or access device information. Consenting to these technologies will allow us and our partners to process personal data such as browsing behavior or unique IDs on this site and show (non-) personalized ads. Not consenting or withdrawing consent, may adversely affect certain features and functions.

Click below to consent to the above or make granular choices. Your choices will be applied to this site only. You can change your settings at any time, including withdrawing your consent, by using the toggles on the Cookie Policy, or by clicking on the manage consent button at the bottom of the screen.

Functional Always active
The technical storage or access is strictly necessary for the legitimate purpose of enabling the use of a specific service explicitly requested by the subscriber or user, or for the sole purpose of carrying out the transmission of a communication over an electronic communications network.
Preferences
The technical storage or access is necessary for the legitimate purpose of storing preferences that are not requested by the subscriber or user.
Statistics
The technical storage or access that is used exclusively for statistical purposes. The technical storage or access that is used exclusively for anonymous statistical purposes. Without a subpoena, voluntary compliance on the part of your Internet Service Provider, or additional records from a third party, information stored or retrieved for this purpose alone cannot usually be used to identify you.
Marketing
The technical storage or access is required to create user profiles to send advertising, or to track the user on a website or across several websites for similar marketing purposes.
Statistics

Marketing

Features
Always active

Special features

Special purposes
Always active

  • Manage options
  • Manage services
  • Manage {vendor_count} vendors
  • Read more about these purposes
Manage options
  • {title}
  • {title}
  • {title}
Manage your privacy
To provide the best experiences, we use technologies like cookies to store and/or access device information. Consenting to these technologies will allow us to process data such as browsing behavior or unique IDs on this site. Not consenting or withdrawing consent, may adversely affect certain features and functions.
Functional Always active
The technical storage or access is strictly necessary for the legitimate purpose of enabling the use of a specific service explicitly requested by the subscriber or user, or for the sole purpose of carrying out the transmission of a communication over an electronic communications network.
Preferences
The technical storage or access is necessary for the legitimate purpose of storing preferences that are not requested by the subscriber or user.
Statistics
The technical storage or access that is used exclusively for statistical purposes. The technical storage or access that is used exclusively for anonymous statistical purposes. Without a subpoena, voluntary compliance on the part of your Internet Service Provider, or additional records from a third party, information stored or retrieved for this purpose alone cannot usually be used to identify you.
Marketing
The technical storage or access is required to create user profiles to send advertising, or to track the user on a website or across several websites for similar marketing purposes.
Statistics

Marketing

Features
Always active

Special features

Special purposes
Always active

  • Manage options
  • Manage services
  • Manage {vendor_count} vendors
  • Read more about these purposes
Manage options
  • {title}
  • {title}
  • {title}